Motortopia - EVERYTHING Automotive!
Exciting News! Motortopia App Now Available on Apple App Store!  
Close Ad

Project Stella Stage III | Preparing for Power!

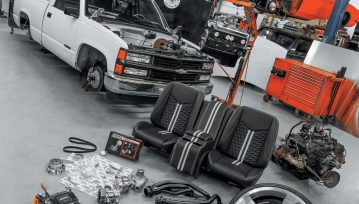
Back to our favorite project of 2020! To catch everyone up, Stella is a 1995 Chevy C1500 truck with no major issues when we picked up for only $2,000. The original owner sold it to us after a fresh oil change and a full tank fill up, which was a good sign right from the start. The goal for this truck is a corner carving, modern driving sport truck that is completely paid off and reliable as a daily driver. Stage I of this build documented the install of a new RideTech coilover suspension system and AZ Pro Performance big disc brake conversion. Now it rides amazing on the 22-inch American Racing Nova wheels.
Next, we wanted to replace the interior so we could stop sucking in old headliner glue and 25-year-old seat dust, so a full TMI interior kit was ordered and the carpet was replaced. Now that the seats are here and ready for install, we dropped the truck off at Florida Boy Custom in High Springs, Florida, for the seat swap. While it was there, Corbin let his skills shine by completely coating the interior. Looks unreal!
Following the interior, we sent the truck over to Overpower Customs in Lake Park, Florida, for the engine swap. Our factory 4.3-liter V-6 still runs and drives like a champ, but the power doesn’t match the looks. Trey and his team will be removing the original and installing a new BluePrint Engines 383ci Stroker motor. This will be paired up with a Centerforce clutch and a new American Powertrain transmission. Before it can be bolted in, we took the time to mount the Vintage Air Front Runner pulley kit. Follow along as we watch the guys do their work.
If you can remember from our last Stella update, we installed new carpet in the cab of our 1995 Chevy C1500. We also spec’d out the parts we need for our Small Block motor swap. Now it time for the next step.

 To complete our interior upgrade, we decided to contact TMI Products to see if the company’s new ’88-’94 Chevy GMT400 seats are ready to order. Timing is everything and we asked at the right moment. They needed a truck to test fit their production pieces and gave us the opportunity to preorder a set before they were officially launched. Naturally we took them up on that offer and our order was placed. When it arrived, we dropped it all off with Corbin at Florida Boy Customs interior shop in High Springs, Florida.
Our custom order included seats, door panels and a headliner. TMI also offers dash pads, headliners, sun visors, carpet, bench seats and bench seat center consoles for this year trucks as well.
The first thing to do is remove the existing interior pieces and make some space to work. Corbin will be painting all the interior pieces black for a cool, sleek look.

 With the old carpet removed, the guys at Florida Boy Custom masked off the dashboard and prepped it for paint. This is not something we recommend you trying yourself. Instead, leave it to some pros at a real interior shop. The paint will chip and fade if not properly coated, especially when you go to put it all back together.
When TMI sent us this teaser photo we were excited as could be, but once we felt them in person, it was a totally different level of smile.
The seats look great and feel perfect. A center console with cup holders is the perfect setup for this sport-styled pickup. Each seat has its own set of sliders, and they not only slide forward, but also recline and fold forward.
The new painted dash looks perfect and our Forever Sharp steering wheel is the icing on the cake. Corbin and his crew at Florida Boy Customs did an amazing job.

Since we have a ’95, we have to swap out the door panel hardware with replacement parts from an ’88-’94 truck for the new TMI door panels to fit correctly. We will add power windows and locks as well, but that’s a project for another day. Until then, Corbin did his best to match our original door panels to the new TMI seats. Additionally, we added a set of Lokar window cranks. We think it looks great!
Now to focus on the engine swap. The factory 4.3L V-6 has got to go, but since this is a perfectly running engine and transmission, we will save it for a quick-flip project.
The crew at Overpower Customs yanks engines on the daily so ripping this one out is child’s play. Jason and Trey removed all the plugs and bolts before hooking it up to a forklift.
Before the new engine can go in, Trey pressure cleaned the engine bay to remove all the old grease and grime. The core of this truck is in great shape!
Our BluePrint Engines 383ci Stroker engine comes turnkey other than the drive pulleys. So, before they bolt up the new 5-speed American Powertrain transmission, a Vintage Air Front Runner drive pulley kit goes in.
First thing we need to install is the harmonic balancer. This engine calls for an 8-inch weighted from a 400ci engine, available on their website or from your local auto parts store.

EDITOR’S NOTE

What exactly does a harmonic balancer (sometimes called a dampener) do? Each time a cylinder fires in your engine, a force acts upon the crankshaft, causing it to twist. This force also causes vibrations in the crankshaft. These vibrations from the engine can become too much for the crankshaft to bear, causing it to fail.

This is where the harmonic balancer comes in. The circular device, made of rubber and metal, is bolted at the front end of the crankshaft to help absorb vibrations. ItÕs usually connected to the crank pulley, which drives accessories like the air conditioner. The rubber inside the pulley is what actually absorbs the vibrations and keeps them at a safe level.

First, Vintage Air pieces to install are the water pump mounting studs. After applying a bead of silicone around the coarse thread end of the water pump mounting studs, Jason threaded them into the block.
After installing the alternator and compressor to the Vintage Air bracket, the complete main bracket assembly fit perfectly over the water pump mounting studs and is bolted down.
The belt tensioner is now installed with the provided spacer on the belt tensioner bracket. NOTE: Be sure to insert the dowel pin into the correct locating hole of the tensioner spacer based on whether you have power steering, followed by installing the crankshaft pulley directly onto the harmonic balancer.
The power steering pump pulley must be installed with the proper tool, available at any parts store. Do not attempt to hammer or press the pulley onto the power steering pump shaft! Failure to use the proper tool will destroy the pump.
To install the belt, insert a ?-inch drive ratchet or breaker bar into the socket on the tensioner, and rotate it clockwise to the tensioner stop. Route the belt around the crankshaft pulley, power steering pulley and alternator, and over the compressor. Finally, pull the belt down and slide it under the water pump pulley. That’s it!

 The completed kit looks amazing! It is nice and tight to the block, so we don’t have to worry about fitment when installing the engine. Also, the bright finish gives its the quality look they deserve. Impressive! Stay tuned to the next issue for our Centerforce clutch install along with the American Powertrain 5-speed transmission.
[divider]SOURCES[/divider]
TMI Products
www.tmiproducts.com
951-272-1996
FL Boy Customs
@floridaboycustomsllc
352-359-4760
Vintage Air
www.vintageair.com
210-654-7171
Overpower Customs
overpowercustoms.com
561-844-3777