Motortopia - EVERYTHING Automotive!
Exciting News! Motortopia App Now Available on Apple App Store!  
Close Ad

Tow with Confidence

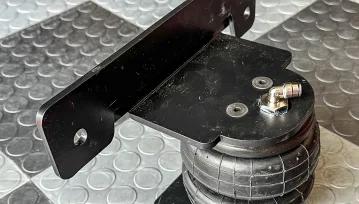
Eliminating Towing Sag

Towing a trailer is a pretty basic function of a lot of trucks on the road today. Whether it’s a boat, a camper, a small utility trailer for yard work, or, in the case of many of our readers, a car trailer, having something hooked to the receiver is common. A lot of times, if the tongue weight is too much or if the load itself is excessively heavy, the rear of the truck can squat. No one likes riding around looking like one of the squatted kids, but that’s part of towing a trailer sometimes. 

01. The helper bag kit comes with everything you need to bolt the bags into your Belltech bolt-in notch, including the airline and fittings not in the photo.
02. The Air Lift Wireless Air system includes the compressor, valves, controller, airline, and all mounting and wiring parts needed, including the remote.
03. Bolt the upper bag bracket to each bag with the supplied hardware.

Not only does this look bad, but it’s extremely unsafe. Having your truck sit level, especially with the extra weight of a trailer, makes driving and, more importantly, stopping easier. This can also apply to those times when you load the bed down with something like mulch, gravel, or even furniture when helping a friend move.

The easiest way to fix this is to add a set of helper bags for extra support for the rear of the truck when it is sagging due to extra weight.

04. Use your choice of sealant on the fitting thread to ensure a leak-free installation.
05. Install the fitting into the bag through the hole in the upper bag bracket.
06. Bolt the bottom bag bracket to the bottom of the bag with the supplied hardware.
07. Here, you can see the orientation of the bag with both brackets bolted to the bag.

The easiest way to fix this is to add a set of helper bags for extra support for the rear of the truck when it is sagging due to extra weight. This fix allows you to add as much air pressure as needed to eliminate the sag. Normally, an off-the-shelf helper bag kit would work just fine, but for my situation, it won’t work, as this truck is already being lowered, which requires the leaf springs to be flipped.

08. The Belltech bump stop needs to be removed. We knew this helper bag kit was going in, so we didn’t use the supplied bolt and nut to install it. We tapped the hole and used a 10mm bolt to make removing it easier.
09. Remove the front Belltech notch bolt closest to the notch opening.
10. If your truck has the factory carpet fender well liners, remove the center lowest screw to get access to the rear of the notch.

Since the Belltech lowering kit on my 2023 GMC Sierra 1500 was added (check out page 52 in last month’s issue, November 2023, for the full suspension install), we had to investigate other options. Fortunately, Switch Suspension has a helper bag kit specifically for the Belltech bolt-in notch that was used on this truck. Being this is a vehicle and aftermarket suspension specific kit, it was perfect for this application. It bolts directly to the bolt-in notch with zero modification. This kit (Part #SWIGM19AIRHELPER-1, $400 retail) is only for the ’19-’23 GMC Sierra 1500 with the Belltech 4/6-inch lowering kit that includes a bolt-in notch.

11. Remove the rear Belltech notch bolt closest to the notch opening.
12. Slide the assembled helper bag assembly between the notch and axle. Compressing the bag all the way makes that easier.
13. Install the supplied hardware to secure the upper bag bracket to the Belltech notch into the holes you removed the bolts from in steps 9 and 11.
14. Bolt the bottom bag bracket to the factory axle plate. For my truck, I had to install one bolt and once the truck was on the ground again, install the other one. Which made the lower bracket install easier.

To control a helper bag system, several options are on the market, from Schrader valves to a full onboard air system. But for my use, I opted for something I could control on the fly while parked or even while driving to really dial in the perfect amount of air pressure for every specific use.

I reached out to Air Lift Company, and the experts there suggested one of the company’s Wireless Air systems (Part #74000EZ, $995 retail). This is a stand-alone unit complete with compressor, valve, and even its EZ mount system. It comes ready to bolt to your frame, plug in the wires and airlines, and you’re done. This system comes with what looks like a TV remote that can be used inside or outside of the cab. You can also control left and right bags individually in case the load is uneven. The remote has a screen so you can see the pressure in the bags at any given time and even has three presets so you can program in set pressures for regular loads.

Follow along for a quick look into how the bags and controller are installed. With basic tools, a knowledge of simple wiring, and a floor jack, this is an install that can be done pretty quick in your driveway or garage.

15. Now that the bags and brackets are installed, it’s on to the controller. Air Lift gives you several mounting options for their unit. I chose to bolt it to a crossmember that gave me plenty of access. Once the mounting holes were marked, I drilled out the two new holes.
16. Once both holes were drilled, the Air Lift Wireless Air was mounted to the top of the crossmember. This keeps it and all connectors out of chance of damage from driving.
17. Plug the supplied wiring harness into the controller connector.
18. Connect the power and ground wires from the compressor on the controller to the power and ground on the wiring harness. You also need to connect the pink wire to an ignition source.
19. The compressor filter was connected and run to where it will stay out of the weather as much as possible.
20. Plug the supplied airline into both connectors and run the lines to the individual bags.
21. With the controller mounted and all wiring and lines tied up, it’s a compact unit tucked out of the way.
22. With the supplied controller, you can control the air pressure in the bags from inside or outside of the cab and adjust while driving without a need to stop and plug in an air hose.


ZERO REGRETS | A Classic ’64 Cadillac Gets Brought Up to Speed

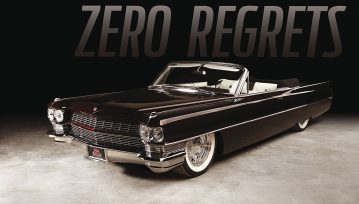
Cadillac has always been the highest standard of American automotive excellence. If you own and drive a classic or showroom-new Cadillac, you’re waltzing through high cotton and enjoying the good life. Cadillac Coupe DeVille dates back to 1949 during those first post-war boom years when America was on the rise and euphoria was in abundance. The U.S. and its allies had won the war and the only way was up. With that rush of excitement were jobs, cash flow and high-end domestic luxury cars.

Apolo’s motivation here isn’t your grandpa’s land yacht DeVille sporting a stodgy cast-iron 429-ci pushrod V-8 and Rochester four-jet carburetion. This is not only about technology, but a desire to build a cruiser you could pilot anywhere in the country.”

1964 Cadillac Cadillac Coupe DeVille OEM headlights on a Cadillac Coupe DeVille

“DeVille” is French for “of the town,” an exquisite ride to be seen in with a massive front bumper and sea of chrome plating that arrived before you did. From 1949-58, the Cadillac DeVille was a glorious big-finned road-going vessel that exuded a commanding presence on the American highway. In 1959-60, DeVille became an incredibly massive wide body with a slippery and overwhelming fin treatment not seen since MISSING TEXT HERE. For 1961, the redesigned DeVille was fresh with a subtle treatment more in line with what was popular in the ’60s. The 1961-64 DeVille really was the last finned Cadillac.

A custom Olympic-themed Dakota Digital instrument cluster machined from billet aluminum excites the senses. We just can’t stop looking at it!

White interior on a Cadillac Coupe

Olympic speed skater and television personality Apolo Anton Ohno has a passion for classic Cadillacs. When he spied this ’64 Coupe DeVille convertible, he understood quickly that his fate was sealed and he had a duty to the breed. Once he had the title in hand, there would be no escaping the dreamy ride he had planned for himself.

It would have to retain the DeVille’s distinctive lines, yet be an edgy work of art. He interviewed the best top ten restoration/custom shops in the country, making the decision to turn his DeVille drop top over to Dave Kindig of Kindig-It Design in Salt Lake City for a little rework time.

The Ramjet 502 from GM Performance yields real street power from electronic fuel injection, a hot hydraulic roller cam and generous port and valve sizing. GM’s heavy-duty 4L80E automatic overdrive gives the 502 an edge under hard acceleration, yet low rpm cruise on the open road. And when it’s time to dance, the 502 steps up with unwieldy amounts of torque.

Apolo’s motivation here isn’t your grandpa’s land yacht DeVille sporting a stodgy cast-iron 429-ci pushrod V-8 and Rochester four-jet carburetion. This is not only about technology, but a desire to build a cruiser you could pilot anywhere in the country. Beneath the bonnet is GM Performance’s own fuel-injected, plug-and-play Ramjet 502 fat-block for displacement, power and durability. The Ramjet 502 big-block commands our respect thanks to a 4.470 x 4.000-inch bore and stroke, steel crank and forged steel connecting rods, forged pistons, hot hydraulic roller cam, 2.250/1.880-inch valves in lightweight aluminum heads and HEI ignition. Call the Ramjet 502 real Chevy muscle in a tuxedo. This zero regrets Caddy DeVille demonstrates what happens when luxury meets an extraordinary level of creativity.


SPECS

1964 Cadillac Coupe DeVille Convertible

OWNER: Apolo Anton Ohno

BUILDER: Kindig-It Design Salt Lake City, UT

FRAME: Factory original steel boxed and smooth

SUSPENSION: Air Ride Technologies custom rear trailing arms

BRAKES: Six-piston Wilwood 16 ½-inch disc brakes

WHEELS: Custom Curtis Speed 22-inch resembling 17-inch with wide white whitewalls

TIRES: Pirelli 265/35/22

ENGINE: GM Performance Ramjet 502 big-block, deburred castings, 4.470 x 4.000-inch bore/stroke, cast-iron block with a Aluminum GM Performance heads, 2.250/1.880-inch intake/exhaust valves, GM Performance hydraulic roller camshaft, EFI, custom one-off charge tube valve covers, Billet Specialties True Trac accessory drive with twin 145-amp alternators, Flowmaster mufflers, runs on 92-octane pump gas

TRANSMISSION: GM 4L80E with GM removable carrier rear axle

BODY & PAINT: PPG custom urethane paint, one-off mirrors, Kindig smooth custom door handles, custom exterior trim

INTERIOR: Shop: JS Custom Interiors/California Audio Custom Keyston Brothers white leather, Vintage Air climate control system, Creative Controls electronic parking brake, Steele Rubber soft parts, Hydro-Electric convertible top, New Relics window glass, Kinetik batteries, Dakota Digital gauges Olympic Ring pattern, Kicker sound system