Motortopia - EVERYTHING Automotive!
Exciting News! Motortopia App Now Available on Apple App Store!  
Close Ad

The Timeless Evolution of a ’66 C10

A Study of Generational Chevrolet Style

Richard Hopkins of Burlington, North Carolina, used to have a pretty cool vintage Chevy pickup back when he was younger. Although the truck is now gone, he still has the greatest memories spent working on it with his father, Richard Sr. (Big Rich). Although that particular truck wasn’t exactly his dream ride, it was still a great project to have and it gave him a great excuse to spend some quality time with his dad. 

“That old truck of mine was a ’66 Chevy C10 longbed”, Richard says. “I always wanted a big window shortbed, but I enjoyed what I had back then. Now that I’m older, I was set on finding the exact truck that I wanted so that my son and I could share some of the same experiences I did with my father.”

It didn’t take long for Richard to find the truck he had been coveting for decades. With the keys in his hand for a ’66 C10 with that big back window/shortbed combo, he began work on what would be an absolute showstopper when the Hopkins men were finished with it. Oh yeah, Big Rich hadn’t given up building trucks just yet, and he was ready to help his son as he set out to dig in on yet another classic Chevy pickup.

“…I was set on finding the exact truck that I wanted then so that my son and I could share some of the same experiences I did with my father.” 

JUNIOR, SENIOR GET TO WORK

Before Big Rich got to work, however, Junior kicked off the project by installing Porterbuilt drop member units to the front and rear to get the ’66 sitting down low. Richard then properly upgraded the drop member systems by bolting on Firestone air bags and Ridetech HQ shocks, dual Viair compressors, and an Accuair e-Level air management to quickly and accurately dial in the desired ride height for cruising.

The completed frame was thoroughly powdercoated once all the components had been test fitted to keep everything uniform and well protected from the elements. Richard also treated his truck to Unisteer power rack-and-pinion steering and went so far as to remove the OEM fuel tank to clean and reseal it before mounting it right back in the factory location.

“…Junior kicked off the project by installing Porterbuilt drop member units to the front and rear to get the ’66 sitting down low.” 

The factory front braking components were removed and slated to hit the junk pile. They would be replaced with fresh, modular disc brake kits from CPP. The rear drum brakes were serviced, however, as the drums would remain intact for the time being. A Wilwood tandem master cylinder with proportioning valve was added to the mix, as were anodized black caliper covers for an unassuming appearance. Since Richard was looking to staying true to his truck’s timeless ’60s styling, he selected a set of 22×9 Centerline Smoothie wheels that have been finished off with chrome retro hubcaps and performance Falken tires.

SPECIAL POWERPLANT

With a solid rolling chassis now intact, Richard then moved on to removing the C10’s engine and dropping in something much more special. Big Rich had a ’57 Chevy that he has planned on building soon, as well as a ’57 Chevy 283 V-8 to go along with it that he was interested in breaking in.

“The Chevy C60 air cleaner had to be sectioned, chopped, and rotated 180-degrees in order to clear the underside of the hood.”

Well, the truck was in need of something to power it, so that’s where that classic GM mill is currently residing—a perfect solution for the scenario. This engine wasn’t whipped by just any means though. The father/son duo had souped it up properly, and it now features some very cool performance additions that also make a lasting visual impression underneath the truck’s hood.

CHOPPING AND TWEAKING TO FIT

Given the C10’s current low-as-hell ride height, a few things had to be done in order for a few things to fit better. The Chevy C60 air cleaner had to be sectioned, chopped and rotated 180-degrees to clear the underside of the hood. The transmission crossmember had to be altered for the Deeds Engineering modular exhaust system to be fed through the frame and not underneath it. After a few more tweaks and additions to the engine, the guys were soon ready to mount a 1969 TH350 transmission, along with an Inland Empire 2-piece driveshaft while still utilizing the factory ’66 Chevy 12-bolt rearend.

“Aside from the routine metal work to get the truck ready for paint, Richard utilized the availability of SelfMade Fab’s shaved and bead-rolled firewall panels and  front and rear wheel tubs.” 

A lot of hard work had been sunk into the project at this point, but Richard was nowhere near ready to slow down on its progress. With the engine and transmission well taken care of, the next phase of the build was one that would not present any curveballs for Richard. Being an expert body shop technician, he was well equipped to take on the upcoming body and paintwork in what would be the easiest stretch of the seven-year ordeal. Aside from the routine metal work to get the truck ready for paint, Richard utilized the availability of SelfMade Fab’s shaved and bead-rolled firewall panels and front and rear wheel tubs. A factory C60 grill was then chrome plated before installation, and a wood bed floor was laid down and finished off with a center access panel to better reach the vital components below deck.

ORANGE FOR THE WIN

Next, Richard began the process of narrowing down paint colors, which promptly halted once he landed on PPG’s Dodge Hemi Orange Pearl for the body and Wimbledon White for the roof. With the inclusion of more freshly chromed parts and pieces, the exterior of the ’66 was looking as cool and timeless as it gets.

“Inside the cab, a combination of pewter material was utilized when reupholstering the factory bench seat and the factory Deluxe model steering wheel.” 

Inside the cab, a combination of pewter material was utilized when reupholstering the factory bench seat and the factory Deluxe model steering wheel. A matching fawn-colored paint was then selected to cover the dash and door panels. The interior color palette is independent of that used on the truck’s outward landscape, which makes for a welcomed change of environment while settling in for a long drive. The toned-down in-cab appearance matches the classic demeanor of the truck’s exterior with its smooth, subtle styling—a feat that wasn’t so simple to pull off.

Once the dust settled on the project, Richard Jr. finally had the truck he had wanted years ago—only in better condition than he could’ve ever imagined. While time and money always present hurdles with a project this extensive, he took it all in stride. Richard had an exact vision in mind, so to get there, he took the extra time to do things right, and he saved up the extra money required to purchase the specific parts he just had to have.

“The one thing the truck constantly gets compliments on is its originality with that little bit of custom flare…” 

“The only advice I can give to anyone is that do not ever give up on your vision,” Richards offers. “If you have a certain look that you want to maintain throughout your project, go that extra mile and do what you have to do. The one thing the truck constantly gets compliments on is its originality with that little bit of custom flare, which was actually more difficult than I would’ve guessed. I am hoping this truck will give my son and me the opportunity to create wonderful memories like how I was able to make with my dad.”

Build Specs

Owner

RICHARD HOPKINS
1966 Chevy C10
Burlington, NC
Relaxed Atmosphere

Engine/Drivetrain

Shop: Richard Hopkins and his father, Big Rich
1957 Chevy V-8 283c.i.
OEM connecting rods
TRW .030 over pistons
Sealed Power rings
Drilled and tapped crankshaft to accept newer balancer bolt
Comp Cams Nostalgic Plus flat cam, valve springs, locks and keepers
258/265 lift and 211/218 duration
Power Pack heads milled .020 and hardened valve seats
ARP screw in rocker studs
Edelbrock Performer RPM intake manifold and 1403 carburetor
Hooker F-Body mid-length headers, 1.5-inch primaries to 2.5-inch collector, Jet Hot coating
Aluminized Deeds Engineering DIY exhaust kit welded together with H-pipe
MSD HEI ignition
Concept 1 pulley setup in black anodized
Customized factory C60 air cleaner
Offenhauser staggered bolt valve covers
Taylor plug wires
1969 TH350 transmission
Energy Suspension trans bushing
Polished finned aluminum pan
B&M shift kit
Boss Hoss torque converter
Milled direct clutch piston to receive extra friction clutch and steel

Chassis/Suspension

Porterbuilt front to rear crossmembers, Dropmember 3 and rear setup
Powdercoated complete frame
Trans crossmember modified to keep exhaust above frame bottom
Narrowed control arms
Firestone convoluted front ‘bags, rear sleeve ‘bags
Ridetech HQ shocks
Unisteer power rack and pinion
Porterbuilt 1.5-inch front sway bar
Dual Viair compressors
Accuair e-Level air management
Inland Empire 2-piece driveshaft w/ slip yoke and billet carrier bearing
Factory 1966 Chevy 12-bolt rearend
CPP 6-to-5-lug rear axle swap
Strange Engineering LPW diff support cover
Two Optima batteries

Wheels, Tires & Brakes

22×9 Centerline Smoothie wheels
265/35R22 Falken Ziex S/TZ tires
CPP front modular disc brakes, factory rear drums powdercoated
Wilwood tandem master cylinder w/ proportioning valve

Exterior & Paint

Factory C60 grille chrome plated
Sylvania Silverstar sealed beam headlights
Raised and bead rolled front and rear wheel tubs by Selfmade Fab
PPG base clean DBC Hemi orange pearl w/ Wimbledon white roof

Interior & Sound

Shop: Steve Kurzman, former owner of The Custom Stitching Company, Charlotte, NC
OEM seat frame covered in vintage fawn leather upholstery with tinsel piping
Matching sun visors and leather covered fuel tank panels
Complete painted interior and eggshell flattened and cleared
1961 Chevy truck Deluxe arm rests
OEM gauges reconditioned with tach
1966 custom model steering wheel
Flaming River street rod tilt column
Vintage Air A/C and heat
Removable trans tunnel buck to access transmission


Preserving the Past: Protecting and Enhancing the Patina on a 1967 Chevy C10

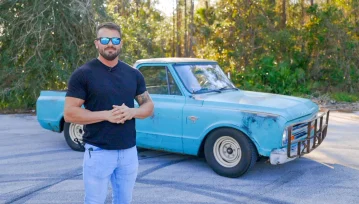
Protecting the Patina on a 1967 Chevy C10

If you’re like me, you LOVE original-paint classic trucks. There’s something about looking over the original paintjob and getting a glimpse at how the truck was treated—or abused—in the past. My OG paint ’67 C10 has a lot of character and most of it came from work on a farm. Now that this original-paint beauty earned its stripes and now resides indoors, it’s time to protect that original paint that has been neglected for 56 years. There are a couple of different ways you can protect and preserve your original paint.

01. Sweet Patina sent us its Trio Kit plus Century Polish. This kit includes its Century Polish, Patina “Sauce,” Happy Ending Final Detail Spray, and So Fresh and Clean All-Purpose Cleaner.
02. The first step of applying the “Sauce” is to get rid of dirt, grime, and contaminants on the paint. Spray a generous amount of the All-Purpose Cleaner. With a light scrubbing pad, gently scrub to loosen up the contaminants and then rise with water. I used a light gray Scotch Brite pad, but you can also use steel wool to smooth the rough surface.
2(a)
2(b)

1. Clearcoat the Original: You can go with a more permanent solution by applying a clearcoat over the original paint. I have never been a fan of this method. If the clearcoat were to ever fail, it is highly unlikely that one would be able to strip just the clearcoat off of the original paint, which means you may have to strip the entire vehicle. While there is essentially zero maintenance on this method, the risk of losing or damaging the original paint is too high for me. If this is the route you would like to go, Sweet Patina sells a matte and gloss clearcoat designed specifically for preserving patina.

03. Now that the paint is clean and dry, I can move on to polishing. This step is not necessary, but it will add gloss and depth to the paint that is left on the truck since this polish is designed to be used on the worn, weathered, and oxidized paint that hasn’t reached the surface-rust stage. Take a look at the first section I polished (far right). The Century Polish removed all of the chalk and brought back some color and depth to this 56-year-old paint. I used an orange light cutting pad, making sure to clean it out regularly because the single-stage paint will clog your foam pad.
3(a)
3(b)

2. Go with the Sweet Sauce: You can use a product like Sweet Patina “Sauce” that acts similarly to a carnauba wax. Not only are you preserving and protecting the paint, but you’re also not applying a permanent topcoat, so there is no risk for this product to fail since it naturally wears off the paint over time. This method does require you to reapply the “Sauce” a couple of times a year, but it’s so easy to do and essentially has zero risk of damaging the paint. This is the method I prefer to use, and that’s where Sweet Patina comes into play.

04. Here’s another image comparing just how well the Century Polish worked. The front clip of the truck is polished while the door and bedside are not.
05. Once the entire truck was polished, it was time to do a final wipe-down to get rid of any residue left by the Century Polish. Applying the “Sauce” is as simple as wipe-on, wipe-off. Using a microfiber towel, I applied the “Sauce” using a circular motion similar to applying wax. Once I let the product sit for 15-20 minutes, I simply wiped it off with a new microfiber towel—and that’s it!
5(a)

Sweet Patina has developed a product it calls the patina “Sauce” that has more than 20 ingredients that make up the proprietary blend, making the product one-of-a-kind. The patina “Sauce” provides a luminous finish that shows the character, depth, and beauty of your patinaed ride. It helps prevent further deterioration, preserve the patina, offer a layer of water-resistant protection that helps inhibit rust, and polymerize to a hard finish.

06. The “Sauce” repels water like a wax. Here, you can see the water droplets beading on the surface of the paint. Now that the surface is protected, we can use the Happy Ending Detail Spray between washes to help keep the paint clean and potentially prolong the life of the “Sauce.”
07. I love the way this came out, and the truck looks much better now that the paint has new life. Sweet Patina has more than 120 years of paint and refinishing experience on its team, and they know paint rust and refinishing.
7(a)


1968 C10 | Perfection, Perfected

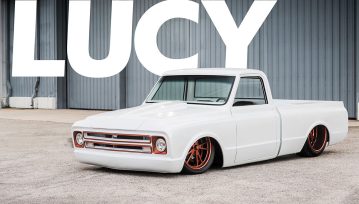
Chris has built quite a few custom rides for himself and clients, but one that he had always wanted to tackle was a late-’60s Chevy truck. He finally got his chance when he picked up a 1968 C10, but it would take more than three years to complete. After all, you can’t rush perfection!

383 with modern FiTech fuel injection
In a world of LS engines, it’s nice to see a tried-and-true old school SBC under the hood. Don’t worry—it’s a stroked 383 with modern FiTech fuel injection and a bunch of other bolt-ons that make it run as good as it looks!

Custom painted wheel on a white 1968 Chevy

The GM Snow White three-stage pearl paintjob by Alamo Custom really accentuates the second-gen C10’s beautiful lines, but you can’t just ignore all of the work hidden underneath. Pretty much anything that protruded from the body was shaved off, front and rear roll pans were grafted on, and both the inside of the bed and engine compartment were completely reworked with some amazing sheetmetal magic. But there’s more—a lot more.

To give you a more thorough idea of the type of work that went into the body, we’ll let Chris finish explaining it himself.

Lucy license plate on white 1968 pickup truck

Porterbuilt’s finest air-ride chassis
The entire frame was painted an amazing copper hue and features Porterbuilt’s finest air-ride chassis components for a jaw-dropping stance. Custom wheel tubs and a smooth sheetmetal floor help accentuate the bed’s focal point.

“Every possible pinch weld and seam has been completely welded up, removed and smoothed out,” he says. “The entire front end and cab have been welded together to form a single assembly. The entire bed received the same treatment with a custom sheetmetal floor. The hood was sectioned and narrowed, and the leftover outer material was added to the front fenders.”

Yeah, he totally explained it better!

The chassis is every bit as wild, with Porterbuilt front and rear “dropmember” Stage 3 air suspension setups added onto the factory framerails for an asphalt-hugging stance, and then coated with copper paint for maximum contrast. The rearend was narrowed and beefed up to better handle the higher output of the fresh 383 stroker engine, which was dressed with a Holley intake manifold, FiTech fuel injection and Hooker headers and mated to a 4L60E transmission. Wilwood and CPP brake components were bolted on front and rear for added confidence when flooring the “go” pedal, and they look pretty dang tasty behind the copper 22×9 and 22×12 Intro Classic wheels as well.

We guess that when you do it for a living and you love what you do, it just goes with the territory!

Custom frontend on a 1968 Chevy C-10 1968 Chevy C10 custom dash 383 stroker engine installed in a 1968 C10

As for the interior, that’s where Chris and his team at MTI Interiors really got to shine. Building around the custom-made bucket seats that were fitted with Relicate leather, the inner confines of Chris’ truck are nothing short of amazing. Again, it makes the most sense to let Chris describe exactly what’s going on.

“The interior was completely modeled in AutoCAD and Fusion 360, and was machined using our in-house CNC machines,” he says. “[The] techs responsible for executing the build are Matt Vowell, Edgar Diosdado, Matt Thomas, Lance Coffman, with me as the lead.”

Custom MTI Interiors Classic Industries custom dash

Classic Industries instrumentation was used in the custom dash, but instead of using a ’67-’72 cluster set, a ’55-’59 Chevy truck setup was fabbed into the center of the dashboard and looks right at home. An Arc Audio stereo system was strategically placed throughout the cab, adding yet another dimension to the already insane interior.

But like we said, Chris is a bit of a perfectionist, so at the time of this writing he was already tearing apart the inside of the truck to completely redo it. We guess that when you do it for a living and you love what you do, it just goes with the territory!

Lowered custom white 1968 C10


View Chevy vehicle profiles here.