Motortopia - EVERYTHING Automotive!
Exciting News! Motortopia App Now Available on Apple App Store!             
Close Ad

Turbocharged 2006 Ram 2500 Build

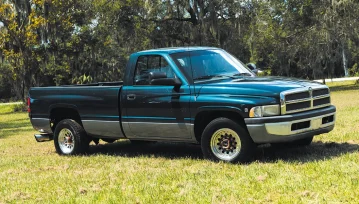
A ‘Factory’ ’06 Ram 2500 that Stands Out and Competes

Photos by Mach1Media

We know what you’re thinking—while it may be a very clean looking 2006 Dodge Ram 2500, since when does Diesel World feature stock-ish trucks? Well, we don’t; and despite appearances, this beautiful Ram, owned by Daniel Hargrove, is anything but stock. In fact, as “factory” as it may seem, this truck not only competes, but also stands out at Outlaw Diesel Super Series and Ultimate Callout Challenge events, not to mention puts up some seriously steep competition at local dyno events.

Haling from Charlotte, Tennessee, Daniel works as a diesel mechanic, giving him the ultimate platform to know the ins and outs of diesel performance. And what better way to show your prowess and passion in the diesel world than to build the ultimate street and strip sleeper?

With the help of a number of diesel-pro buddies, Hargrove was able to put this rendition of his truck together in just 6 months, but the build has been a never-ending project.

“I purchased the truck in 2017 – bone-stock, one-owner, old-man truck,” Daniel told us. “Within a month, it had a Comp 48RE, 200 percent-over S&S injectors, a dual-pump kit, and made 900hp. I drove and raced the truck like that for four years and had a blast.”

Now, 900hp may sound like the tip-top of performance for some, but after four years of competing below the 1K threshold, Daniel opted to elevate the truck’s game considerably.

The Ultimate Build

Putting massive amounts of power to the pavement is the first objective of any competitive diesel, and Daniel accomplished this for his truck starting with a swapped 6.7L Cummins inline-six. On top of that sits a large single S485 turbo from Stainless Diesel pro Johnny Gilbert.

Adding even more performance to the Cummins are a Hamilton Cams 178/208 camshaft, fully ported Wagler Competition Products big-valve cylinder head, ARP 625 head studs, a Kingspeed LLC intake manifold, and a full S&S Diesel fuel injection system with 450 percent-over fuel injectors and a 14mm CP3 pump. The bottom-end was upgraded with Wagler connecting rods, Mhale Motorsports coated and cast pistons, Total Seal rings, and a 12mm girdle and main studs.

The exhaust system for the inline-six was also upgraded, making use of a Stainless Diesel exhaust manifold, custom V-banded 5-inch exhaust piping, and a 5-inch downpipe exiting under the truck.

While Daniel played a pivotal role in choosing every component that went into the engine build, it was Jeff McCord of Linco Diesel Performance who was entrusted with the ultimate build of the diesel.

Backing the built engine is a Dodge 48RE transmission with a Suncoast billet triple-disc torque converter equipped with a 2600 stall, Sonnax 35-spline input shaft, Sonnax billet intermediate shaft, and a Sonnax billet fat output shaft, all compliments of Logan Epling of Epling Motorsports. When it came to the transfer case, the Dodge’s stock 271 T-case was utilized and tied to large front and rear driveshafts, compliments of Derek Rose of DNR Customs. Both front and rear axles are fitted with 3.73 gears, while braking power comes from second-generation Ram brakes due to size restrictions related to the truck’s competition wheel and tire combination.

The goal of the build was to get somewhere in the area of 1,200 to 1,300 horsepower on straight fuel, with a three-stage nitrous system utilizing a Nitrous Express Maximizer 5 progressive controller, 375 solenoid and two .99 jets, pushing the diesel to an impressive 1,700 to 1,800hp. The results, however, were a bit grander than Daniel and his team thought they would be, with the truck putting down over 1,400hp on straight fuel, and just over 2,000hp on nitrous.

A Strong Foundation

Now you can’t build a highly competitive diesel without also upgrading the chassis and suspension system, so Daniel entrusted Keaton Samples of Samples Performance Fabrication to upgrade the truck’s undercarriage. In addition to modifications to the rear section of the frame, Keaton equipped the Ram with Firepunk lowering coils and Bilstein 5125 shocks in the front, while modifying the truck’s factory leaf springs in the rear to make use of just two leafs in each pack, and adding Afco coilovers with 200-pound springs to the mix.

The whole chassis sits atop 22×12-inch Forgiato Ventaglio wheels wrapped in Toyo Proxes 305/40/R22 rubber.

Street and Strip 

When it comes to body and interior modifications to the truck, Daniel opted to do very little, wanting to keep his truck as versatile as possible. Outside, the truck maintains its original white paint, chrome trim, badges and bed. Inside, the truck maintains a similar factory look, right down to the standard heated leather seats, intact heating and air conditioning system, and even a functioning back seat thanks to the singular interior addition – a full rollcage built by Paul Cato of Maverick Diesel, which has removable tubing in the rear section.

As Daniel told us, he may not be taking it to the hardware store to get a load of 2x4s, but he likes the idea that if he needed to, he still could in this truck. Plus, it’s extra comfortable to take on a drive-to-drag trip, which Daniel hopes to do in the near future.

A Never-Ending Project

Remember when we said that Daniel’s truck had been a never-ending project right from the start? Well, that continues to be so today. As of December 2023, the truck was once again torn down and in the midst of another full rebuild in order for it to be more competitive in the 2024 Ultimate Callout Challenge season. Among the upgrades for the new version of the ‘06 Ram 2500 are a deck plate 6.7L diesel engine, compound turbos, and additions to the nitrous system, including two more 375 solenoids and another bottle. This would give the truck a full four-stage nitrous system to make use of. Additionally, Daniel and his team were said to be redoing the wiring, tacking in some new firewalls, and reworking the piping.

The goal for the 2024 competition season is to put down numbers in the range of 2,500hp. We certainly can’t wait to see just what massive marks Daniel and his Ram throw down in the world of competitive diesels in the future.


2006 Dodge Ram 2500

Owner

  • Daniel Hargrove
  • Charlotte, TN

Chassis & Suspension 

  • Modified stock frame to accommodate rear coilovers
  • Firepunk lowering coils
  • Bilstein 5125 front shocks
  • Stock rear leaf springs with two left in the pack
  • Afco coilovers with 200lb springs
  • Lowered two inches

Wheels & Tires

  • 22×12-inch Forgiato Ventaglio-T tires
  • 305/40/R22 Toyo Proxis Tires

Engine & Drivetrain

  • Cummins 6.7L inline-6
  • Stainless Diesel S485 turbo
  • Wagler Competition Products connecting rods
  • Mahle Motorsports coated cast pistons
  • Total Seal rings
  • 12mm main studs and girdle
  • Hamilton Cams 178/208 camshaft
  • Wagler fully ported big-valve cylinder head
  • Kingspeed LLC intake manifold
  • S&S Diesel 450 percent-over fuel injectors
  • S&S Diesel 14mm CP3 pump
  • Fluidampr
  • Nitrous Express Maximizer 5 progressive controller
  • Nitrous Express 375 solenoid
  • Two .99 nitrous jets
  • Stainless Diesel exhaust manifold
  • Custom wastegate tubes
  • Custom V-banded 5-inch exhaust
  • Custom 5-inch downpipe exiting under the truck built by Samples Performance Fabrication
  • ARP 625 head studs
  • Dodge 48re transmission
  • Suncoast billet triple-disc torque converter with 2600 stall
  • Sonnax 35-spline input shaft
  • Sonnax billet intermediate shaft
  • Sonnax billet fat output shaft
  • DNR Customs large front and rear driveshafts
  • 3.73 front and rear gears
  • Second-generation brakes

Interior & Stereo

  • Stock heated leather seats
  • Full AC/Heat still intact
  • Not stripped of any weight from factory aside from the on-board spare tire
  • Custom rollbar with removable rear tubes built by Paul Cato at Maverick Diesel


Transforming a Stock 1994 12-Valve Cummins

The Road to a 700hp 12-Valve

Diesel World’s newest venture is our 1994 Ram 2500, with the ol’ reliable 12-valve Cummins. We are setting out to take this truck from its (well loved) stock state, to a “streetable” 700HP street tractor over the next 6 months.

This truck is a 2WD auto that has been used in stock form for 209,000 miles, and we are about to wake her up after a bit of sitting around from having transmission issues. It’s definitely rough around the edges, but runs great, doesn’t leak from the oil pan, and the AC works… that’s all that matters, right?

We’re working with some awesome companies like FTI Performance, Smeding Diesel, FASS Motorsports, FarFromStock, Dynomite Diesel Products, Liberty Forged Wheels, and CenFlo Mechanics to make this project stand out and put down some reliable power at some dyno events in the 2024 show season.

Now that we’ve introduced the truck, let’s get into it. In our opinion, the first part to any diesel build should always be your fuel system. FASS sent us one of their 140GPH systems to make sure our injection system is supplied with constant pressure and clean fuel, so we can get a long life out of these big injectors and fresh P7100.

Here’s the first segment of “Stock to Not – The Road to a 700hp 12 valve,” where we start at the baseline – installing our FASS 140!


Step 1: Installing Electrical Harness

This is the first step in the process because we first need to power the pump to ensure that everything will be properly lubricated later on.

Note: FASS supplies dielectric grease, and recommends that you use a small amount on all electric connections, especially the relay pigtail.

1A. First, we used a wire stripper to remove any excess insulation from the add-a-fuse and the red single wire of WH-1006-3.

1B. We placed the wires from 46044 and WH-1006-3 into the butt connector, then secured the connection using a crimping tool. Then, we installed 46260 to the top slot on 46044, near the added circuit/wire. We routed the 46044 lead through the fire wall, using the existing grommet.

1C. Next we crimped the ring terminals to the red and green wires of the wire harness. Then, we attached the red wire to the positive terminal of the battery and the green terminal to the negative terminal. FASS recommends using a corrosion preventative on electrical connections like this one.

1D. We secured the relay and fuse in an upright position, to prevent moisture from entering. As recommended by FASS, we used a small amount of the supplied dielectric grease on the relay pigtail.

1E. If your truck’s fuse panel is located in the cab, you’ll have to guide the single red wire from the relay through the fire wall grommet to access the fuse panel.

1F. The next step is to locate the fuse box and select the ignition hot fuse. We removed the fuse and replaced it with the FASS Add-A-Fuse. Then, we reinstalled the fuse we’d previously removed. Again, we recommend that you use a corrosion preventative here.

1G. We then routed the WH-1006-3 wire harness along the frame rail to the mounting location of the pump. That’s all for now, though – we’ll get to more instructions on completing this step during Step 3.

Step 2: Installing a Sump

2A. We opted to use a sump gravity fed system for our setup. And the tank was absolutely full, so we found our mounting location on the tank and used our pilot bit to drill a drain hole.

2B. Once we drained the tank, we installed the sump, and got it to the correct angle we needed to run our supply and return lines to our FASS system.

Step 3: Mounting Fuel System

3A. To begin Step 3, we inserted part 10-300 into the “E” port and 10-302 into the “T” port of the FASS, then torqued to 20 ft./lbs.

3B. Just to make sure everything would fit right when it comes time to secure everything later, we loosely bolted part PBR-2001 to the pump assembly using three ¼ 20×1 ¾ bolts and three WA-1001D. We’ll come back to this later during final correct fitting of brackets.

3C. Next we unbolted the driver’s side front bed bolt from the bed. (Hold on to that bolt for the next step.) Then, we aligned RS-2001 with PFB-2002.

3D. After aligning, we secured the PFB-2002 and RS-2001 with the bed bolt we just took off in the previous step.

3E. We had to check the fit of the mounting location of the PBR-2001 to the PFB-2002 pump assembly. Once we were sure it was correct, we marked it on the mounting location and double-checked for the right fit. The next step will be mounting, so it’s important to make sure it’s right now.

3F. Next, it was time to connect the factory plug into the FASS harness. First, we connected the female plug of the FASS harness to the pump. Then, we turned our key to on. With the pump operating (you may have to bump the starter), we turned the pump over, then sprayed lots of WD-40 into the water separator nipple that lubricates the Gerotor.

3G. We started the assembly for the FASS pump bracket PBR-2001 using the RS-2002 spacer between brackets PFB-2002 and PBR-200. We used 4⅜-inch torque bolts (not flange nuts), nuts, and washers.

3H. Once secure, we used three 1¾-inch bolts and three WA-1001D spacers to mount the pump to the bracket.

3I. Next, we applied motor oil to the gasket located on the filters, attached to the system, and hand tightened. Finally, we installed the Extreme Water Separator on the side of the pump with the draw tube in the middle of the filter nipple. Then we secured the Particulate Filter (PF-3001) on the filter nipple without the draw tube. Make sure to insert the provided O-ring.

Step 4: Installing Fuel Line

Note 1: Hose clamps are not recommended for Push-Lok fittings, as fittings will hold up to 300 psi. Use oil on fittings and inside the fuel line when installing Push-Lok fittings.

Note 2: FASS recommends securing all fuel lines with cable ties. They’re the cheapest way to stop anything from coming loose, preventing problems in advance.

Note 3: Always be sure to secure hoses safely  away from moving objects.

4A. We first routed the suction line from the suction tube to port ‘T’ on the FASS system. We cut FL-1058 to the proper length, then inserted PL-1058 using oil. Finally, we connected to 10-302 in port ‘T’ and torqued to 18 ft./lbs.

4B. Next, we had to route the fuel line from the Return port on BHF-1002 to the ‘R’ port on the FASS system. It’s okay for it to bend gently while doing this. Next, we cut and inserted the PL-1005 fitting to the hose using oil. We attached to the 10-300 in the ‘R’ port, and torqued to 18 ft./lbs.

4C. The remaining fuel line had to be connected to the 10-300 in ‘E’ port of the FASS system using a PL-1005 and oil, then we routed this line up to the P7100 Injection pump. (Don’t cut it yet.)

4D. We disconnected the factory fuel line from the inlet side of the injection pump, then installed the DIPF-1004 into that port and torqued it to 18 ft./lbs.

4E. We next inserted the PL-2003 fitting into the fuel line. (Remember to use oil.) Then, we connected the PL-2003 to the DIPF-1004, and, you guessed it, torqued it to 18 ft./lbs.

4F. Here’s where it gets a little complicated. Stay with us. To finish installing the fuel line, the return line from the injectors has to be T’d into the return line of the injection pump. To do that, we assembled the T-fitting with two HB-14516, the CP-1003 compression fitting, and PB-14316 bushing using thread tape. Then, we removed the rubber hoses that were attached to the Injection Pump Return line and Injector Return line with reused clamps. We installed the FL-1056 fuel line from the steel injector return line to the T-fitting, then secured it with the HC-4001 clamp provided in the kit as well as a factory clamp. We installed the remaining fuel line from the T-fitting to the factory steel line at the frame. Finally, we cut the Injector Return line (measure twice, cut once!), slid on a compression nut, ferrule, and hold line, nice and tight to the T-fitting, and tightened the nut accordingly.

Step 5: Reviewing the Install

Before wrapping up the process, we ran through a list of checks to make sure everything was working properly.

This pump comes with a 1 Year Manufacturer’s Warranty. Once we ensured everything was working properly, we submitted our warranty information at FASSride.com/register-a-warranty.

5A. The first thing we tried was to blow out any open lines and cover any open ports.

5B. We made sure all bolts  and fasteners were properly tightened.

5C. We also checked to ensure all electrical harness and fuel lines were secured and properly tightened, and reconnected the battery.

5D. We correctly primed the system by turning the key in the ignition, turning on the FASS pump for 15 seconds, then cranking the engine and allowing it to run for at least 1 minute.

5E. We checked for leaks, started the engine, and rechecked all fluid and filter connections for leaks again. Better safe than sorry.


SOURCE

FASS DIESEL FUEL SYSTEMS
FASSRIDE.COM
(866) 769-3747


Immaculate Cummins-powered 1969 Chevy C-10 Resto-Mod

This Cummins-powered Chevy C10 bodied Ford F250 chassis lifted 4×4 creation took Trevor Lima, of Diesel Performance Specialties, over three-years to build. He finished it just in time for SEMA 2018. It set him back a $150,000 to realize this dream build.

Lima has been in the industry for over six-years and created some impressive builds over that time. The last big one, before this Cummins C10 build, was a crazy six-door 2016 Excursion.

1969 Chevy C10 Cummins Build
The 2010 Ford F250 Frame benefited from a box and full reinforcement while an 8-inch suspension system from Fabtech helps soak up the bumps.
The Spark

Lima built an orange 1967 Chevy C10 2WD single cab short bed alongside his Dad as a young adult in their home garage. The build was nearing completion, with body paint, powder coated frame, engine and trans already done, when his parents got a divorce, and the truck was sold. That truck turned into the famous “Tootsie,” as it’s known in C10 circles.

Between the build with his Dad and restoring a 1970 GMC 2WD in dark metallic green and white with woodgrain trim for his great uncle Pete Lima was hooked. He always wanted to make one for himself, but has always been a 4WD diesel lifted truck guy, so this creation is the culmination of those early build experiences and dreams.

Getting Started

Lima decided in 2015 that it was finally time to tackle a build like this for himself, in his personal style. The idea for this build started off as a cool halfway clean daily driver, but nothing over the top. Lima wanted a lifted 4WD, and wanted a Cummins diesel stuffed under the hood. He also loved the retro classic paint look, and couldn’t resist that orange two-tone.

As Lima started on the build he ran into problem after problem trying to get the big Cummins to fit in the original 1967 Chevy frame. In the end it wasn’t wide enough or strong enough to support the big diesel. A frame swap was going to be required.

24×14 American Truxx Forged 1909 Aries Wheels wrapped in 40×15.50 Toyo MT Tires

Lima says that the running gear under the Dodge frame from the same vintage as the engine he chose, 2003-2007, was “the world’s worst,” so he decided to use a Ford chassis. He found the axles, steering, suspension, etc… to be superior to a 2000’s Dodge truck.

As he started working on the truck more and more he quickly realized that he couldn’t justify not doing the build perfect. He had built a nice 1995 K3500 Silverado several years before, with a 12 Valve Cummins in it, but when he was done he knew there were a few things he should’ve done differently.  Lima couldn’t stomach having that feeling again with this build.

Doing It Right

At this point the personal build budget went out the window and Lima focused on doing every aspect of this project just right, and to his personal style. He aimed to build a show truck that was an extremely capable weekend driver and was every bit as aggressive on the road as it would look.

Of course, as with most projects like this, it took much longer and cost much more than expected to build. Lima had to keep putting this personal build on the back burner as his business grew, he moved into a larger building, sold his house and the usual life events happened.

The Build

The 1969 Chevy K20 single cab body has been refurbished to better than OEM quality and updated with a billet grille. The classic Chevy body sits atop a 2010 Ford F250 chassis, which has been boxed and reinforced. A 2005 5.9L common rail Cummins has then been stuffed under the Chevy hood and between the Ford frame rails. The American truck trifecta has been achieved with this truck!

The Cummins has been bored .020 over stock, the block deburred and all new high quality internals fitted. Parts like Carillo Rods, Mahle Pistons, Hamilton cams, valves, lifters and pushrods and even a big S369 SXE Turbo with race cover and a billet wheel have been fitted. An Airdog 220 GPH, 12mm Stroker-BD Diesel Injection Pump and Exergy Injectors all add to this impressive engine package. An HP Tuner tuned by Firepunk Diesel helps the truck put down 1500 ft/lb torque and 800 HP.

Chevy C10 with a 5.9L 2005 Common Rail Cummins
Under the hood lies a fully built 5.9L Cummins with enough go fast parts to easily crest the 800hp mark without breaking a sweat.

Under the truck you’ll find Fabtech 8” lift springs up front and stock F250 leafs in the back, with a shackle flip. Pro Comp MX2 shocks keep the ride smooth over the rough Texas roads. The truck rolled on huge 24×14 Forged American Truxx 1909 Aries Wheels wrapped in 40×15.50 Toyo Mud-Terrains for SEMA, but normally rolls on classic 17-inch pacer wheels wrapped in 40×13.50 Toyo MTs.

A full custom interior is both modern and classic at the same time. It features seats out of a 2005 Chevy truck, OEM Dodge gauges and a full custom tan leather interior by Pacos Upholstery.

Fabtech 8” Lift on a Chevy C10

The list of upgrades on this truck is more than extensive, as Lima needed  to find ways to integrate the big Cummins into the Chevy body and Ford chassis seamlessly. A Firepunk Comp Stage 2 transmission turns custom B&W Driveline driveshafts while a ATS 3-piece stainless exhaust with MBRP flow through muffler let the Cummins breath easy. Touches like a custom 35 gallon aluminum fuel tank, dual optima batteries mounted on the frame rails and Amp Research powered side steps help keep this build tidy and functional.

Life With His Dream Truck

All in, Lima is super happy with how this build turned out and says he “doesn’t really have any plans in the future to upgrade it.” He built it the exact way he wanted, and correct the first time. He says “it has tons of power and drives like a dream.  It doesn’t need anymore work in my opinion. It turns more heads than you can count when its cruising down the road or driving by on a trailer.”

Build Sparks New Business

After this build started coming to life, it started gathering a ton of attention locally in California. People were stopping by Lima’s general auto repair shop to check it out. The more people came around he realized that there was an untapped niche in the diesel community where he was living. His general auto repair shop wasn’t doing great, as there were about 20 other repair shops on the same road and the competition was fierce.

1969 Chevy C10 Cummins Build
The interior of Lima’s C10 is just as (if not more) impressive as the rest of the truck.

A lack of a quality diesel shop around was very evident, so he changed his shop’s name and refocused on the diesel market. Diesel Performance Specialties was born, and business was booming immediately. After only six-months he moved the business from a tiny 2,000 Sq ft shop into a huge 8,000 Sq ft space right off a major freeway.  Within several months at the new location, he even took over the 8,000 sq/ft building next door. Lima had found his niche and business is good.

Life Of A Show Truck

This build was winning local truck shows before the interior was even finished, even landing in a few local auto parts calendars. Lima never saw his creation as a SEMA truck, as he “figured it was too old and classic for the modern touches of the show.”

Truck Guru’s Cris Payne was looking for some SEMA trucks for the 2018 show and multiple people tagged Lima’s build on Facebook to be considered. In the end this custom diesel C10 build was upgraded with 24×14 American Truxx wheels and showcased in the company’s SEMA Show booth in 2018.

1969 Chevy C10 Cummins Build

These days it’s been attending a few local shows and sitting in the shop not getting much drive time. It can currently be seen at the brand new Diesel Performance Specialties shop in Weatherford, TX.

After flying out to meet with American Truxx in Dallas before SEMA 2018, Lima fell in love with th  e area and decided to move his shop to the DFW area, which opened in the summer of 2019. Lima’s Chevy C10 dream build is on display at the new facility. It even got a top 100 placing at this year’s Lonestar Throwdown, out of over 2000 trucks at the show.

Check out other custom C-10’s here!

1969 Chevy C10 Cummins Build

Frame & Body: 2010 Ford F250 Frame (Boxed & Reinforced), 1969 Chevy K20 Body w/ Billet Grille & 1970 OEM Reproduction Front Bumper

Engine: 5.9L 2005 Common Rail Cummins (machined by NAPA Machine Shop & assembled by Diesel Performance Specialties) (bored .020 over, block deburred, Carillo Rods, Mahle Pistons, Assembly Balanced, Hamilton Cams, Hamilton HD Valves, Hamilton Pushrods, Hamilton Lifters, 103 lb springs, 188 Duration and 220 Lift), Mishimoto Intercooler, S369 SXE Turbo w/Race  Cover & Billet Wheel (60 PSI boost), Airdog 220  GPH, 12mm Stroker-BD Diesel Injection  Pump, 1/2” fuel lines, Exergy Injectors (100% over size), HP Tuners with Firepunk Diesel tune

Axels: Sterling 10.50 with 4.56 Gears, Detroit Tru-Trac Locker

Suspension: Fabtech 8” Lift Front Springs, Stock F250 Springs w/ Shackle Flip, Pro Comp MX2 Shocks

Steering: Redhead Box, 2006 Dodge Column

Wheels & Tires: 24×14 American Truxx Forged 1909 Aries Wheels wrapped in 40×15.50 Toyo MT Tires

Other: ATS 3 Piece Stainless Exhaust w/ MBRP Flow Through Muffler, Firepunk Comp Stage 2 Transmission, 1410 Ujoints, Custom Driveshafts by B&W Driveline, NP241 DHD Transfer Case, 35 Gallon Custom Aluminum Gas Tank, Dual Optima Batteries on Passenger Frame Rail Under Cab, Linex Sprayed Bed, Amp Research Running Boards, American Made Wood Grain Trim, Painted Orange/Red by Rookers Collision, Custom Tan Interior by Pacos Upholstery, Seats from 2005 Chevy Truck, Stock Dodge Gauge Cluster with Dash Bezel from 2005 Dodge, Overhead Dodge Control Panel, Power Windows & Doors, Autometer A-Pillar Guages, Pioneer & JBL Sound System


PLUM CRAZY |  Cummins-Powered ’29 Plymouth

The vehicle of choice for most diesel engine enthusiasts is a pickup with a really powerful engine. And that was initially the plan for a client (who prefers to remain nameless) of ACR’s Andrew Faris. On the other hand, Faris’s client has three kids and likes his Sunday drives. So a four-door sedan made more sense from a comfort standpoint—but he couldn’t let go of his diesel obsession. Why not build on the best of both worlds, a stylish street rod with a 1,200hp Cummins? Sounds plum crazy, and the result is this insane ’29 Plymouth.

The project went through other changes midstream, as the original concept called for a rat rod in bare metal. “I wanted a modern industrial theme to the car using metal and wood detail pieces,” Faris recalls. Obviously the treatment went bonkers from there, as the trim and finish on this street rod is not merely industrial, but maniacal in quality.

How did it go off the rails? Faris started out sensibly enough, by selecting the tire sizes: Pirelli PZero 325/30, 19 inches in the front and 21 in the rear. Then he set the original tin body on the floor and moved the tires around until they looked right.

With the wheelbase sorted out, “I ordered a differential and rear clip from Chris Alston Chassisworks,” Faris relates. “And had Pete & Jake’s build me a drop-tube axle.” He then built the 2×4-inch square-tube perimeter frame on his shop table, and installed a four-link rear end and Watts link with Air Spring bags and Bilstein shocks. At the front, the drop axle rides on Posies springs and a Pinto box actuates the steering system. The brake asemblies are 4-piston Wilwoods with Lincoln drum covers and Aeroquip lines.

ENGINE WORK

In the meantime, Industrial Injection was building a 5.9L Cummins with a Phatshaft 62 / S474 compound turbo setup, and Bowler Transmissions was putting together a bulletproof 4L80 trans. A Destroked adaptor links the two together. A FASS filter keeps a good clean supply available to the Cummins, and a Dragon Fly injection pump raises the fuel delivery to keep up with the pair of high-performance puffers. A custom intercooler provides plenty of air density as well.

Once those items arrived, Faris had some measurements to work from, so he decided to widen the body three inches to make more room for his client’s kids. Here’s were things start to get a little nutty.

EVEN MORE BODYWORK

“This meant a lot of fab work,” he admits. “We had to build the hinging front and rear window openings, the whole rear panel, and widen the cowl.” But that was only the beginning of the insanity, as he also had to figure out the best routing for the custom exhaust. It consists of a five-inch pipe flowing into two four-inchers that dump into a Magnaflow seven-inch muffler. In addition, Faris got the harebrained idea of putting some rain caps on the roof, so he had to make that happen as well. The next major obstacle was to get the rear door functioning, which required moving the lower portion of the door jamb forward to allow easier access to the rear seat.

With the overall look of the car sorted out, Faris worked with Mike Miernik of Miernik Design to draw up some details. He penned a rendering that would promote the Plymouth as a SEMA show car. House of Kolor agreed to host it in their booth and supplied a new hue of Indigo Blue. It looks more like Plum Crazy to us, but what’s in a name? Whatever the label, it looks just as sweet. Commenting on the color and intensity of the paint, Faris notes that “it’s got quite a flop on it.” He also applied Galaxy Grey and flat clear as a contrasting color.

Much more work was left to do with only five months to go before SEMA. “It is very difficult to change directions in mid-project,” Faris points out. “But there’s always a way to get it done.”

SEMA CRUNCH

That meant really digging in, and a lot of late nights handling items such as hand-finished brushed stainless on the window frames, headlight and taillight buckets, and grille. The wheels are one-offs designed by Faris and Miernik. They were cut as one-piece rims by Evod Industries and the wooden inserts were machined out of teak. The whitewall is in fact part of the rim, not the tire, giving the car a more vintage flavor.

“We tied the old-school feel of the car in with the tuck-and-roll interior design,” Faris points out. The customized hides covering the bomber seats came from Relicate Leather and perfectly match the Galaxy Grey. Carrying the vintage theme further is a classy teak storage trunk mounted on the rear bumper, which echoes the teak veneer wrapping the trans tunnel and dash inserts.

1,200 horsepower and 2,100 lb-ft of torque.

Faris also designed all of the trim and bezels to match and had them machined by Accutec Tool and Die. The dash had to be widened as well (to fit the wider body), and the BOG (Big Old Gauge) cluster was custom built at Classic Instruments to fit with the theme of the car.

The level of detailing went to even higher levels of lunacy. “All the Lokar components, such as the door handles and shifter and e-brake look right at home in the interior,” Faris says. All that remained before the customer took delivery was a custom roll cage.

Getting back to the diesel, the difference in output is startling compared with the engine used in the original ’29 Plymouth. Chrysler introduced an inline four-cylinder version of its straight six in 1926 (just as Cummins had a four-cylinder version of its 5.9L straight six). But that’s where any similarity ends, aside from the type of fuels used. The Chrysler displaced less than 2.8 liters and churned out 45 horses. The 1,200hp Cummins delivers 26 times that output, plus 2,100 lb-ft of torque. Is that crazy or what?