Motortopia - EVERYTHING Automotive!
Exciting News! Motortopia App Now Available on Apple App Store!             
Close Ad

Project Rocky: Lifted 2WD, LS-Powered 1979 Chevy C10 Squarebody

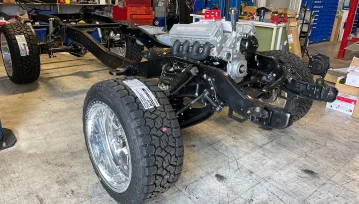
A Heavy Hitting, Lifted, 2WD, LS Powered Squarebody!

There’s a new contender moving up the ranks in this thrilling world of C10 restorations: Project Rocky, a 1979 Chevy C10, poised to redefine what it means to be a classic. For those who might have missed a beat in our journey, welcome back to the show. We are refocused on this project after a long hiatus while Rocky was at the paint and body shop, as well as our dedication to Sergeant Square, our military charity build for Mission 22. But now, the spotlight is back on Rocky, and we’re excited to bring you up to speed.

Picture this: a truck stripped down to its very core. Every nut, every bolt, every inch will be transformed. The old body panels are making way for new ones from Auto Metal Direct. They will be prepped and restored to an even better version than its original.

At the core of it all lies our chassis, the foundation upon which Rocky stands. We’re not merely refurbishing; we’re enhancing. Strengthening the structure, tweaking the aesthetics, and it all starts here. While the factory frame and original cab stand resilient, everything else will be a modern version, courtesy of some remarkable American companies that support our vision.

To upgrade the suspension, we collaborated with partners like Rock Auto who provided OEM suspension components, BDS Suspension for a larger-than-life stance, and Performance Online for a brake upgrade that is necessary for a build of this caliper. The wheels have been upgraded to a dazzling new set from American Force, wrapped in 33-inch Toyo Tires.

Our cab is now rust-free thanks to the team at Street Dreams paint and body shop in Ocala, Florida, and now wears a coat of Ferrari Red. With fresh glass from National Parts Depot and rubber seals from Steele Rubber, every detail has been planned to perfection.

Under the hood, the heart of this prize fighter is a new Summit Racing 5.3-liter LS crate engine, complete with accessories from Lokar Performance. This combo promises power, performance, and a style like no other. Our story doesn’t end here. We can only fit so much into the pages of this magazine, so we invite you to join us through our video series on YouTube. Project Rocky is more than a restoration; it’s a testament to passion for any and all C10 enthusiasts. Let’s go!

01. For those who don’t remember, project Rocky is our 1979 Chevy squarebody truck that we picked up for a measly $2,500. It looks rough, but this once-retired fighter will be the champ again one day.
02. With the original engine out and the bay all cleaned up, the truck can be brought to its next destination to be disassembled. Luckily for us, there is basically no rust on the firewall of the truck so the body shop will not be overwhelmed.
2(a)
2(b)
03. The frontend of this truck can come off in one piece by simply removing the bolts on the top of the fender and in the gap between the fender and the door.
04. Now that the front is completely removed, we can add some straps to the cab and prepare to lift it with a forklift. (Don’t try this at home lol!)
05. Now that we have a clean and body-free chassis, we can assess the situation and start a parts list.
06. We called up the sand blaster to clean the factory frame rails, rear axle and the cab.
07. With a fresh clean cab and frame, it’s time to start prepping for our new upgraded parts.
08. The frame will be coated and sealed with KBS Rust Coater for a long-lasting and permanent finish.
08(a)
09. The brakes we installed came from Performance Online. This is a nice kit because all the parts can be serviced at your local auto parts store.
10. The rear suspension consists of new upgraded leaf springs from BDS Suspension. Check out those new American Force wheels!
10(a)
11. Next up is a new EFI fuel tank from Hot Rod Fuel Hose. This kit is perfect as it bolts into the factory location.
11(a)
12. This is a crate LS from Summit Racing. The company makes it easy and affordable to upgrade your C10’s factory powerplant.
12(a)
13. LS Classic accessories from Lokar make this engine look unique and custom.
14. For a transmission, we went with a Street Fighter 4L60E from TCI Performance. It’s a solid and reliable product for a daily-driven classic.
15. The new Auto Metal Direct body panels and original cab look great in Ferreri Red.
15(a)
16. Front and rear glass from NPD along with new rubber seals from Steele Rubber Products were the right choice.
16(a)
17. To bolt on the hood, we are using these beautiful billet hood hinges from Eddie Motorsports.
18. The final install for this issue is our new drive-by-wire throttle peddle from Summit Racing. Lucky for us, Liquid Kreations makes a bracket for an exact fit to our factory location.
19. What a great transformation! This truck will be a testament to the aftermarket manufacturers who spent the time engineering perfect-fitting parts. Stay tuned for more in the next issue! And watch the video series for more in-depth details on Project Rocky!


Memphis Audio Install | 12V Entertainment for a Full-Time Show Truck

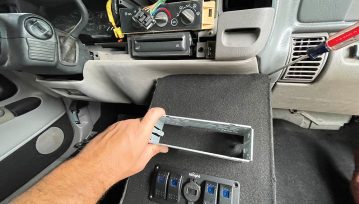
With the decision made that this would be a show-stopping weekend cruiser, we didn’t feel the need to replace the OEM dashboard with a mint marketplace find. A dash cap from NPD was all we needed to be satisfied on any trip to a local weekend event. The next major decision came with the audio upgrades. We felt we needed to win some awards. Even though the truck has a rear seat from the factory, it’s pretty obvious that no one will ever be back there and there really wasn’t much space for anyone to be comfortable anyway. So, the factory seats were removed and a custom CNC-built wooden speaker box was fabricated to fit perfectly in the back.

These new MOJO 6 ½-inch subwoofers from Memphis Audio will blow you away with the beats they can make, and the new VIV amplifiers can easily produce enough power to handle four of these little subs. We installed a 2200-watt amplifier for the subs and a four-channel amp for the mids and highs, all wired up by a Memphis audio amp install kit that made everything simple and smooth. The complete amplifier and speaker system is receiving signal and being controlled by a Planet Audio Apple CarPlay Receiver.

Finally, we wrap up the interior with a new billet steering wheel from Eddie Motorsports that was a simple swap using the company’s ’88 to ’98 Chevy steering wheel adapter. Follow along as we dig deeper into the details and show you the results of our “Ready Player One” inspired interior. In the next issue, we have one more trick up our sleeves that you may find exciting. Stay tuned!

Now that the interior is gutted and the new carpet is installed, we can start assembling the speaker box and center console inside the truck.
A quick spray of black paint on any of the spots that won’t be carpeted will hide any potential wood that you may see underneath the trim panels.

Power and ground are the two most important connections to start with. Bringing a large power wire directly from the battery and a ground wire directly to the frame is the best option for a clean, reliable power. Memphis Audio distribution blocks help us send the correct-size wires directly to the amplifiers.
To power the mids and highs, a Memphis Audio four-channel amplifier will be installed with new wires directly to the speakers. The 2200-watt sub amp will handle our low range audio through 6 ½-inch MOJO subwoofers.
With the power and ground connected to our amps, we can now run the remote wire to the factory harness and our RCA cables to the new radio.
Our head unit of choice is the new Planet Audio P90CPAC Apple CarPlay Android Auto Car Receiver. This is a single din, 9-inch touchscreen with rear camera and Bluetooth. To make and receive calls, and play and control music and apps like Spotify/Pandora wirelessly, we’ll need another device to connect to the World Wide Web. Stay tuned—it’s coming up in the next issue!
Instead of installing the radio in the dashboard and dealing with the shifter hitting the face, we decided to move it down to the center console where it’s easily accessible and free of interference. All we really needed from the original factory radio harness is power ground and remote, so three simple wires can be run and connected.

With the single-din cage placed and measured, we can drill some corner holes and use our jigsaw to create the opening.
The new head unit looks great, and we can’t wait to see how it sounds. It’s a very impressive user experience on this new Planet Audio touchscreen head unit!

These MOJO 6.5-inch subwoofers are small but powerful and feature DVVC (Direct Vent Voice Coil) cooling technology to rapidly dissipate heat, allowing MOJO mini subwoofers to play louder and longer. That’s all we need to do with carpet the box before we screw them in place!
With everything installed, the system design looks really cool, and adding some additional LED lights make it light up like the outside. Our buddy at CVJ welding cut this really cool aluminum Artemis sign that we installed with some standoffs for a killer effect. Love it!
Time to tackle the dashboard. This cracked up original plastic can be completely removed and replaced by a pricey pristine original that you can find somewhere online. But since this truck is not being restored, a dash cap is just fine for us.
A quick trip to our local National Parts Depot made it easy to snag a cap. The retailer generally always has these in stock and has locations all around the country.

Before we add the silicone and install the new cap, we really need to clean the original one and the new one. Any oils or dirt on the surface can potentially make this cap lift later in life. So, a little bit of time cleaning with some strong cleaner will make it last longer.
We use the silicone that was provided with the dash cap from National Parts Depot to outline the entire cap and go around any of the vent openings.

With the cap completely coated and the dash nice and clean, we slid the cap in place and made sure it fits snuggly.
Going around the door pins is especially important in lining up the air vents will help make sure it’s in the right spot.
Adding some weight to the cap and setting it in the sun is your best option for a strong bond. Give it at least a day or more before removing the weights.
The final part to be replaced is the original, boring steering wheel. We disconnected the battery, removed the air bag, and rented a steering wheel puller from our local AutoZone.
The steering wheel puller is very simple to use with just a standard ratchet. The best thing is that after you use it, you can return it and you never spend a dime. Don’t yank on the steering wheel to get it loose. You can potentially break something and cause yourself a lot more problems.
With the old steering wheel off, we can now install the Eddie Motorsports billet steering wheel adapter. This is splined to fit the original steering shaft, and bolts on simply and easily.
How nice does that steering wheel look? In the future, we will replace the radio bezel and dash gauges, and eventually coat the entire dash with a solid color.

A few final touches inspired by the movie were added to the LED switch panel in speaker box. If you’re a fan of “Ready Player One,” you know exactly what part of the movie these are in!
Now you can see the complete final layout of the audio system. The switches control the interior and exterior LEDs, and it looks super cool at night. We’re not quite done yet! We still have to install our Voxx media system as well as our vehicle cell signal booster, along with a new set of seats from TMI. But that’s for another day.
Success! We officially reached our deadline. The audio system sounds great, and we are proudly displaying this project for the first time ever at the 30th annual Slam Fest Truck Show in Tampa, Florida. Stop by and see Artemis in person!