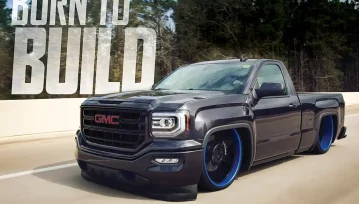
Motortopia - EVERYTHING Automotive!
Exciting News! Motortopia App Now Available on Apple App Store!  
Close Ad

’57 Chevy Cameo | PIMPIN SIMPSON

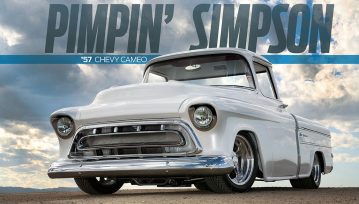
At the time, Allan Simpson was in the middle of a move away from all that. He’d just bought a stock ’57 Chevy Cameo and used it to relocate his family from California to Alamosa, Colorado.

’57 Chevy Cameo
The ’57 Cameo runs a 502 backed by a built 700R4 with Billet Specialties valve covers and an air cleaner painted to match the exterior. All components—motor, transmission, A-arms, 4-link and rearend—are smoothed and painted silver with semi-flat clear. A polished Be Cool radiator and Street Performance serpentine pulley system share the bay with Eddie Motorsports hinges. After all is said and done the Cameo’s big-block expels its nasty gasses with a Stainless Performance exhaust system. While that may sound bad on paper, it has a beautiful resonance in person.

The truck served dual purposes as a farm and work vehicle up until 1976 when Allan gave it to his son Cleave (no relation to the Beav). Cleave, 16 at the time, commuted to and from school for a while until the high-test started flowing through his veins as it does many of us when we reach that age. He and his dad put a 396 and a turbo into the old farm truck and slapped on a coat of white Imron paint. Mullets and Sho-Los more than likely grew in unison as Bob Seger resonated through the Kracos while Cleave and his high-school sweetheart (now his wife, of course) cruised Main Street on Saturday nights. Cleave took the truck to college at the School of Mines before moving to Texas. The truck sat there for a few years before it eventually found its way home like one of those cats you hear about.

Billet Specialties polished billet aluminum Legacy 17 x 8 wheels are wrapped in Michelin Pilot Sport 145/45R-17 rubber. In the back, a pair of Legacy 17 x 10 wheels in Michelin Pilot Sport 335/35R-17.

Enter Johnny Martin of Johnny’s Auto Trim and Rod shop, also in Alamosa and also a childhood friend of Kevin Simpson, Cleave’s younger brother.“I remember this truck from a very young age,” said Martin. “Cleave was the older brother with the bitchin’ ride. When he asked if I would bring the car back to life, I was honored.”

This isn’t Martin’s first rodeo. Around the same time Cleave approached him to do the build he happened to be in the middle of one of the biggest projects of his career, a Corvette he called Elegance. This tour de force received accolades from the Detroit Autorama when they named it one of the Great 8 builds of 2011. Martin eventually took Elegance to Barret-Jackson with no reserve and pulled down a whopping $412,000 for his pristine creation.

’57 Chevy Cameo

The same type of effort and then some has gone into Cleave’s project, being so close to the family and all. Only this time, of course, the vehicle’s not for sale.

“This tour de force received accolades from the Detroit Autorama when they named it  one of the Great 8 builds of 2011.”

“I intend to one day hand the truck over to my son Jared,” said Cleave. “But only after I have driven the hell out of it can he pry my hands from the steering wheel.”

The theme for the exterior is clean with shaved handles and PPG one-off Pearl White paint created by Johnny Martin and Emmett Flowers of the Santa Fe Paint Company. Credit for the rest of the bodywork goes to Wayne Saunders of Alternative Automotive Design. Beauty isn’t just skin deep, though, thanks to a TCI fully boxed chassis, coil-over 4-link 9-inch Ford rearend with a Mustang II and 2-inch dropped spindles with Shockwave pneumatic ’bags.
’57 Chevy Cameo
History resonates through the cabin in the form of a shifter made by Cleave in his high school machine shop. While his right hand is rowing through the gears, Cleave steers through the power slides with his left hand on the Billet Specialties steering wheel attached to an ididit chrome column. His steely eyes glance at the Classic Instrument gauges and custom console while he’s nestled in the custom dark red leather seat with aluminum accents around the interior.
Specialties steering wheel attached to an ididit chrome column. His steely eyes glance at the Classic Instrument gauges and custom console while he’s nestled in the custom dark red leather seat with aluminum accents around the interior.

See the specs →

RIDETECH AIR SUSPENSION | PROJECT ARTEMIS PART 2

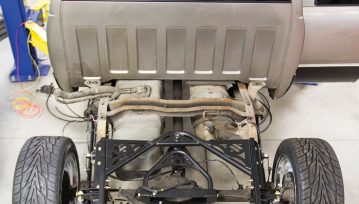
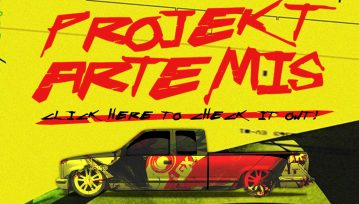
Project Artemis Ridetech Air Suspension Install.

 A couple of issues back, we introduced you to not only our latest project truck known as Artemis but also a new tech team helping out on this year’s OBS build. SaltWorks Fab in Myakka City, Florida, is known for building some amazing hotrods and trophy-winning showpieces for customers. With way more expendable income than we do, so having the crew take time out of their busy schedule to help us document Artemis’ RideTech suspension swap is an honor we are proud to boast about. So, if you missed the February ’21 issue where we documented the front suspension install, we suggest you head over to www.engagedmediamags.com to buy a copy while you can. In this issue, we tackle the rear of our 1998 GMC Sierra 1500 SLE. A C-notch install and a lot of sweet-looking, well-engineered suspension parts.

We said it in the last issue, but it stands repeating. This is a completely bolt-on air-ride suspension for ’88-’98 Chevy/GMC 2WD trucks.

No cutting the bed floor and no removing the fender liners. Just a C-notch and a quick shave of the bed brace. All the permanent modifications that needed to be made. They’re nothing that would stop us from putting it back to stock one day if we wanted to. Which is what we were looking for in an air suspension system. This Ridetech system also has electronic ride height sensors that set your ride height to whatever PSI you want. This way, even if you have a leak. The system will correct it at the push of a button until you can pull off and make a repair.

The final piece to the new suspension puzzle is picking a wheel and tire package. For project Artemis, we wanted a setup that would allow us to have a super low stance without cutting anything and a decent ride on 40-series tires. If you have any experience with air suspension, county roads and 35-series tires, you will more than likely understand our desires for this driver. The wheels are staggered fit, 20-inch aluminum wheels from US Mags with a width of 8 inches up front, and 9.5 inches in the back. Having a wider wheel in the back not only looks cool, but it also stretches the 40-series tire just a bit to give up some extra clearance out back when cruising low and slow. Now let’s check out the steps to installing the rear of this extremely well-engineered air suspension system for GMT400 trucks.

C-notch install
In this issue, we tackle the rear of our 1998 GMC Sierra 1500 SLE with a C-notch install and a lot of sweet-looking, well-engineered suspension parts. If you missed the February ’21 issue where we documented the front suspension install, we suggest you head over to www.engagedmediamags.com to buy a copy while you can. Until then, step one, of course, is removing the bed.
Rear frame rail ready for c-notch
With this Ridetech suspension system, the only major modification you need to make to your ’88-’98 Chevy or GMC truck. Is to add a C-notch to the rear frame rail. This is a simple yet tedious process that must be done in order to get as low as possible. By allowing additional clearance for the axle to travel up, while bringing the body of the truck down.

Drilling frame for c-notch

Grinding out frame for c-notch
Lots of guys have their own technique for cutting a notch, and generally they all work great, but the way the team at SaltWorks performed the task made it look basic beyond belief. Trace the pattern, drill some relief holes in the corners, grind down the gunk so you don’t ruin your blade, and simply use a grinder to remove the piece. (Editor’s note: Be sure to properly support both sides of the frame to avoid any drooping or sagging.)

Installing ridetech c-notch

With the Ridetech provided C-notch in place, they drilled all the bolts and bolted it onto place. You may be surprised by just how much additional strength these give to the chassis.
Ridetech lower bag mount bracket
Next, the lower bag mount brackets are installed on the rear axle using a set of U-bolts provided in the kit.
With the bracket in place, the front of the parallel link bars can be bolted into the factory leaf spring location.

Now the rear of the link bar can be bolted to the lower bag bracket mounting point.
Ridetech upper wishbone bracket
Next to the upper wishbone bracket is installed. This piece bolts into the C-notch on both sides and eventually ties to the differential.

This differential bracket easily bolts to the rearend and the upper crossmember. It’s a very, very well-engineered design and fits absolutely perfectly.

Ridetech shockwave
The Ridetech shockwave airbag is next to be installed. It simply bolts into place behind the axle and allows for plenty of wheel clearance.

The final pieces to the mechanical parts puzzle are the ride height sensors. These digital do-gooders keep the truck height in check by maintaining pressure to your pre-desired setting.
Here you can see the complete rear suspension installed and ready to be covered by the bed—but before that we need to coat that frame!

kbs undercoating

KBS Coatings is our go to source for frame and fuel tank coatings. This spray-on rubberized undercoating not only prevents rust and corrosion, but it also helps with sound deadening which is great for a 20-plus-year-old truck!
Before the bed can go on, we snipped off the back of the exhaust pipe so it doesn’t clank on the axle while driving. We will be replacing this in the next issue with an all new Flowmaster exhaust from Holley Performance.

Next up, the bed can be bolted back into place and the fun part begins—ruining electrical wires and airline! But that’s after they mount the air tank.

Organizing and planning are a big part of any major modification, and this one is no different. Deciding which way to route the black airline and which wires need to go where is not a task for the tired. So, if you’ve been working long hours with no sleep, hold off on this step until after your nap.

This is a completely bolt-on air-ride suspension for ’88-’98 Chevy/GMC 2WD trucks. No cutting the bed floor and no removing the fender liners.

When attaching the hose to the frame, be sure to give it some slack in case you need to trim the ends a few times. The last thing you want is to have to replace an entire airline for a few missing inches. Once it’s all complete, the battery power can be connected and tested. Time to turn the key!
You can’t hear it in the picture, but this baby is buzzing with energy from the dual compressors filling up the air tank.
That first time setting any suspension project on the ground is exciting. Nicole even broke away from her digital duties to show her love of the low.

Us Mags

Our choice for wheels is this ultra-bright chrome Bullet design from US Mags. These are staggered fit, 20-inch aluminum wheels. With a width of 8 inches up front and 9.5 inches in the back. If you have any experience with air suspension, county roads and 35-series tires. You will more than likely understand our desires for a 40-series tire. Having a wider wheel in the back not only looks cool. But it also stretches the 40-series tire just a bit. To give up some extra clearance out back.
Man, she looks good! Those wheels are the perfect fit, and the stance is impressive. Since we didn’t have to cut anything major away from the factory truck.

Before we can take it for a test ride, we need to coat the bed with a real bedliner. This will prevent it from rusting near the drill holes and will look amazing next to the new wrap.
Speaking of wrap, here’s a little teaser!


Ridetech Air Suspension | Project Artemis Part 1

Ridetech Air Suspension Install Project Artemis!

It’s an exciting day here for the team at Street Trucks as we remove the first bolts from our 2021 primary project truck, Project Artemis. This 1998 GMC Sierra is getting a complete makeover. From front to back, including an all-new air-ride suspension from Ridetech, a retro-fit wood bed floor, all new interior pieces, and tons of upgrades to its original 5.7-liter V-8 engine. There’s no custom fabricating involved with this project, and we’re using only off-the-shelf bolt-on parts. It’s gonna be a good one!

This is an everyman’s project that caters to hundreds of thousands of truck enthusiasts alike. We understand that these projects take time and money that not everyone can spare. But we can at least show you what to do while you wait for the right time to make your next move.

Our project this year is to build a custom, bagged OBS Chevy truck that is reliable and ready to cruise with the whole family. So, meet Artemis, a 1998 GMC Sierra that has been female owned since it came off the lot. She’s been well maintained, and she’s ready to be reborn!

The name Artemis seemed perfect for this future trophy winner because it means “goddess of the hunt.” Artemis is also the main character’s name in my favorite movie of all time, “Ready Player One!” In the movie, Artemis is a gold/pewter-colored female character. In an online virtual reality game being played by a normal person in the real world. When playing as the character, she turns into a more confident, prouder version of herself. Just as we do when we are driving our custom truck around town, right? Customizing your character to a gamer is customizing a truck to a gearhead. So, we combined the two lifestyles, and a name was born: Project Artemis, Goddess of the Hunt for Trophies!

Stage one for this multi-stage resto-mod is to get the suspension replaced. We don’t want to be cutting and grinding the frame with a nice paint job or custom wrap. Definitely don’t want any greasy mechanics getting in and out of our nice new interior. So, we called up Ridetech, told the crew our goals, and they helped us order a complete, turn-key air-ride system designed to fit ’88-’98 Chevy and GMC C1500 trucks. When I say complete, I mean absolutely everything you need to fully bag your OBS without needing to run to the parts store. Suspension components, compressors, air springs, electronics, hoses and even all the fittings you will need, guaranteed! We were so impressed by the ease of ordering and the logistics behind this entire process, and we can’t recommend it enough for your GMT400.

This running-driving, three-door GMC has only 124,000 original miles and absolutely no mechanical issues that we know of. She’s a perfect project truck!

Once the complete kit arrived, we packed everything up and headed out to SaltWorks Fab in Myakka, Florida, for the install. Thom Ophof is the man behind all the metal magic that comes out of this amazing shop. We were impressed by his confidence when he assigned a few of his best men to tackle the teardown. Chris Hagerty and Telly Violleto were excited to break away from their high-end fab work for a couple of days to bag our OBS. We were there pestering them throughout the whole process. This issue we will focus on the front, the next issue will be the back. Then we have something special coming for Artemis—and his name is Glarb!

As we arrived at SaltWorks Fab in Myakka, Florida, the first thing we saw was this amazing, bagged GMC that was built by this crew. Not that we had any concerns before, but this was all the visual we needed to know we made the right choice!
SaltWorks Fab is a wonderful mix of metal-shaping, chassis-building and complete turn-key custom builds that range from your standard styled hotrods, full blown custom cars, resto-mods and even Pro Touring racers.
This is the office of one of the techs who took time to help us on our build. Not a bad view to have every day, right?
This complete frame-off 4×4 Toyota will definitely be in the pages of Street Trucks once it’s complete. The level of detail is unreal!

OK. Back to reality. Time to get Artemis on the lift and unload all the parts.

All the equipment from Ridetech came packaged with such great care that not a single piece was scratched or missing. We unboxed and laid it all out nicely so the crew can get to work.

With the truck on the lift, we took the time to inspect the rest of the chassis and engine to make sure we didn’t miss anything while buying this 23-year-old truck.
The OEM front suspension is all still in great shape, but it’s completely covered in grease. It’s going to make for some messy hands!

First to come off is the bed. A few bolts from the bottom and some plugs for the taillights are all you need to remove before taking off the bed. Better ask a few friends for some muscle assistance.

The next thing to be removed were the wheels and front sway bar. Ridetech provides a new sway bar so this one can be tossed out.
Safety first! Telly wrapped chain around the spring so it doesn’t fly out when he removes the spindle. Pretty smart!
The tie-rod end is carefully removed so to not damage the threads. The Ridetech kit comes with new inner tie-rod ends, but these outters will be reused.
A nice big pile of parts in the corner is a sign of progress! Now, it’s time to bolt on the new Ridetech suspension components.

For the upper control arms, we installed these StrongArms that are designed for ’88-’98 Chevy C1500 trucks. They are developed by Ridetech in Jasper, Indiana, on an actual running, driving vehicle, so you know they fit.
The front kit includes these CoolRide airbags designed to be used with the Ridetech lower arms. Everything comes with the kit including air springs, brackets, HQ Series shocks, bolt-on shock mounts and hardware.
Before the bag can go in, the press-on style air fitting needs to be installed on it. Don’t skip this step or you will regret it!
With the top hat mounted to the air spring, it can be bolted into place using the factory shock hole to secure the top of the bag mount.
To get as much drop as possible, Ridetech provides these 2-inch drop spindles that allow you to slam your ride and increase ride quality. They are forged from heavy duty steel and will increase the track width by a quarter inch per side.

With the upper bag mount loosely bolted in, the lower control arm can be installed, and the bottom of the air spring can be tightened.

Moving on, the shock needs to be relocated since the air spring takes the location of the OEM one. So Ridetech engineered this perfectly fitting shock relocation kit that bolts to the frame and the lower control arms.

With the suspension components in place, the brake can be reinstalled. We once again ordered a set of EBC rotors and pads as we have had nothing but great experiences with this brand.

To finish up the front, the new Ridetech MuscleBar needs to be bolted up. Using precision CNC tubing benders, Investment cast steel bar ends, and Delrin lined mount bushings, Ridetech can produce sway bars with unheard of dimensional and rate accuracy.
For Artemis to sit at the correct level anytime she’s cruising down the road, we ordered these RidePROx. These height sensors digitally measure your vehicle’s exact suspension movement to provide accurate and repeatable vehicle height adjustment. Even when the vehicle has a heavy load, it will sit perfectly every time.
The completed front is a thing of beauty. Modern engineering meets good old fashioned American metal.
With a jack under the control arm, Chris was able to drop the lift to see how low we can go. From the looks of it, we are gonna get down!

Before we bolt on wheels, we want to check clearance on everything from brakes to sway bars. Luckily, SaltWorks has a set of GuniWheels on site like all shops should. These universal-fit wheels have solid tires that are capable of holding the weight of your build while you move it around the shop. Pretty cool!
IN the next issue, we will walk through the back install and show you how it all works. Then feast your eyes on a teaser of the final look before we throw some wheels on Artemis. Stay tuned! For Part 2 CLICK HERE

Project Artemis Debut! Our 1997 GMC Sierra Goals and Plans

In the first-ever OBS Builders Guide, we put our direct focus on swapping the factory engine for a Blueprint Engines 383c.i. stroker motor, an American Powertrain transmission, along with a full RideTech Coilover suspension system and 22-inch American Racing wheels. It was an impressive truck that was built right from day 1.  Now we turn focus to our Q1 project truck and 2021 OBS Wheel Buyers Guide. This issue we focus on adjustable suspension and bolt-on options for bagged OBS trucks. We have Ridetech AirRide suspension, Toyo Proxes STIII tires, EBC Brakes, Bed Wood and More Retroliner, and much more being installed at Saltworks Fab in Florida.

We are running a staggard setup for the wheels and tires. Sizes 20×8 in the front and 20×9.5 in the rear.

In the same issue, we will also run a 5-page Wheel Manufacturer Highlight article and the OBS Wheel and Tire Buyers Guide. This will be a ton of ink of multiple books and digital/social properties about buying options on these radical trucks.

Project Info:

Truck – 1997 GMC Sierra Ext Cab (see attached with rendering)

Tires – https://www.toyotires.com/product/proxes-st3

Install Shop – SaltWorks Fab https://www.saltworksmfg.com/

Official OBS Builders guide Vol 2 Preorder Link!

https://engagedmediamags.com/automotive/obs-builders-guide/obs-builders-guide-2021

Previous OBS Builders Guide Coverage

Link to previous digital articles

Youtube install video link with over 500,000 views

https://www.youtube.com/watch?v=JhlNFufsx48

Video of the new truck project


STELLA! The Complete Build…

A Street Truck Aimed to Inspire

The classic movie, “A Streetcar Named Desire,” was recently selected for preservation in the United States National Film Registry for being “culturally, historically or aesthetically significant.” Lately, it seems that ’88-’98 Chevy trucks are quickly being known to have the same qualities in the truck enthusiast world. GMT400 trucks were on every street corner and car show in the ’90s. With massive production numbers and excellent engineering, these Chevy trucks are still pretty easy to come by and available in many different forms, including shortbed, longbed, quad cab and even two different SUV platforms. Oftentimes, the guy who’s buying and restoring these trucks wanted one in his teen years, and now he’s older, generally successful and more financially stable than when he was 16 years old. These factors also drive custom parts manufacturers to focus on making products for the industry icons and get ahead of the popularity curve.

’88-’98 Chevy trucks

It’s easy to talk the talk and say you’re a fan of this body style, but it’s far more impactful to walk the walk and own one yourself. So, we took the challenge and jumped into the deep end of desire by picking up a running, driving ’95 Chevy C/K truck from the original owner for a smooth $2,000. Cold A/C and a solid cranking 4.3-liter V-6 gave this truck the appeal, but the full gas tank and a fresh oil change showed us that the previous owner still had love for this 20-plus-year-old family member. 

To quickly explain the project’s name: “Stella” is a Latin term meaning “star.” The name popped in our heads after we ordered our 22-inch American Racing Nova wheels. The word “Nova” is a female name of Latin origin that has a definition of both “newness” and “of great energy.” It’s also an astronomical term for a star that suddenly increases in brightness, just like this truck’s future. (Plus, Stella was a pretty stellar character in “A Streetcar Named Desire.”) So, with all that in mind, the name Stella just fits, don’t you think?

Over the next few pages, we’re going to take you through the process of giving this truck new life on the same old roads it’s been cruising down since its inception, first starting with a new suspension, upgraded disc brakes and a new set of wheels and tires. That’s only the beginning, but you have to follow along to see the rest. If this truck doesn’t motivate you to go out and start wrenching on your own OBS project, I’m not sure you picked up the right publication. Now let’s get to the good stuff!  

Chevy Frame
Before we got down to the nitty gritty, Dallas Maynard from Full Pen Fabrication removed the bed and pressure cleaned the frame. Twenty-plus years of rust and road grime is better off in the driveway than in your face—am I right?
RideTech C-notch
RideTech supplied this C-notch
To get the truck as low as we want it, we need to make some clearance in the factory frame rail. If we don’t, the axle will hit the frame every time we hit a bump, and the sound it makes is something we don’t want to hear! RideTech supplied this C-notch with our new suspension kit so the frame was traced, drilled and sliced before our new C-notch was bolted in. This bolt-on C-notch reinforces the OEM frame rails and features integrated suspension mounts.
 This bolt-on wishbone system greatly improves traction, handling and ride quality while offering a 4- to 6-inch drop in height. Installation does not require any welding or major modifications to the bed floor. It includes patent-pending R-joint rod ends to eliminate binding and noise. The HQ Series coilovers are direct bolt-on and allow for easy adjustment.
HQ Series coilovers
HQ Series coilovers
Front HQ Series coilovers include bolt-on upper shock mounts to allow more ground clearance and maximum suspension travel, front upper and lower StrongArm tubular control arms, front and rear HQ Series coilover shocks, front sway bar and HD drop spindles.
Big brake kit
This Pro Performance 14-inch front and 13-inch rear big brake kit is designed for ’88-’98 GM trucks and SUVs. This kit does not require machining to the axle or rotors, and the caliper has an integrated parking brake option. This brake kit will work with any disc brake drop spindle, such as McGaughy’s, Street Edge or Belltech. You will receive a template and instructions on modifying your spindle, which requires cutting of the caliper “ears” and drilling and tapping for the caliper mounting bracket. They look amazing behind our 22-inch American Racing wheels and Nitto Invo tires.


Plastic grille
Classic Industries black plastic grille
Classic Industries offers this reproduction black plastic grille as well as the dual composite headlamps and corner lights that are all designed to replace the original. This conversion is as simple as unbolting the original grille and headlights and swapping in the new stuff. To swap the headlight plugs, we turned to MrTailLight.com for the kit. The company offers the new headlight plugs and all the mounting hardware you need to take the guesswork out of the process. We can’t convey how simple this process is and it’s very affordable.
383ci Stroker motor
BluePrint Engines 383ci Stroker motor
Now to focus on the engine swap. The factory 4.3-liter V-6 has got to go, but since this is a perfectly running engine and transmission, we will save it for a quick flip project. The crew at Overpower Customs yanks engines on the daily so ripping this one out is child’s play. Jason and Trey removed all the plugs and bolts before hooking it up to a forklift. Replacing it will be a new BluePrint Engines 383ci Stroker motor paired up to a Centerforce clutch in our American Powertrain transmission.
Cleaning the engine bay
Before the new engine can go in, Trey pressure cleaned the engine bay to remove all the old grease and grime. The core of this truck is in great shape!
Vintage Air pulley kit
Our BluePrint Engines 383ci Stroker engine comes turnkey other than the drive pulleys. So, before they bolt up the new 5-speed American Powertrain transmission, a Vintage Air Front Runner drive pulley kit goes in. The completed kit looks amazing! It is nice and tight to the block, so we don’t have to worry about fitment when installing the engine. Also, the Bright finish gives its the quality look they deserve.

To control our fuel delivery system, we chose to go with Edelbrock’s new Pro-Flo 4 electronic fuel injection. The Pro-Flo 4 is not just a replacement for your carburetor. It’s a complete engineered system that provides the ultimate in performance, drivability and quality. This will result in a smoother idle, faster acceleration, better peak power, improved fuel economy and the ability to control detonation, all in the E-Tuner 4 app

The key to the improved performance is the fuel injector location, which is at the end of the runner on the intake manifold right before the airflow stream enters the combustion chamber. This location provides a more efficient mixture control that’s unaffected by varying intake manifold runner temperatures and length.

Next to be bolted to the block are our Hedman Hedders designed for the SBC 350ci engine. Hedman Hedders began as a one-man shop in 1954. Bob Hedman, founder of Hedman Hedders, sold his highly sought-after exhaust tubes to fellow racers on the salt flats of the Mojave Desert. But what started out as a way to make a few bucks to pay for Bob’s racing hobby quickly turned into the premier header manufacturer for both the racing and street header marketplaces.


Centerforce is the clutch of choice for our project and recommended by American Powertrain. The Centerforce II Clutch Series utilizes a full facing disc with premium friction materials and a pressure plate with centrifugal weights. It offers superb holding power and maximum clutch life, making this clutch ideal for selected street/strip, off-road and towing applications.


• Patented centrifugal weight design
• Patented ball bearing pressure plate
• High quality friction material 
• Light pedal effort
• Increased holding capacity
• Smooth engagement

American Powertrain’s Pro-Fit kits for 88-98 Chevy/GMC C1500 OBS GMT400 trucks come in either 5 or 6-speed. There is no need to cut the floor if your truck is already manual since it fits in the factory location. This kit reuses the original cross-member. It’s actually a very easy install!  

Benefits Include:
30-50% increase in fuel economy
Low RPM cruising for greatly reduced driver fatigue and an improved highway driving experience. 
Reduced engine wear leading to longer engine life
Cooler engine operating temperature

The 88-98 Chevy kit includes
AP Revolution Shifter Mechanism locates shifter that will fit bench or bucket seats
Seamless DOM Driveshaft Assembly that has been race balanced
Solid U-Joints
A Driveshaft Slip Yoke made from Cryogenically hardened steel
Polyurethane Transmission Mount
Greased and pre-packed pilot bearing with stainless rollers
Reverse Light Harness
Electronic Speedometer Conversion
Shifter Knob and all the Hardware and instructions you need.

Mishimoto Radiator
Mishimoto radiator

With the engine fully assembled, Trey can slide the engine into the bay and start prepping the cooling system. We used a set of factory V-8 motor mounts to bolt it to the frame and Mishimoto radiators and electric fans. This is a 6.2-liter (383ci) diesel cooling system that Trey recommended for additional cooling. To make it all work correctly, Trey installed a factory OEM diesel coolant reservoir and made a trick aluminum coolant transfer pipe.

Aluminum coolant transfer pipe.
The last thing to complete before the first startup is the Dynomax exhaust. Jason welded the DIY stainless exhaust kit together and sprayed it black to look the part. 
The engine swap is complete, and no fancy wiring harness was needed. We know that LS swaps are the popular trend nowadays, but we didn’t want to hassle with the electronics on this one.
Now that we have a 5-speed transmission, we need to cut a hole in the floor for the shifter and install a clutch pedal. We used a factory pedal from the junkyard and it simply bolts into the factory location. While the interior is out, we had Corbin from Florida Boy Customs dye the dash and interior panels black.
Billet steering wheel Forever Sharp
Billet steering wheel from Forever Sharp
Instead of reinstalling the factory bench seat, we turned to TMI Interiors to see if we could get a set of their new ’88-’98 GMT400 interior kits. Luckily for us they came through and we were able to bolt in these new custom bucket seats with center console. This kit is now available for your truck and includes door panels, seats, headliner and dash cap. We also installed a new billet steering wheel from Forever Sharp and it looks perfect! What a massive upgrade to the interior of this ’95 Chevy C1500. Those TMI seats look amazing!
Dakota Digital
Dakota Digital
Sport truck mirrors from LMC Truck.
Before bolting up the new door panels, we swapped out the factory-style side view mirrors and replaced them with these sport truck mirrors from LMC Truck.
Time to get some blood in Stella’s veins and give her some spark. As with all of our build, we turned to Red Line for their engine oil, power steering and transmission fluids. We also poured in Mishimoto’s Chill radiator fluid. After a 500-mile break in we will flush the transmission and refill it with synchromesh transmission fluid.
Our first start was a success and Stella finally got to see the sunlight again! The Blueprint Engines 383ci Stroker sounds strong and the Dynomax exhaust rumbles perfectly. Naturally Trey wants to see if anything is loose—and what better way than to light the tires up!
While Trey finishes some final tuning to the Edlebrock Pro-Flo, we started working on the exterior of the truck. A new 2-inch raised cowl hood from Autometal Direct combined with an LMC replacement tailgate and an AVS on the Web roll pan will give the truck the aggressive look it deserves. All this new metal will need to be painted to match, and to save costs we decided to go with Automotive Touchup color matching paint and their DIY paint products that even include the paint guns.
2-inch raised cowl hood
As with any paint project, the prep work is key. We wanted a clean work area, so the garage was cleared out and sawhorses were brought in. Taping off the parts we don’t want painted comes first.
OEM panels
These OEM panels are ready for a primer with a simple scuff with scotch pads and a wipe down with acetone.
Automotive Touchup
Automotive Touchup
Automotive Touchup made it easy on us by offering a three-stage ready-to-spray paint system that requires no mixing at all. Just stir, pour and spray, giving around 15 minutes per coat and one-hour per stage.
LMC replacement tailgate
Keeping the hose away from the surface and your hand parallel the panels is what we were focused on. We are not pros or even experienced amateurs, but Automotive Touchup gave us the confidence we needed to pull off a great paint job. We were extremely impressed and pleased with the results.
Eddie Motorsports billet hood hinges
Instead of reusing the factory hood hinges, we took the opportunity to bolt on these new Eddie Motorsports billet hood hinges. They come in polished or powdercoated with the bolt-on in the factory location. No cutting, no welding.
Bolt on the hinged hardware
The provided hardware is bolted into place and the new gas struts are clipped in. No hassle!
Hood Hinges
Lastly, the hood is brought back into the mix and bolted on with the new hardware. These hinges look great and operate extremely smoothly.
2-inch raised cowl hood
2-inch raised cowl hood from Autometal Direct.
The front of the truck is complete, and it looks great! Now time to focus on the back.
LMC replacement tailgate
Hinged and hardware.
Before the new tailgate can go on, we need to bolt on the hinged and hardware. This kit from LMC Truck provides all the parts and pieces you need including the latch and trim ring.
DIY brush on bedliner
DIY brush on bedliner kit from KBS Products.
To give the inside of the bed a makeover, we taped off the edges and coated it with this DIY brush on bedliner kit from KBS Products. It’s easy to accomplish and looks great if prepared properly.
Now that the new tailgate and roll pan are installed, the back of the truck looks great, too!

Project Sources

American Powertrain
americanpowertrain.com

American Racing
www.americanracing.com

Autometal Direct
www.autometaldirect.com

Automotive Touchup Paint
www.automotivetouchup.com

AVS on the Web
www.avsontheweb.com

AZ Pro Performance
azproperformance.com

Blueprint Engines
blueprintengines.com

Centerforce Clutch
www.centerforce.com

Classic Industries
www.classicindustries.com

Dakota Digital
www.dakotadigital.com

Dynomax Exhaust
www.dynomax.com

Edelbrock
www.edelbrock.com

Forever Sharp
fssteeringwheels.com

Full Pen Fabrication
www.fullpenfab.com

Hedman Performance Group
www.hedman.com

LMC Truck
www.lmctruck.com

Lokar
www.lokar.com

Mishimoto
www.mishimoto.com

MrTailLight
www.mrtaillight.com

Nitto Tire
www.nittotire.com 

Optima Batteries
www.optimabatteries.com/en-us

Overpower Customs
overpowercustoms.com

Red Line Oil
www.redlineoil.com

RideTech Suspension
www.ridetech.com

TMI Interiors
www.tmiproducts.com

Vintage Air
www.vintageair.com

RideTech Suspension Install 88-98 Chevy OBS CK GMT400 Trucks

Generally, truck trends are unpredictable and cycle quickly through the ranks of the top industry builders and ballers. F-100 bump-sides and pro-touring, patina-paneled C10s are just a few recent examples of popular projects that the average Joe wouldn’t think to produce until they see a fully completed custom gracing the pages of national publications or influential social media channels. These ideas and completed concepts come from the mindset of being unique with the goal of making a statement at massive events like SEMA, LST and Texas Heatwave. With that said, I think it’s safe to say we all see the next major trend hurling down the pipeline like a 6-foot surfer named Bodhi riding a 15-foot wave off Bells Beach during the 50-year storm. (That was a “Point Break” reference if you didn’t catch it. What a great ’90s movie!)

Speaking of the ’90s, if you were a natural born truck junkie finally making it to the legal driving age around those times, you most certainly wanted a Chevy C/K truck since they were literally everywhere. Everyone from utility company employees to school district secretaries used these heavily produced pickups for their day-to-day operations. Even your grandpa’s grocery-getter was most likely an ’89-’98 Chevy. They came in so many different visual styles with factory options galore. Originally designed by Donald Wood in 1983, Chevy was able to move 551,223 of these GMT400 trucks by 1989 alone according to the Standard Catalog, not to mention the popular 454 model released in 1990 that sold 16,953 units over the four years with 13,748 of those units selling in the first year of production alone.


This is the 1995 Chevy C/K that we originally picked up for a mere $2,000. We purchased it from the original owner, it has 150,000 miles on the factory installed engine, cold air conditioning and a handwritten chart that records all of the basic maintenance that has ever been done. The perfect project truck, and we named her Stella for “female star” because we intend to make her famous!

With that heavy of a number, it’s easy to see why we not only saw a massive increase of these trucks in magazines, but also why the custom aftermarket scene is heating up so much right now. These trucks are still pretty easy to come by and the demographic of buyers are slightly older and more well-off than your average new-truck enthusiast. The guys who wanted these trucks in their teens are now older, generally successful and more comfortable than they were at 16 years old. These factors are driving the great custom parts manufacturers to focus on these industry icons to get ahead of the curve.

It’s easy to talk the talk, but it’s far more impactful to walk the walk. So, we put on our Airwalks and jumped into the deep end of desire by picking up a running, driving 1995 Chevy C/K truck from the original owner for a smooth $2,000. Cold A/C and a solid cranking 4.3-liter V-6 gave this truck the appeal, but a full gas tank and a fresh oil change just shows that the previous owner still has love for this 20-plus-year-old family member.

In the next few issues we are going to take you through the process of giving this truck new life on the same old roads it’s been cruising down since its inception, first starting with suspension, brakes and wheels/tires, followed up with a facelift for the ages. The plans don’t stop there, but you’re going to need to stick to the script the see the next steps. If you’re not a subscriber already, I implore you to do so. If this truck doesn’t motivate you to go out and start wrenching on your own project, I’m not sure you picked up the right publication. Now let’s get to the good stuff!


Usually we include the “after” shot toward the end of the story, but we wanted to show you the before and after side by side so you can see the dramatic transition. Now to walk you through how it was done.

Like most of the projects in the past, we turn to Dallas Maynard of Full Pen Fabrication to make the magic happen. Before he got down to the nitty gritty, Dallas removed the bed and pressure cleaned the frame. Twenty-plus years of rust and road grime is better off in the driveway than in your face—am I right?

While he cleaned the chassis, I laid out all the parts. Our suspension of choice is RideTech’s all new wishbone designed coilover suspension that is completely bolt in and professionally engineered by the team at RideTech. We are also installing Pro Performance’s big brake upgrade that is designed specifically for the ’89-’98 GMT400 trucks.


First on the list is to remove the old suspension hardware. Leaf springs are old news and completely obsolete with this kit.


Using the supplied paper template, Dallas marked the C-notch location and used a cut-off wheel to slice the frame. Before the new structured brackets can go on, he took the time to coat the frame to avoid any more future rusting.


A few C-clamps hold the new RideTech notch bracket in place while he drills out all the holes and bolts in the new hardware. Everything we needed was supplied in the kit, saving us trips to the hardware store. The notches are reinforced in multiple planes to maintain structural integrity while improving axle to frame clearance.

Moving on, Dallas installed the wishbone cradle between the frame rails. The cradle accepts a “wishbone” upper link that eliminates the need for a Panhard bar or other lateral locating device.

Next in the list is the lower axle mounts for the coilovers. Compared to the platform’s original leaf springs, RideTech’s wishbone system dramatically improves ride quality and handling and accepts either coilovers or Shockwave for air suspension.


All RideTech coilovers utilize a single-tube cartridge. Known as “monotube,” the design features a significantly larger piston area, which in turn provides more responsive damping than a twin tube shock. A single adjustment knob controls the rebound curve, allowing you to fine tune your truck’s shocks to suit your driving style and specs. Also, we get our first look at this killer brake upgrade from AZ Pro Performance.

The final piece is the lower links that feature RideTech’s patented R-joints. The advanced rod end design offers long service life with zero binding and no noise.

After a quick coat of paint, we can step back to appreciate this amazing system setup. We can’t wait to drive it!

Before the bed could go back on, Dallas had to make a quick cut to the brace under the bed. This gave us that little bit of extra clearance we needed without cutting the actual bed floor.

The front of this truck is next on the list. To make things easy, we simply unbolted the upper and lower control arms, the factory sway bay and steering linkage. Slide it out as one massive unit and ask a friend to help you toss it in the dumpster.


With an empty wheel well, we are ready to bolt in the new upper and lower control arms. All the factory brackets are reused and the coilovers mount in the stock shock location. Really well designed!

Before we can install the new McGaughy’s spindle, we need to make some minor modifications. A simple slice with the cutoff wheel and a drill/tap is all that’s needed. It’s time consuming but definitely not something you can’t do at home. Just use the right tools and be patient.

With the spindles installed, Dallas can now focus his efforts on these massive disc brakes from AZ Pro Performance.

Key features of these brakes:

  • No need to buy new spindles, just modify current spindles
  • Uses new calipers, not rebuilt
  • Precise machined hub
  • Laser cut mounting bracket
  • Fits 19-inch wheels and larger
  • Will work with most aftermarket wheels, since caliper offset is kept to a minimum


Our choice for wheels and tires are 22-inch American Racing Novas that are staggered front and back. The tires are none other than Toyo Tires ST III. The Proxes ST III is the perfect balance of dynamic looks and sport-oriented performance for trucks and SUVs. With a wider tread and a silica-based tread compound, the Proxes ST III stops up to 6 feet shorter in wet conditions while delivering superb handling, excellent all-season performance, consistent wear and a smooth, quiet ride. These tires are also backed by a 40,000-mile warranty.

Our first look at Stella on the ground gives us the chills! Although before we take a test drive, that front end has to be upgraded. We can’t roll with that work truck grille with this amazing stance. The final stance has not been dialed in yet due to some additional weight that will be soon added to the front. More on that later.

Originally founded in 1976, Classic Industries made its name selling small, hard-to-find items for the restoration of early Camaro models from a small facility in Palm Springs, California. The Classic Industries headquarters now features a retail showroom, corporate offices, parts production, complete call center, shipping center and multiple warehouses for the largest inventory of parts and accessories in the restoration and performance industry.
This reproduction black plastic grille is designed for models with dual composite headlamps and made to replace the original. However, it features semi-flush Bowtie emblem mounting pad for a smooth, clean look.

This conversion is as simple as unbolting the original grill and headlights and installing the new. There is an additional step required and we turned to Mr. Tail Light for the parts. The company offers the new headlight plugs and all the mounting hardware you need to take the guesswork out of the process. We can’t convey how simple this process is when you work with great companies like these.