 BOB RYDER
.
May 23, 2022
.
All Feature Vehicles
BOB RYDER
.
May 23, 2022
.
All Feature Vehicles

TMI Products is a family-owned company founded by the four Tuccinardi brothers in 1982. They started out making Volkswagen door panels in their family garage in Torrance, California, and from there the brothers moved to a retail store and manufacturing facility in Hawthorne, California. The business grew, and in 1992 they agreed that it was time to move to a new 49,000-square foot manufacturing facility in Corona, California. Expanding their classic interior line and pursuing the OEM market, TMI moved into their present facility, a massive 139,000-square foot location. Today, TMI manufactures high-quality interior automotive seating, interior consoles, floor coverings, door panels, convertible top assemblies, headliners sun visors and integrated electronic systems.
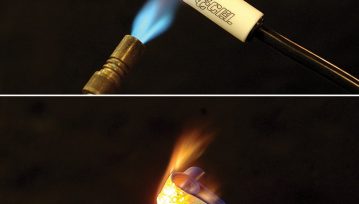
Last year, Andy Radi of Radi’s Custom Upholstery approached TMI about getting involved with the Labor Day Cruise giveaway vehicle, a ’67 Chevelle. The last segment when building a custom vehicle is always the interior, so Andy located the front bench seat and the back seat from a donor Chevelle. They were stripped down, and the frames were sent out to Olympic Powder Coating in Santa Ana, California, where they receive a glossy black powder coat. Then the coated frames were delivered to TMI where they received the company’s signature foam and leather upholstery. We followed along as TMI installer Emmanuel Gamino showed us how it’s done.


TMI Products
1493 Bentley Dr.
Corona, CA 92879
951.272.1996
888.460.0640
Radi’s Custom Upholstery
10652 Stanford Ave.
Garden Grove, CA 92840
714.534.2915
Olympic Powder Coating
2737 S. Garnsey St.
Santa Ana, CA 92707
714.979.2233
All Feature Vehicles
New and interesting automotive products to pump your enthusiasm Aerospace Components Pro Terminator Shifter Aerospace Components has created this stylish and functional shifter for standard… Continue reading
MAXIMUM DRIVE STAFF . June 02, 2022

All Feature Vehicles
The 28th Street Metro-Cruise In August my wife Carol and I found us in the Grand Rapids, Michigan area for the 11th annual 28th Street… Continue reading
PETE CHAPOURIS . October 27, 2022

All Feature Vehicles
Dan Parker lost his sight in a drag racing accident in 2012. His Pro Mod Corvette hit the wall at 175 MPH while doing performance… Continue reading
Dan Parker and Michael Eckerson . January 18, 2023
All Feature Vehicles
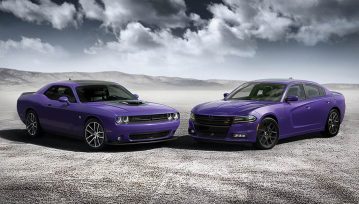
The Return of Plum Crazy When it was released in 1970, the Dodge color pallet was one of the wildest and most desirable of the… Continue reading
Drive Staff . July 19, 2022

All Feature Vehicles
Replace, Restore, Build your Project with these amazing products National Parts Depot NPD is now a distributor for Real Deal Steel 1967-69 Camaro and Firebird… Continue reading
Drive Staff . December 15, 2022
All Feature Vehicles
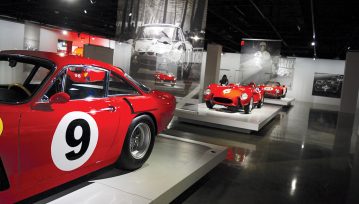
Surrounded by all of downtown Los Angeles, the Petersen Automotive Museum stands out in its surroundings. A sculpted and modern architectural form wrapped in undulating… Continue reading
MICHAEL ECKERSON . January 26, 2023


Goodguys 35th Speedway Motors Heartland Nationals Presented By FiTech Fuel Injection
Iowa State Fairgrounds 3000 East Grand Avenue, Des Moines, IA 50317
Goodguys 28th Summit Racing Nationals Presented By Grundy Insurance
Ohio Expo Center 717 East 17th Avenue, Columbus, OH 43211
Stray Angels Show & Shine
Stray Angels Show & Shine at Melrose Vineyards 885 Melqua Rd. Roseburg OR. 97471
43rd Annual Stray Angels Show & Shine
Melrose Vineyards, Roseburg, Oregon
Firecracker Car Show
Pioneer Park, Ferndale, WA
We use cookies to enhance your browsing experience, serve personalized ads or content, and analyze our traffic. By clicking "Accept All", you consent to our use of cookies. Visit our Cookie Policy for more info.


 Please wait...
Share Link