Chris Hamilton . May 18, 2023 . All Feature Vehicles
Share Link
Save ArticleLogin to save it
A Street Truck Aimed to Inspire
The classic movie, “A Streetcar Named Desire,” was recently selected for preservation in the United States National Film Registry for being “culturally, historically or aesthetically significant.” Lately, it seems that ’88-’98 Chevy trucks are quickly being known to have the same qualities in the truck enthusiast world. GMT400 trucks were on every street corner and car show in the ’90s. With massive production numbers and excellent engineering, these Chevy trucks are still pretty easy to come by and available in many different forms, including shortbed, longbed, quad cab and even two different SUV platforms. Oftentimes, the guy who’s buying and restoring these trucks wanted one in his teen years, and now he’s older, generally successful and more financially stable than when he was 16 years old. These factors also drive custom parts manufacturers to focus on making products for the industry icons and get ahead of the popularity curve.
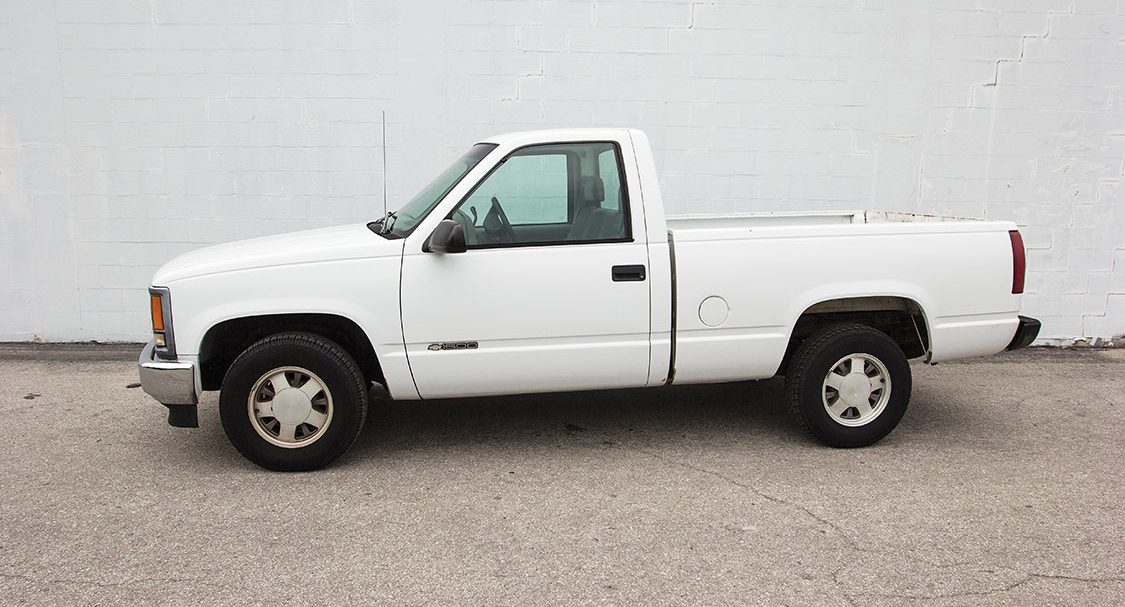
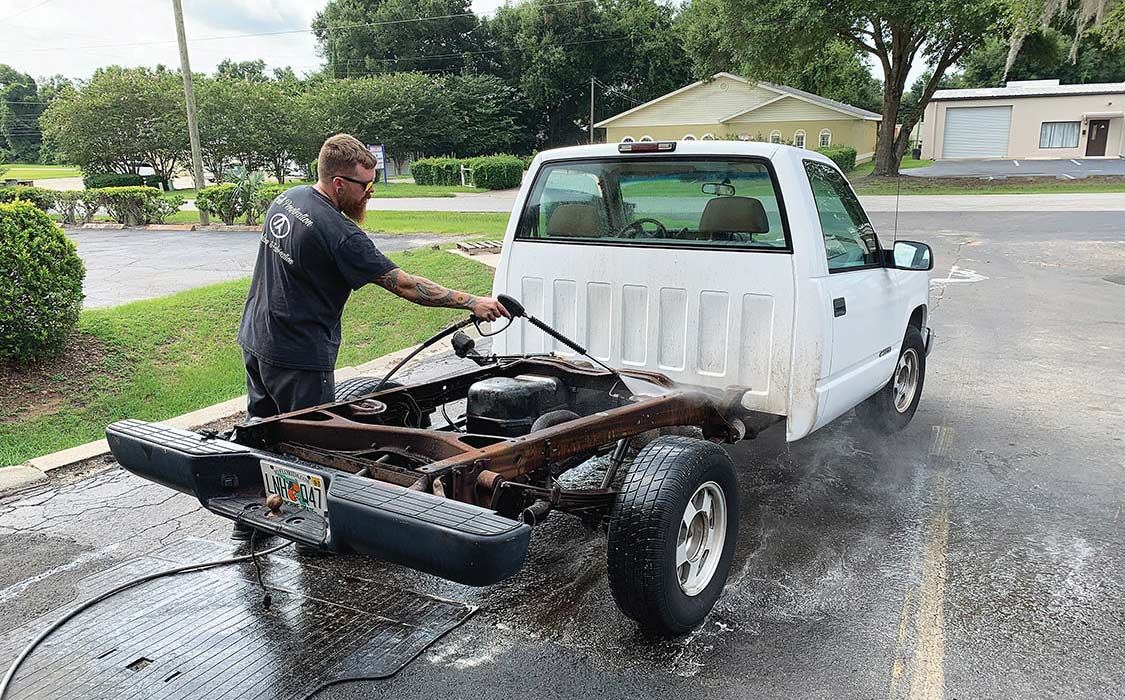
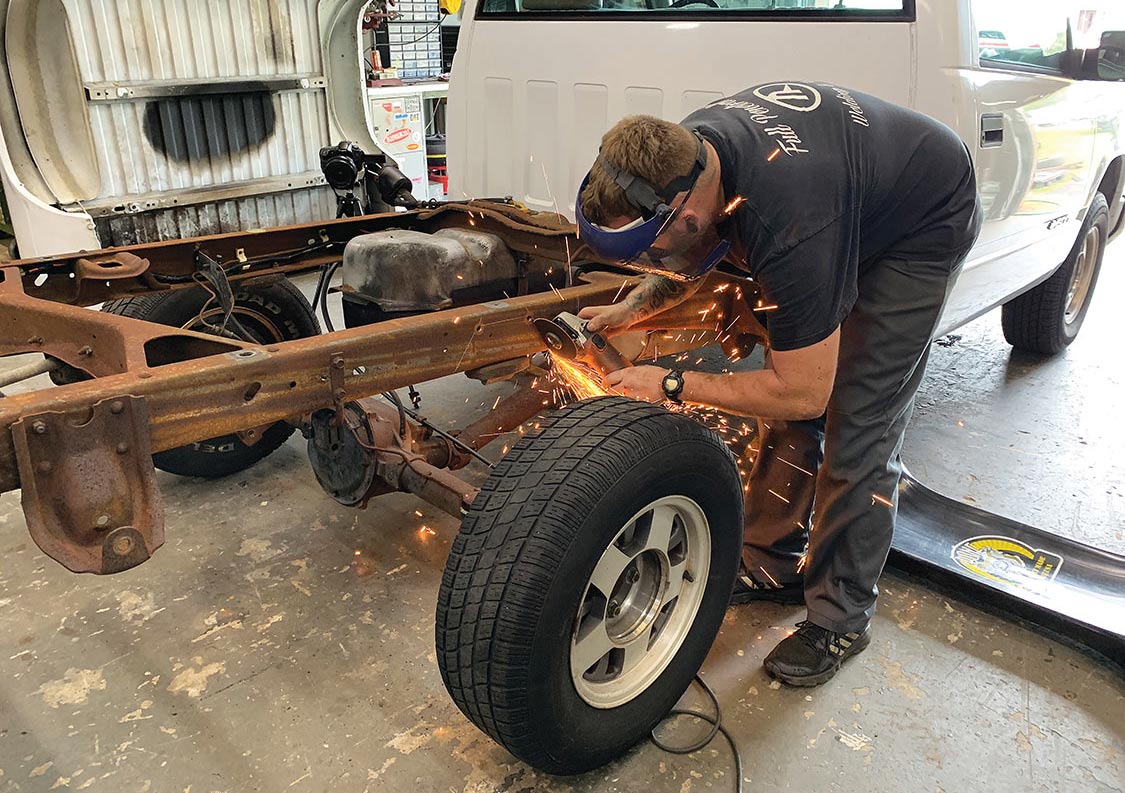
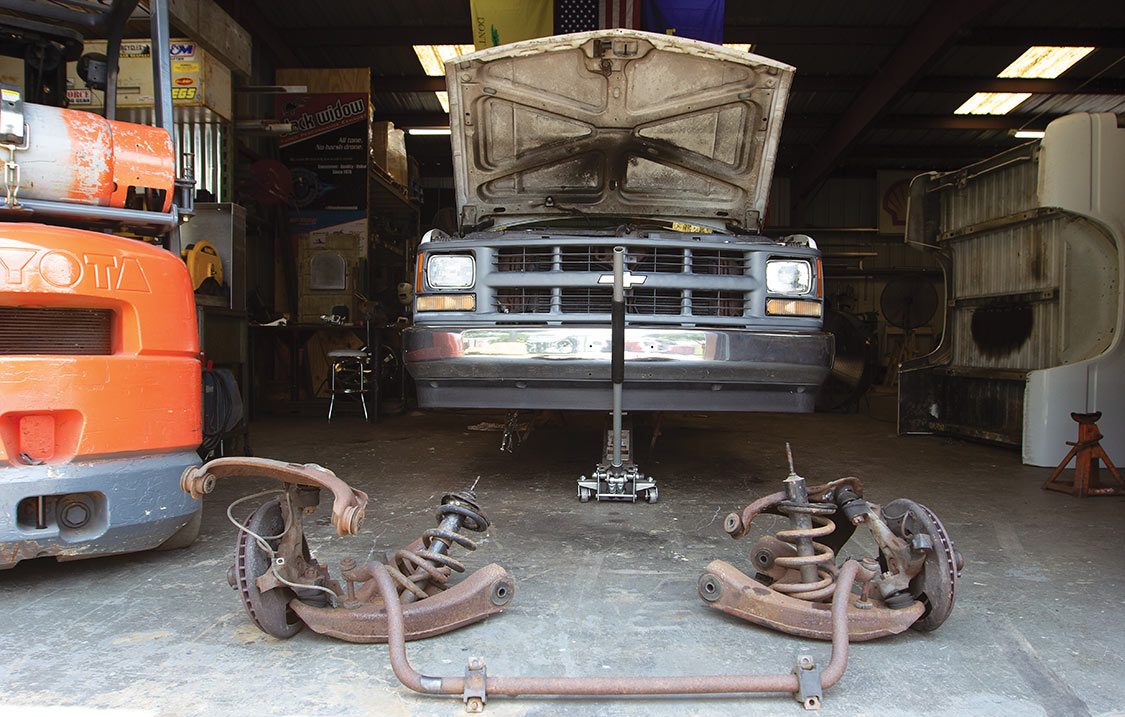
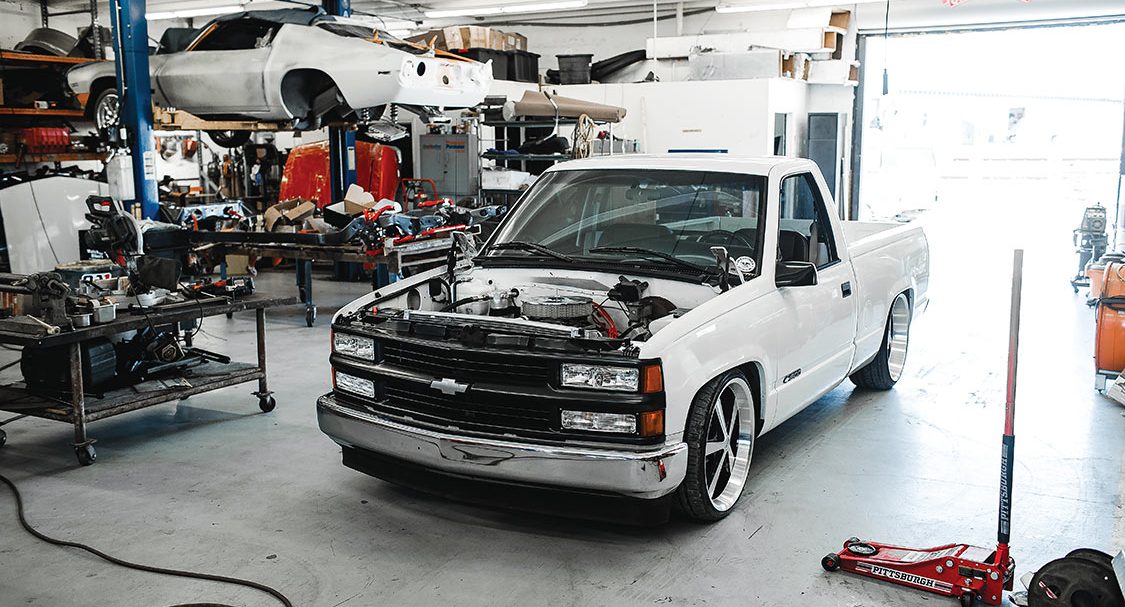
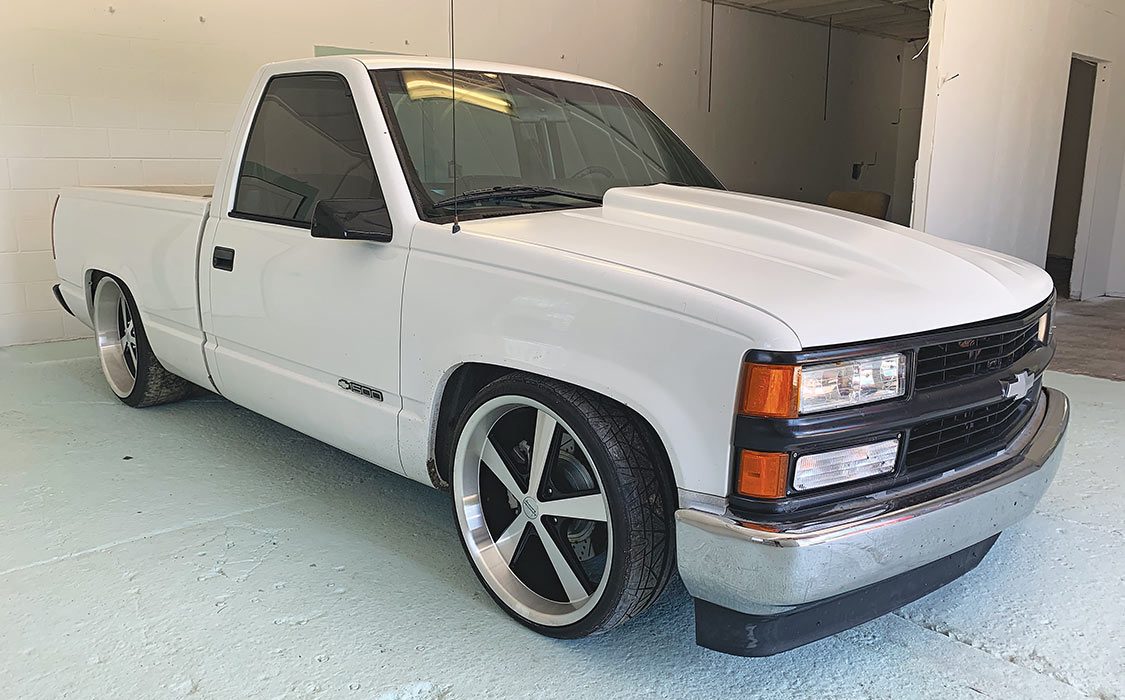
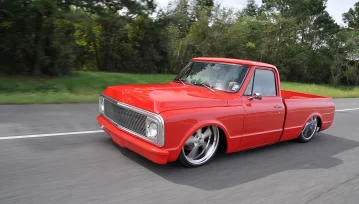
1. This is the ’95 Chevy C/K that we originally picked up for a mere $2,000. We purchased it from the original owner. It has 150,000 miles on the factory-installed engine, cold air conditioning and a handwritten chart that records all of the basic maintenance that has ever been done. She’s the perfect project truck, and we named her Stella for “female star” because we intend to make her famous!2. Before we got down to the nitty gritty, Dallas Maynard from Full Pen Fabrication removed the bed and pressure cleaned the frame. Twenty-plus years of rust and road grime is better off in the driveway than in your face—am I right?
It’s easy to talk the talk and say you’re a fan of this body style, but it’s far more impactful to walk the walk and own one yourself. So, we took the challenge and jumped into the deep end of desire by picking up a running, driving ’95 Chevy C/K truck from the original owner for a smooth $2,000. Cold A/C and a solid cranking 4.3-liter V-6 gave this truck the appeal, but the full gas tank and a fresh oil change showed us that the previous owner still had love for this 20-plus-year-old family member.
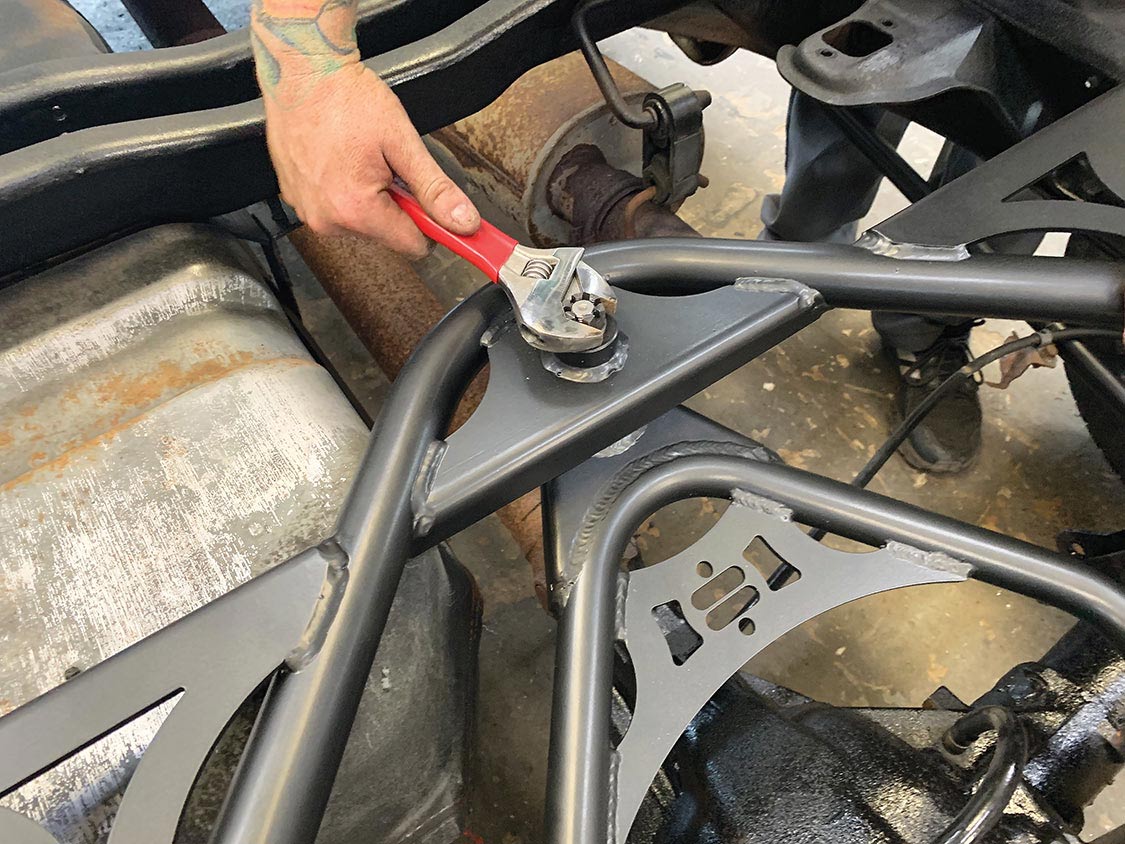
3a. To get the truck as low as we want it, we need to make some clearance in the factory frame rail. If we don’t, the axle will hit the frame every time we hit a bump, and the sound it makes is something we don’t want to hear! RideTech supplied this C-notch with our new suspension kit so the frame was traced, drilled and sliced before our new C-notch was bolted in. This bolt-on C-notch reinforces the OEM frame rails and features integrated suspension mounts.3b. To get the truck as low as we want it, we need to make some clearance in the factory frame rail. If we don’t, the axle will hit the frame every time we hit a bump, and the sound it makes is something we don’t want to hear! RideTech supplied this C-notch with our new suspension kit so the frame was traced, drilled and sliced before our new C-notch was bolted in. This bolt-on C-notch reinforces the OEM frame rails and features integrated suspension mounts.3c. To get the truck as low as we want it, we need to make some clearance in the factory frame rail. If we don’t, the axle will hit the frame every time we hit a bump, and the sound it makes is something we don’t want to hear! RideTech supplied this C-notch with our new suspension kit so the frame was traced, drilled and sliced before our new C-notch was bolted in. This bolt-on C-notch reinforces the OEM frame rails and features integrated suspension mounts.
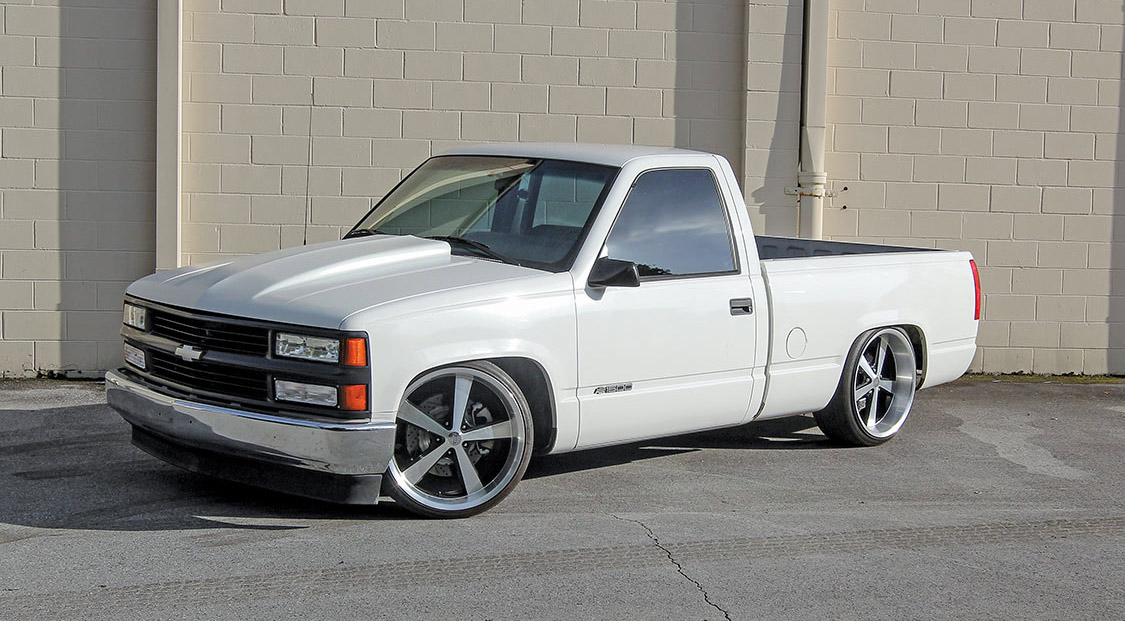
To quickly explain the project’s name: “Stella” is a Latin term meaning “star.” The name popped in our heads after we ordered our 22-inch American Racing Nova wheels. The word “Nova” is a female name of Latin origin that has a definition of both “newness” and “of great energy.” It’s also an astronomical term for a star that suddenly increases in brightness, just like this truck’s future. (Plus, Stella was a pretty stellar character in “A Streetcar Named Desire.”) So, with all that in mind, the name Stella just fits, don’t you think?
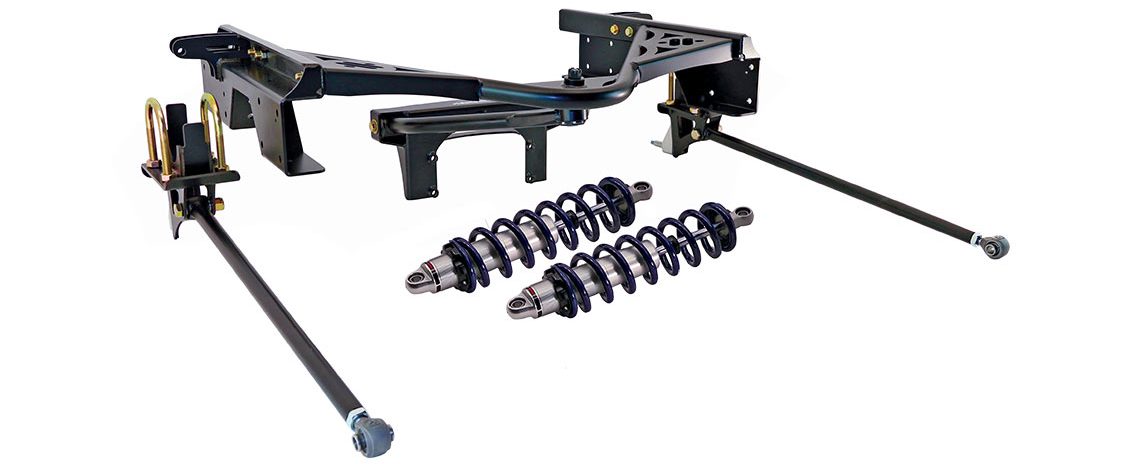
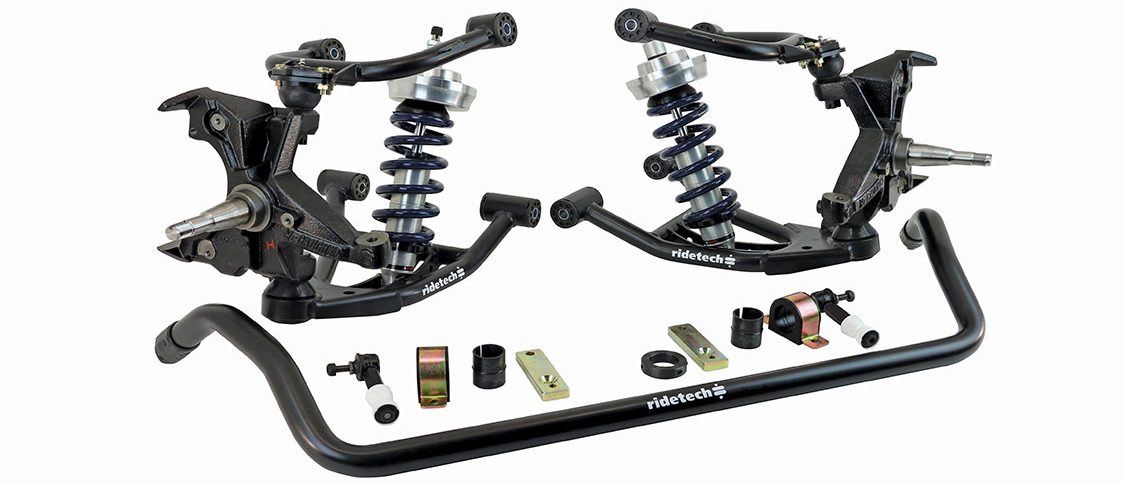
4a. This bolt-on wishbone system greatly improves traction, handling and ride quality while offering a 4- to 6-inch drop in height. Installation does not require any welding or major modifications to the bed floor. It includes patent-pending R-joint rod ends to eliminate binding and noise. The HQ Series coilovers are direct bolt-on and allow for easy adjustment.4b. This bolt-on wishbone system greatly improves traction, handling and ride quality while offering a 4- to 6-inch drop in height. Installation does not require any welding or major modifications to the bed floor. It includes patent-pending R-joint rod ends to eliminate binding and noise. The HQ Series coilovers are direct bolt-on and allow for easy adjustment.4c. This bolt-on wishbone system greatly improves traction, handling and ride quality while offering a 4- to 6-inch drop in height. Installation does not require any welding or major modifications to the bed floor. It includes patent-pending R-joint rod ends to eliminate binding and noise. The HQ Series coilovers are direct bolt-on and allow for easy adjustment.4d. This bolt-on wishbone system greatly improves traction, handling and ride quality while offering a 4- to 6-inch drop in height. Installation does not require any welding or major modifications to the bed floor. It includes patent-pending R-joint rod ends to eliminate binding and noise. The HQ Series coilovers are direct bolt-on and allow for easy adjustment.
Over the next few pages, we’re going to take you through the process of giving this truck new life on the same old roads it’s been cruising down since its inception, first starting with a new suspension, upgraded disc brakes and a new set of wheels and tires. That’s only the beginning, but you have to follow along to see the rest. If this truck doesn’t motivate you to go out and start wrenching on your own OBS project, I’m not sure you picked up the right publication. Now let’s get to the good stuff!
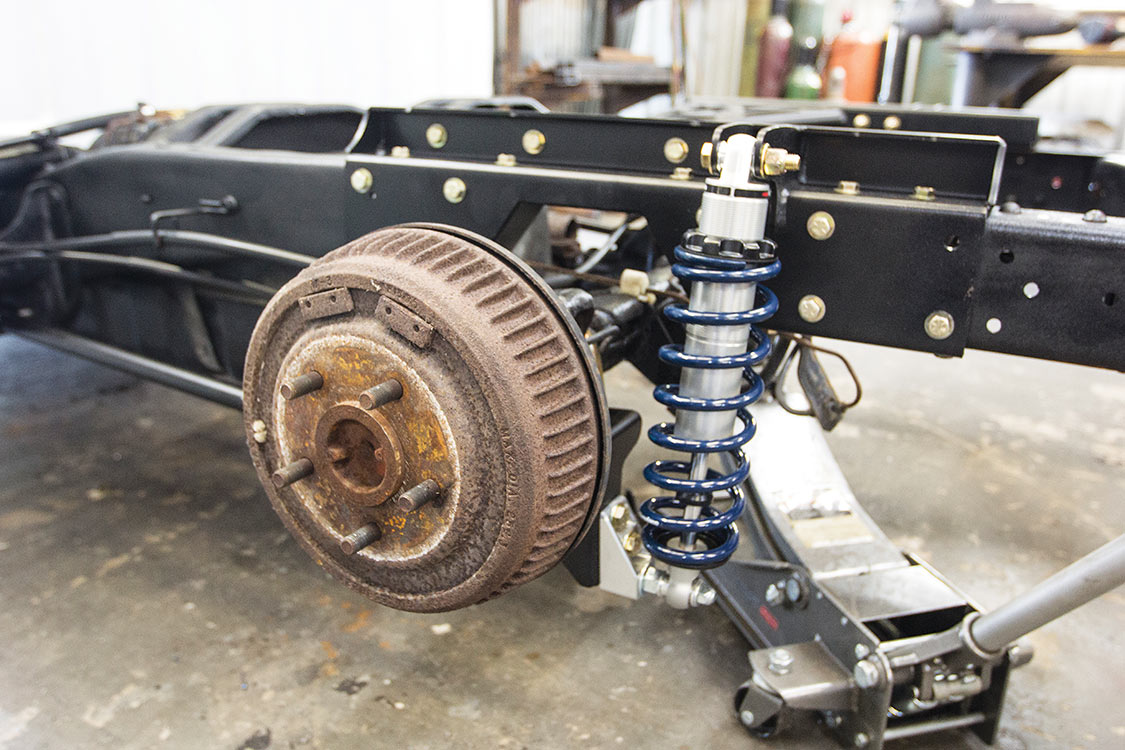
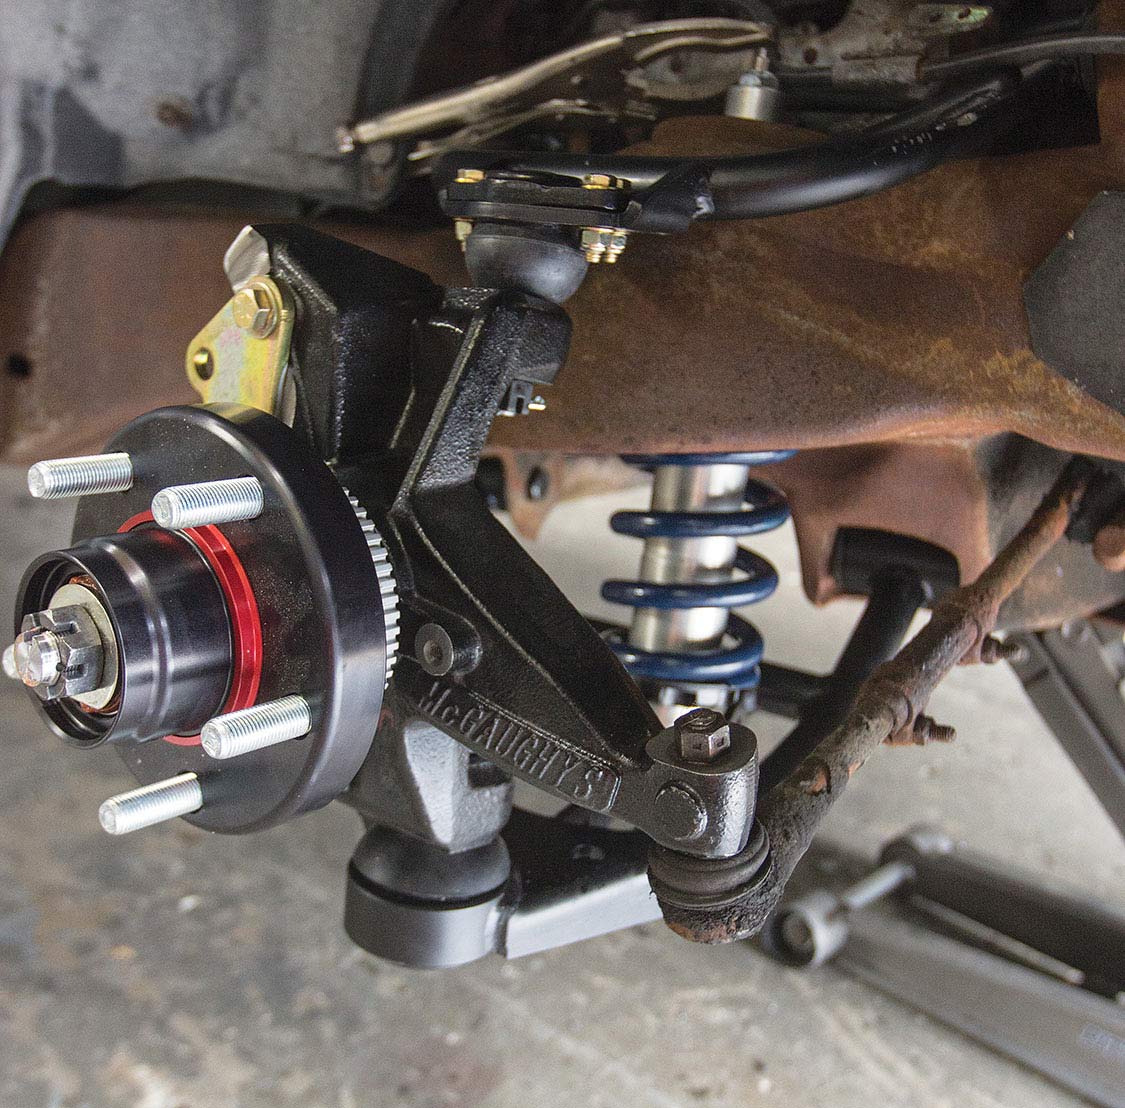
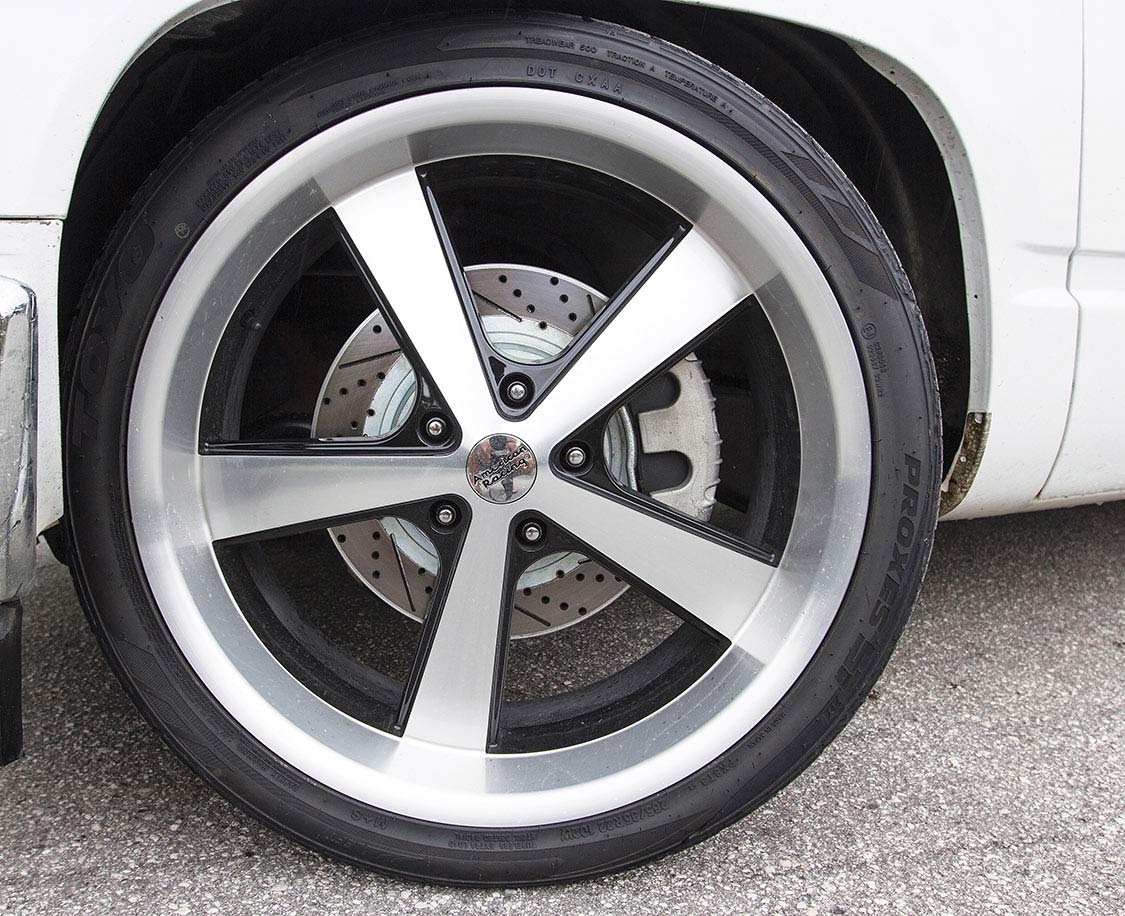
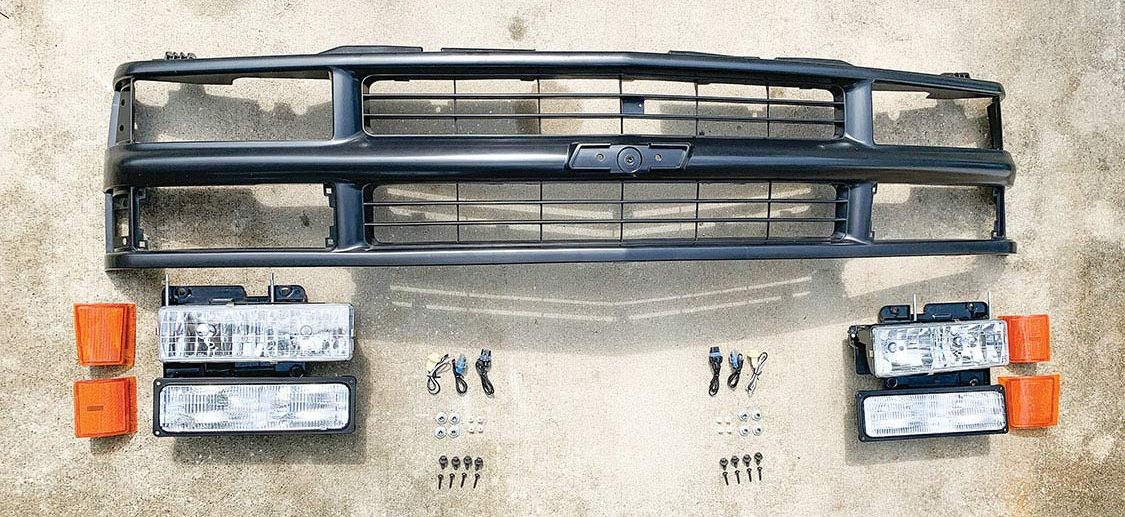
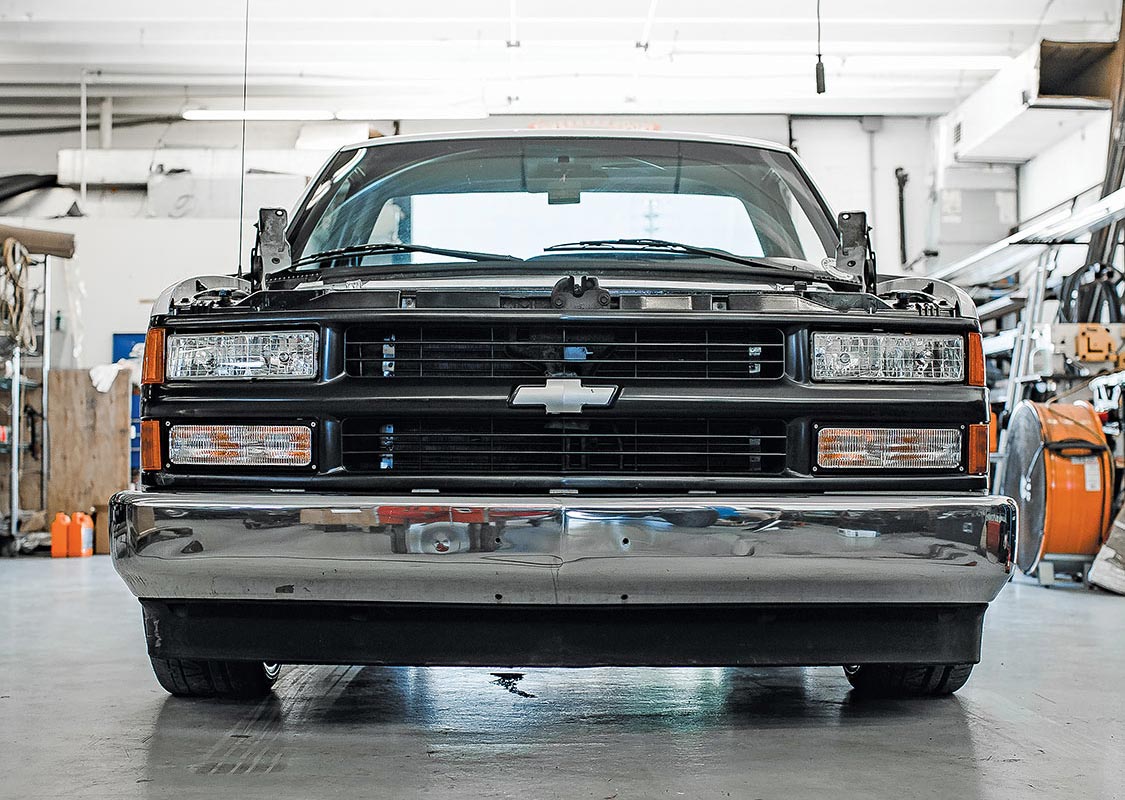
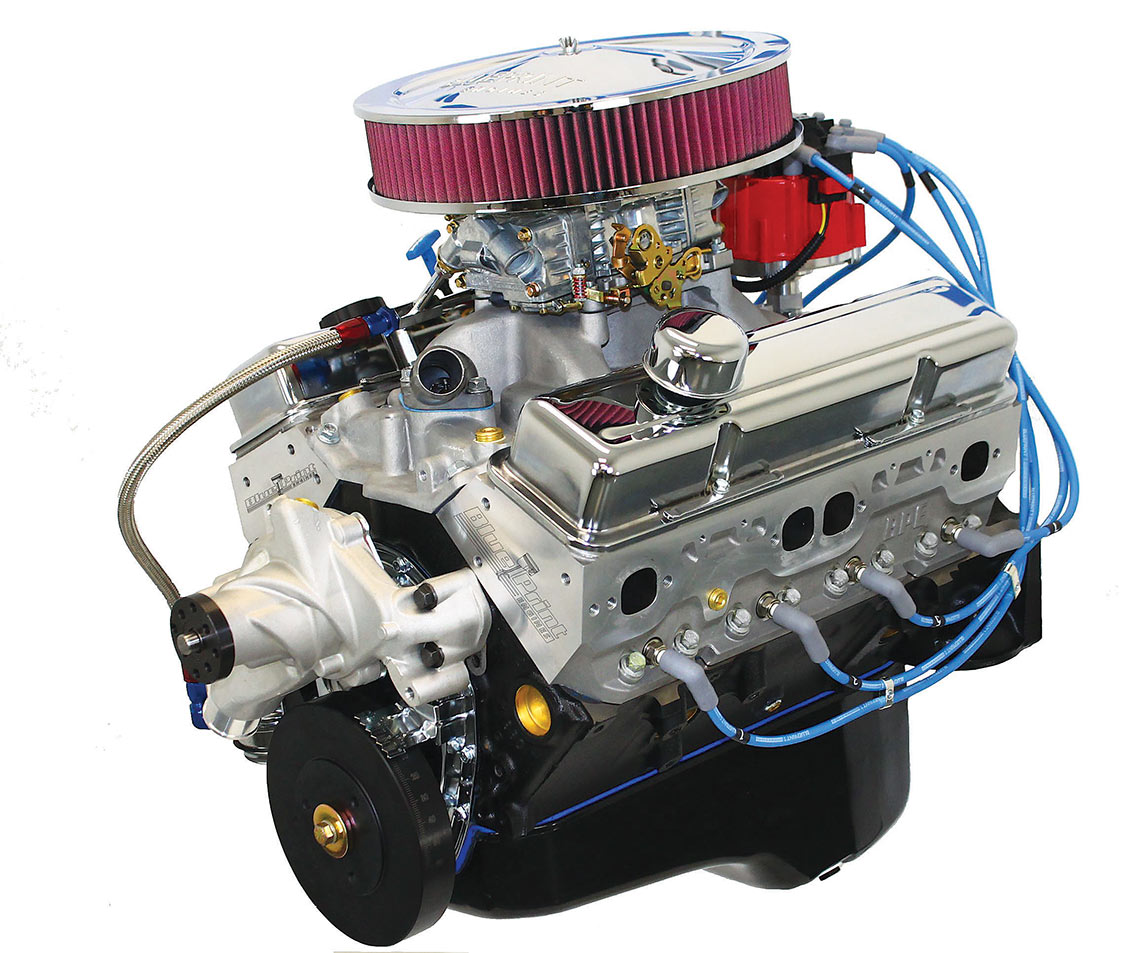
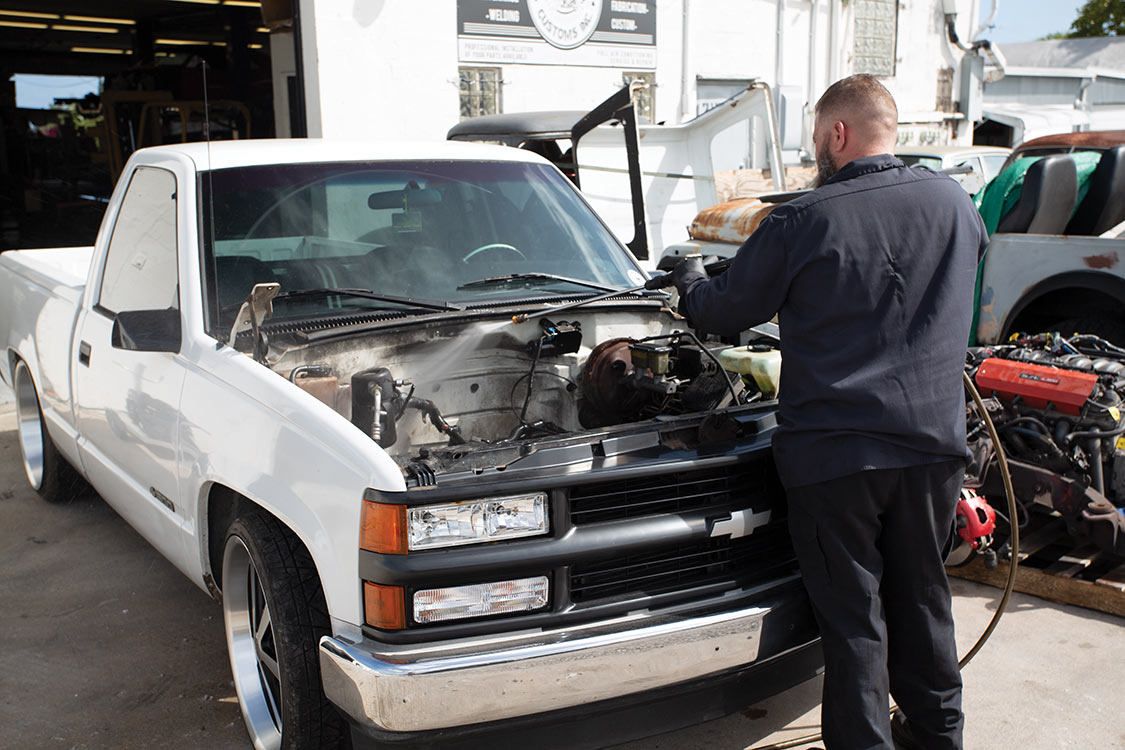
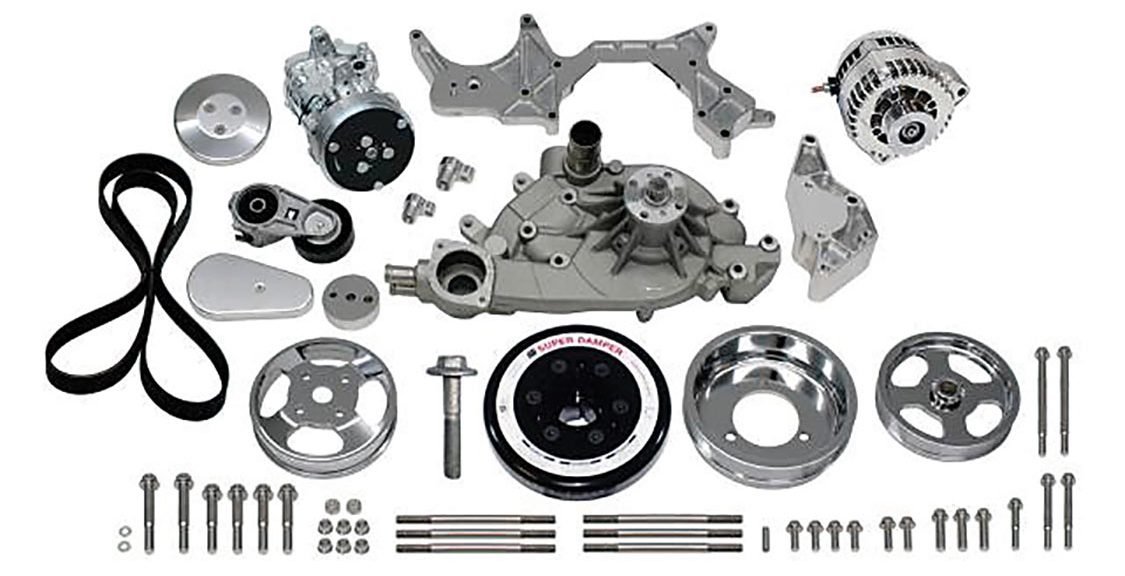
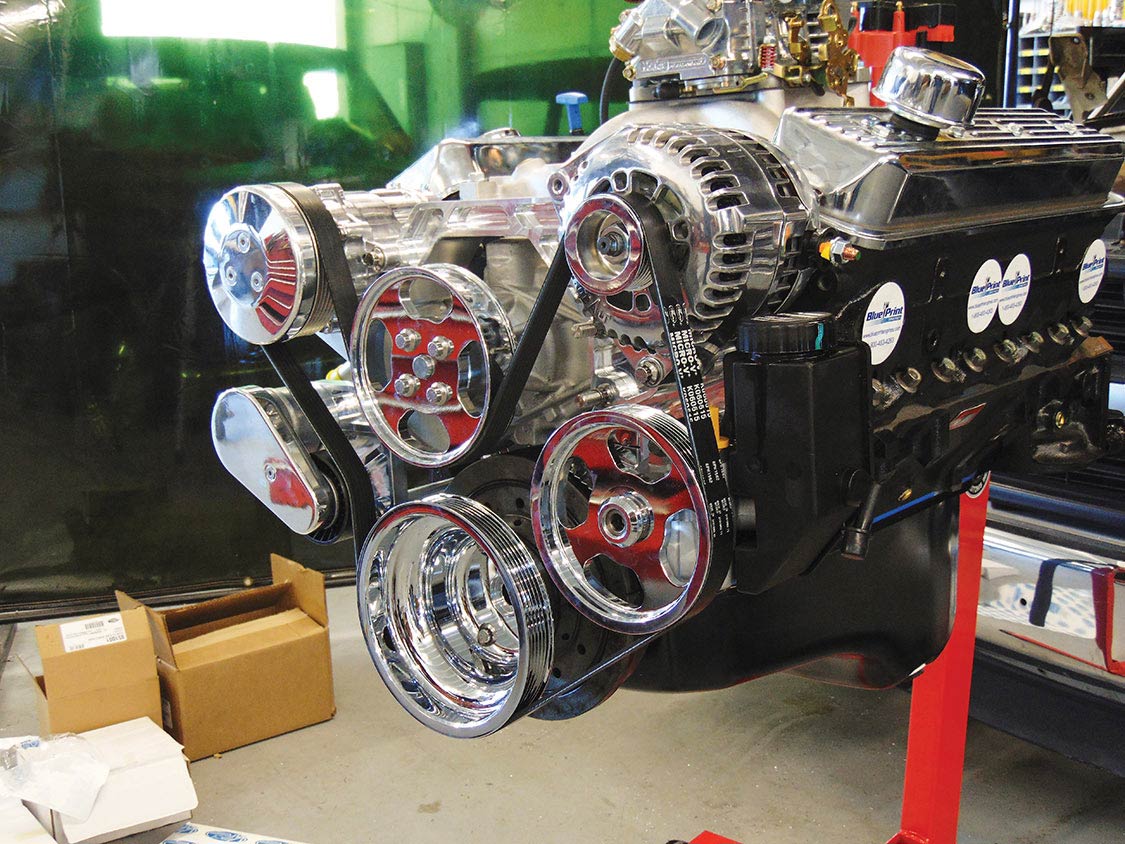
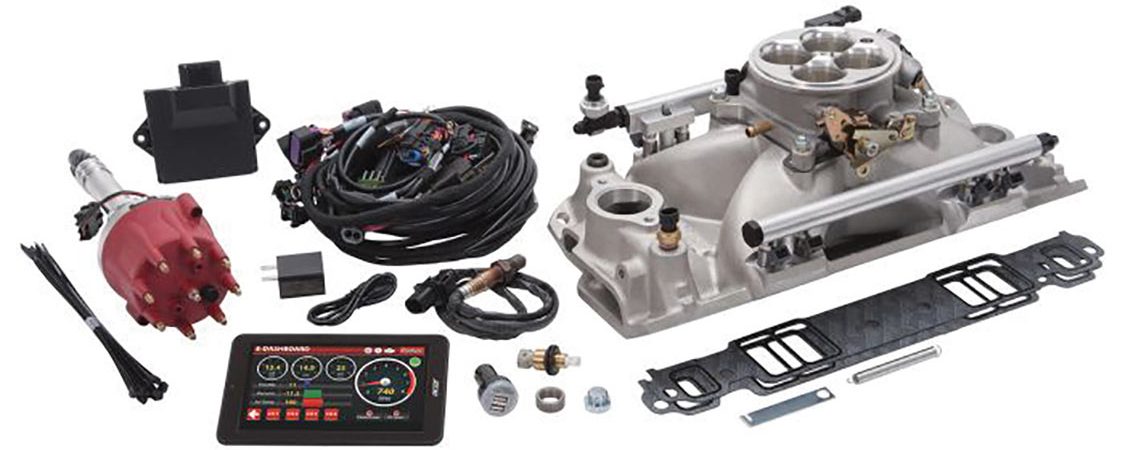
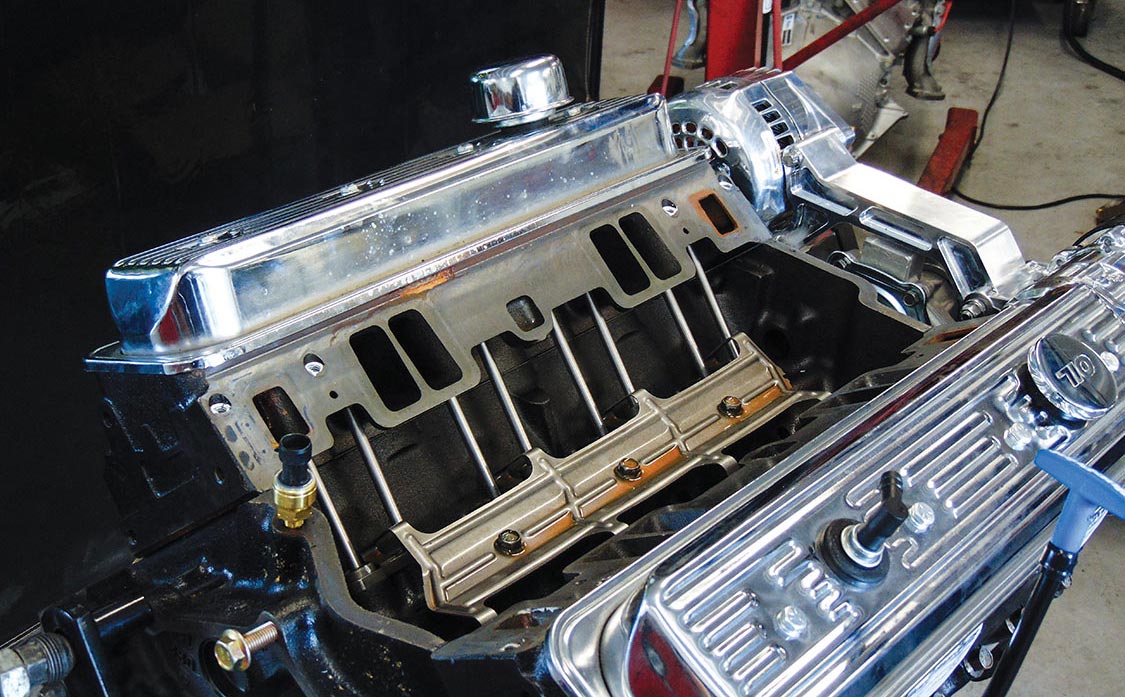
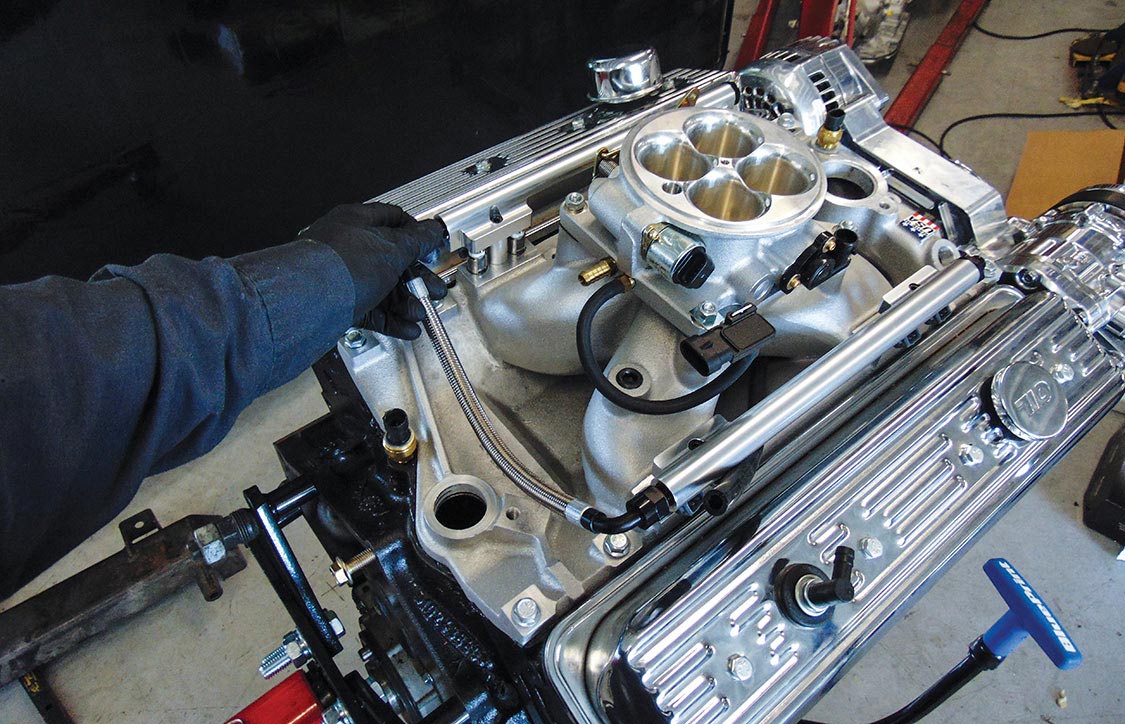
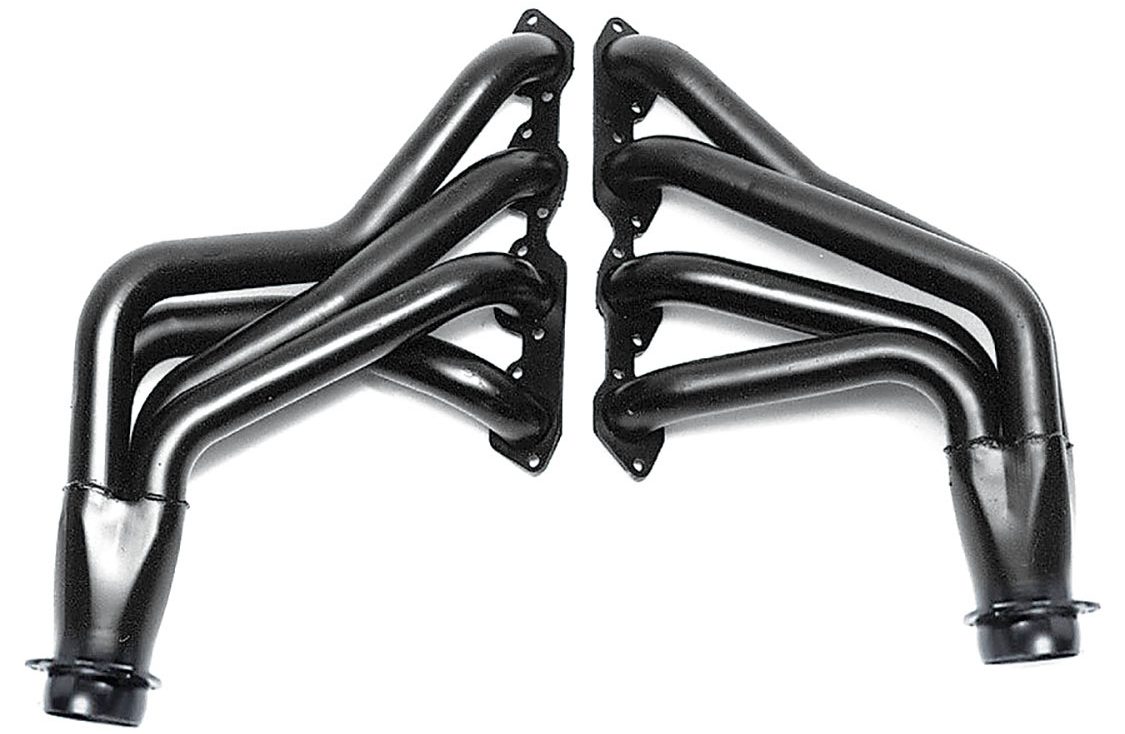
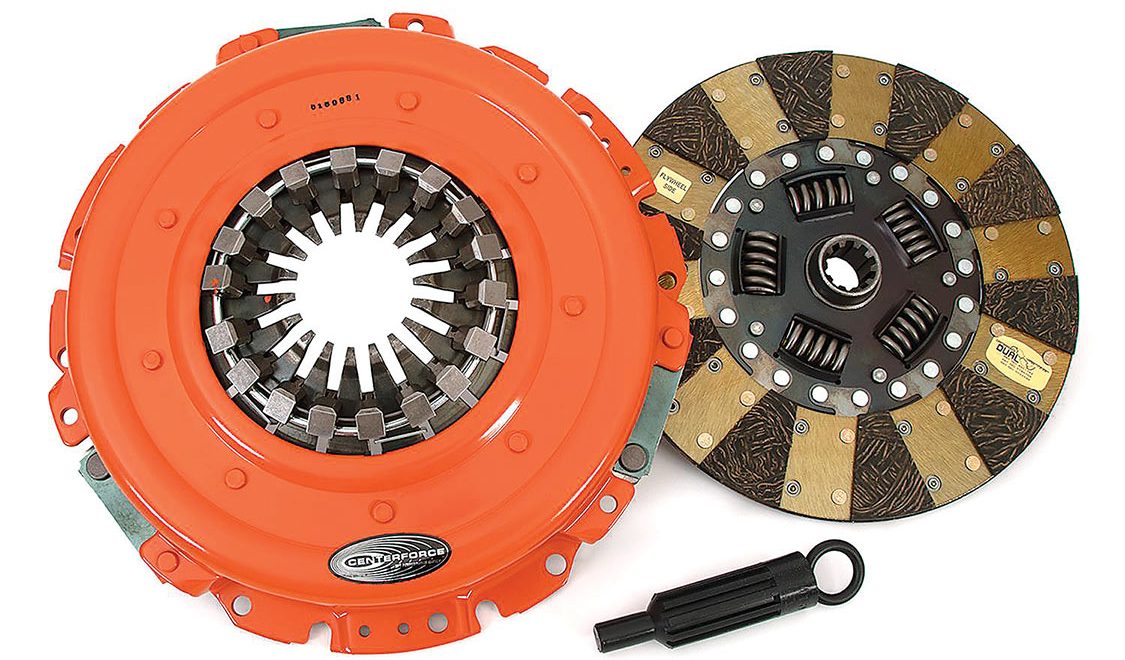
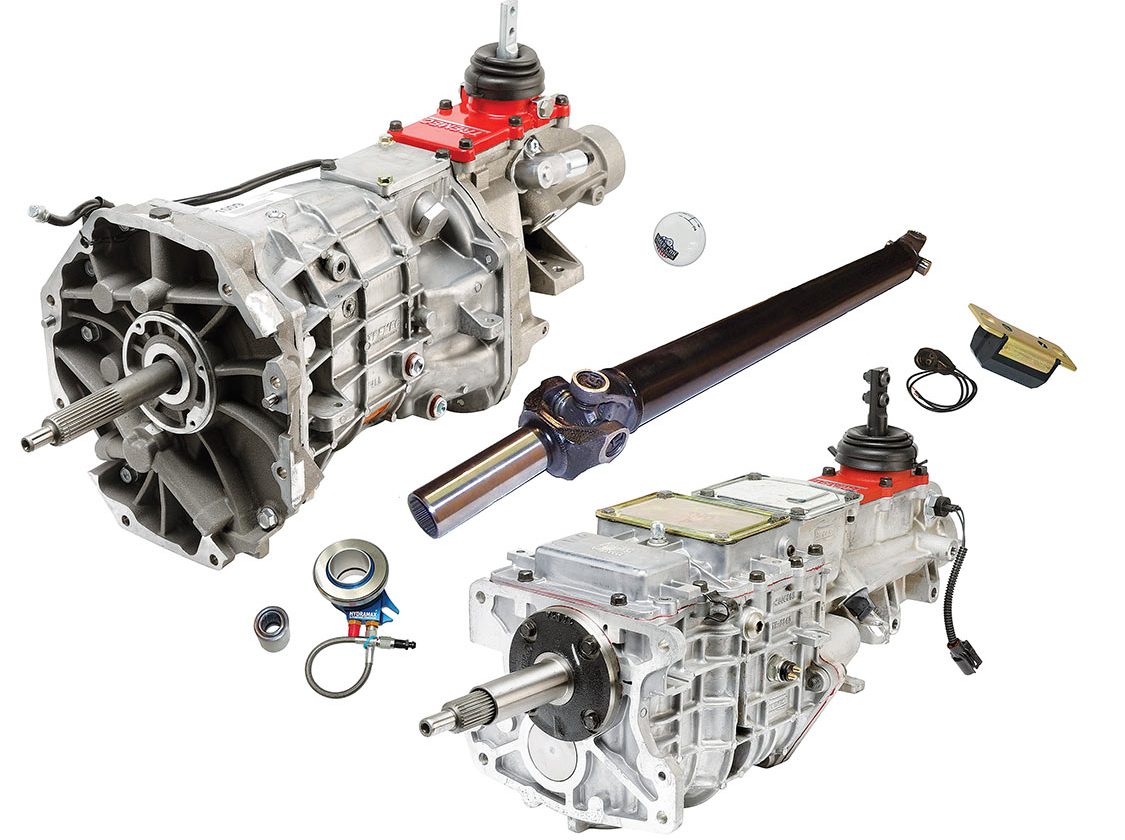
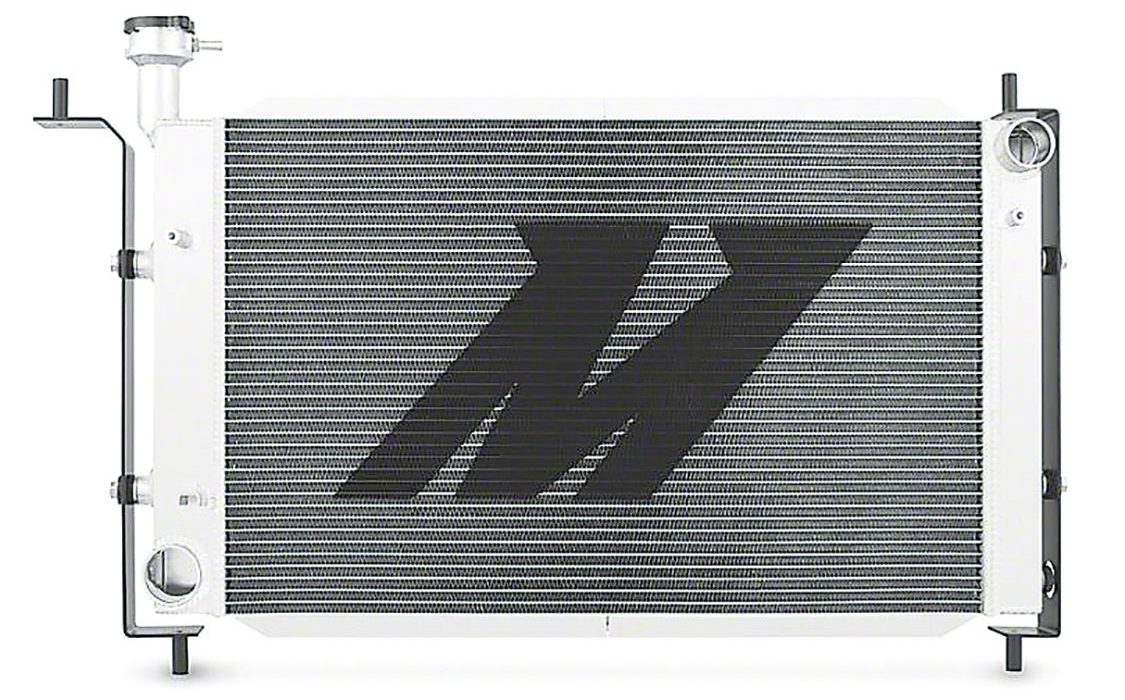
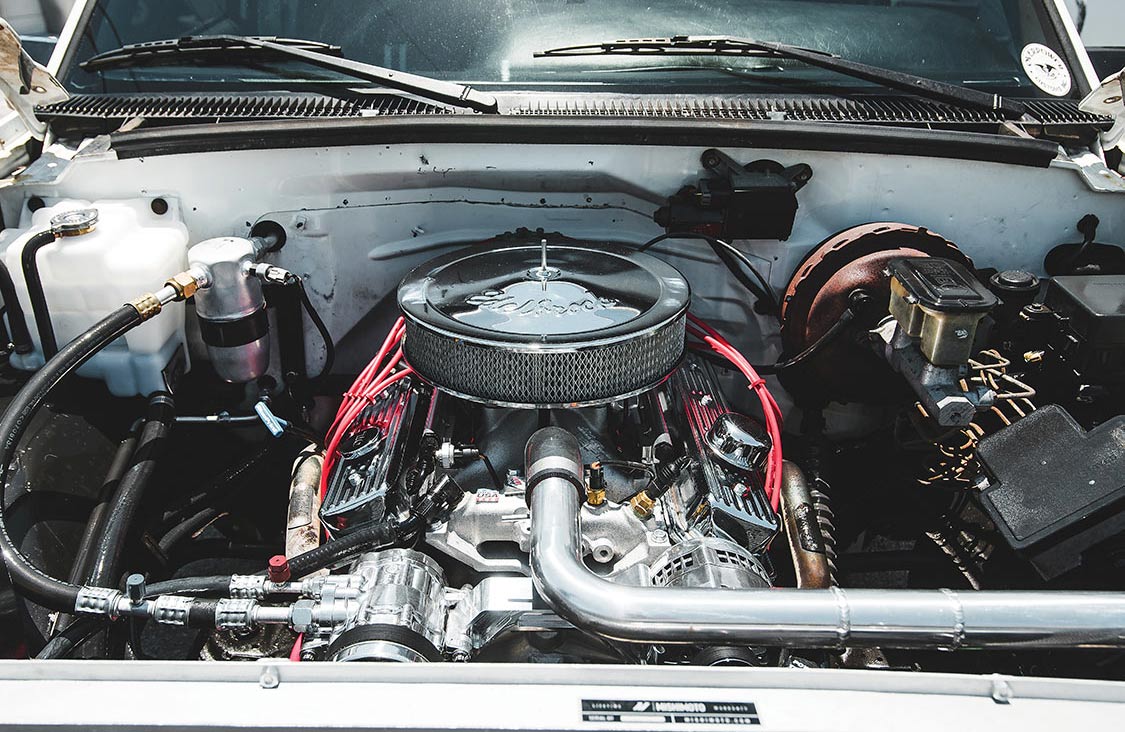
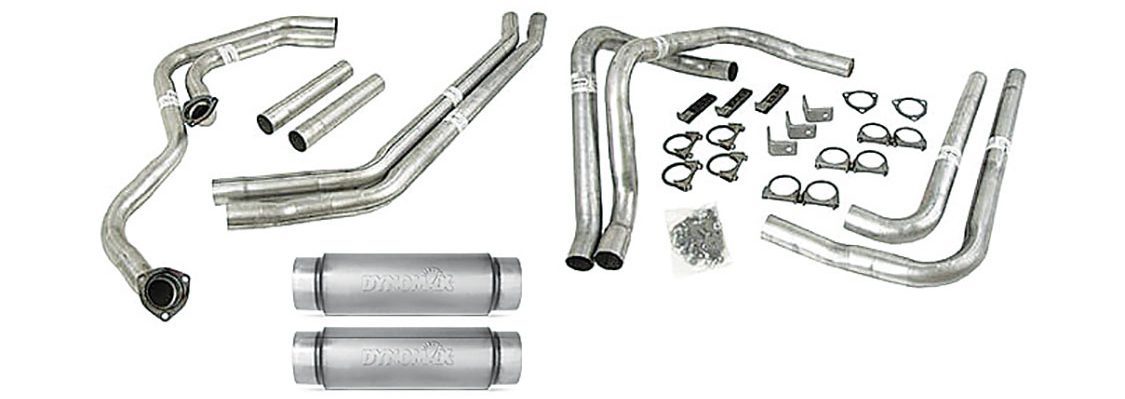
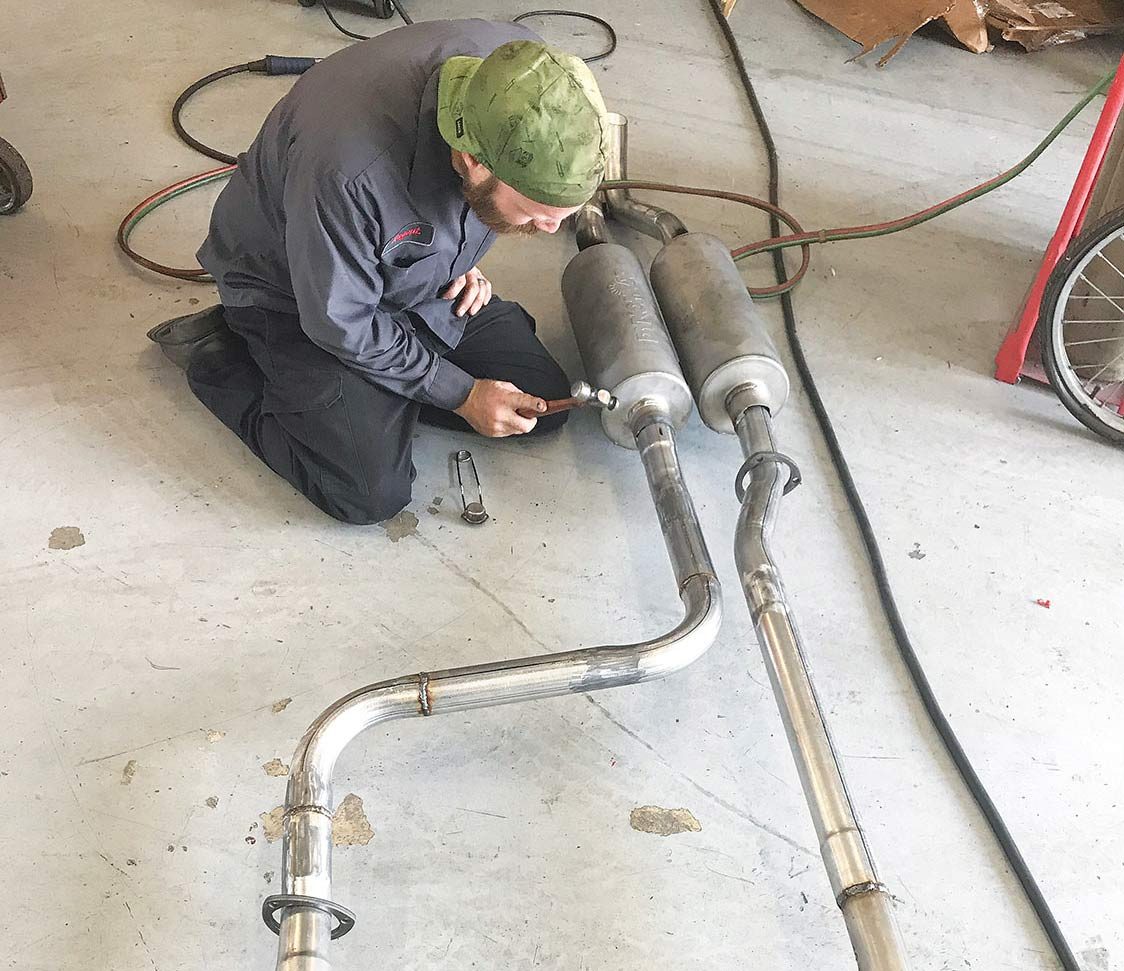
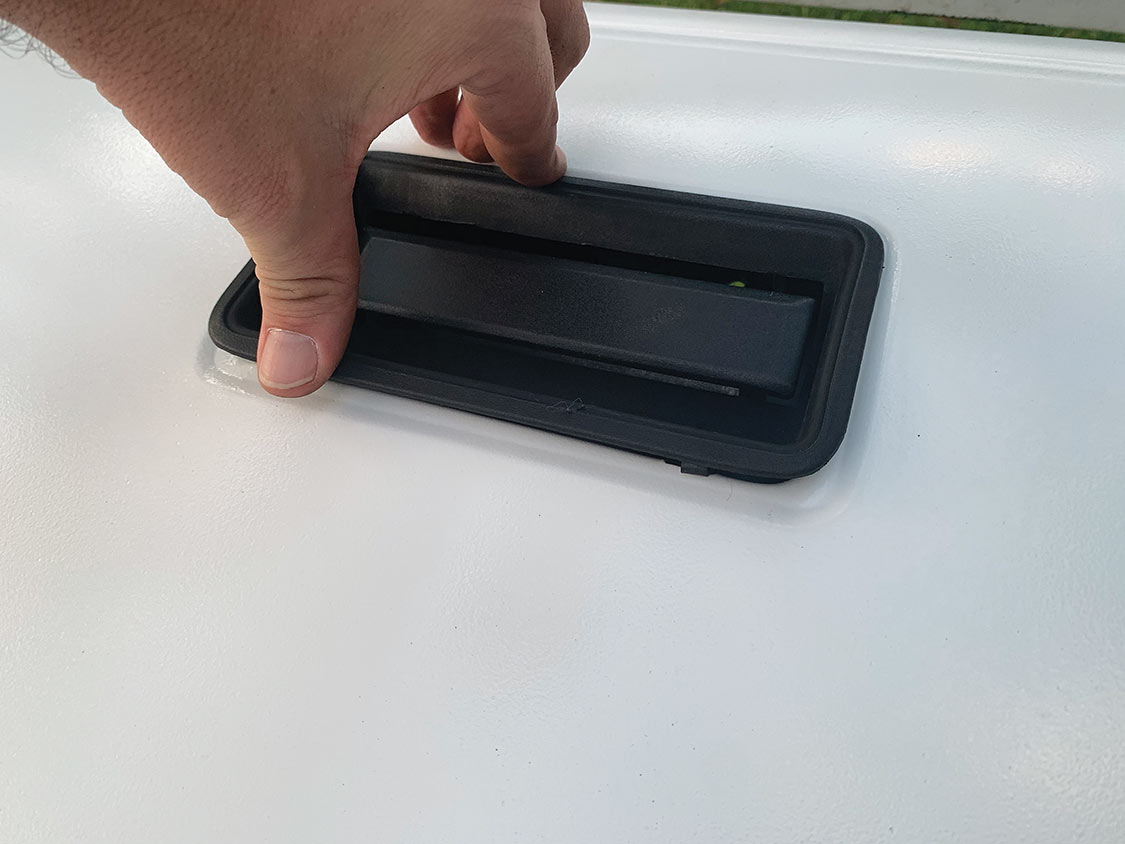
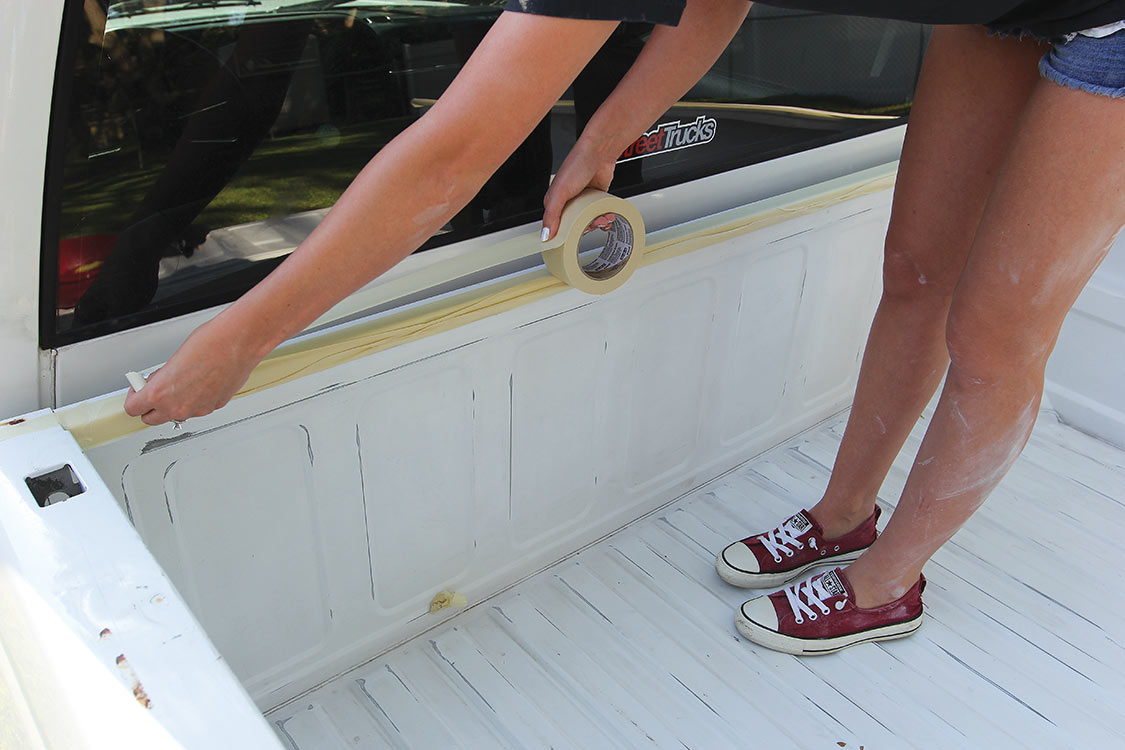
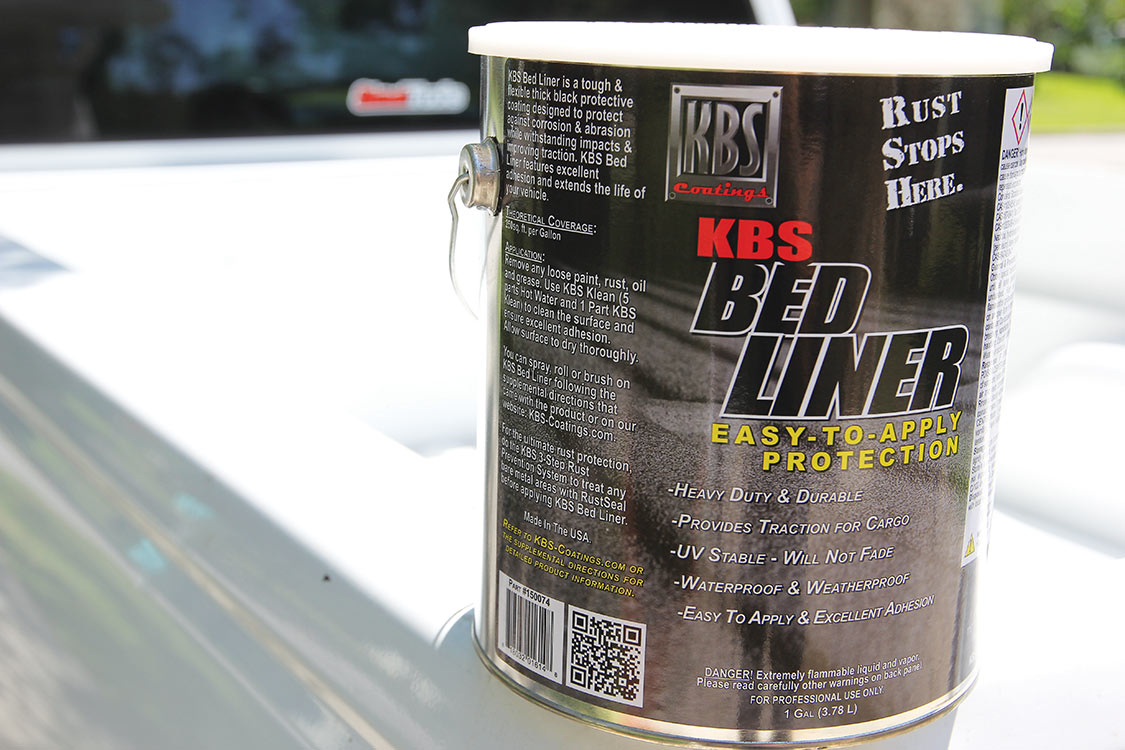
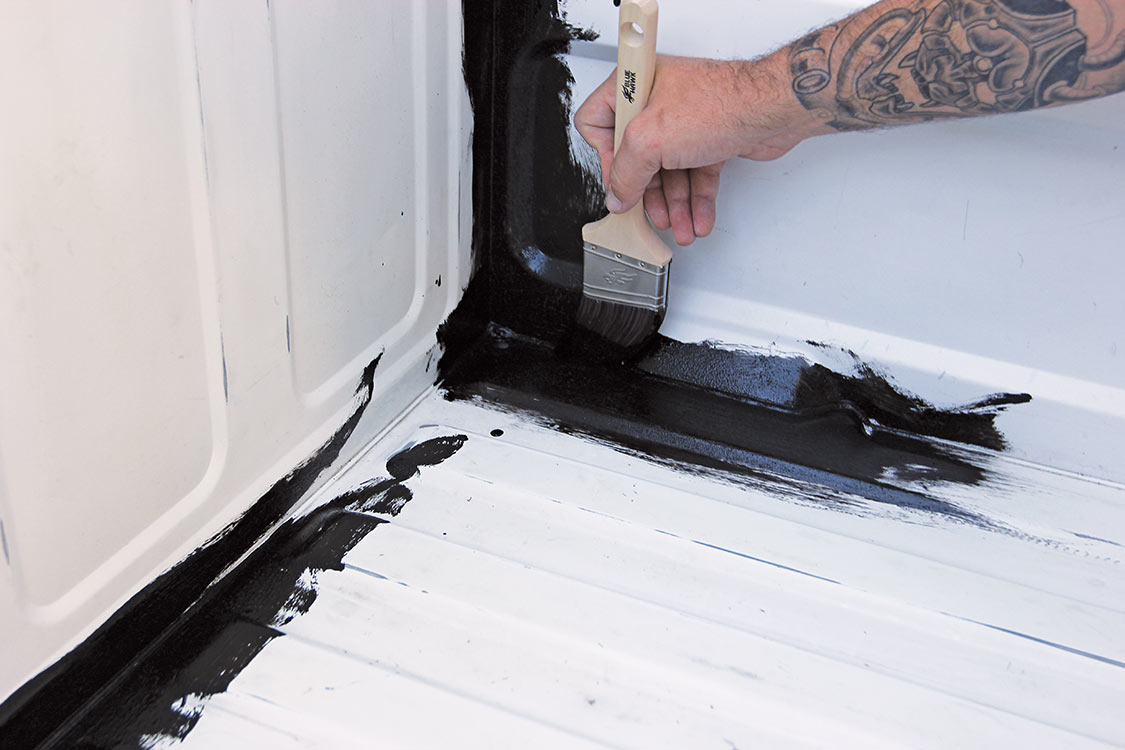
5a. Front HQ Series coilovers include bolt-on upper shock mounts to allow more ground clearance and maximum suspension travel, front upper and lower StrongArm tubular control arms, front and rear HQ Series coilover shocks, front sway bar and HD drop spindles.5b. Front HQ Series coilovers include bolt-on upper shock mounts to allow more ground clearance and maximum suspension travel, front upper and lower StrongArm tubular control arms, front and rear HQ Series coilover shocks, front sway bar and HD drop spindles.5c. Front HQ Series coilovers include bolt-on upper shock mounts to allow more ground clearance and maximum suspension travel, front upper and lower StrongArm tubular control arms, front and rear HQ Series coilover shocks, front sway bar and HD drop spindles.6a. This Pro Performance 14-inch front and 13-inch rear big brake kit is designed for ’88-’98 GM trucks and SUVs. This kit does not require machining to the axle or rotors, and the caliper has an integrated parking brake option. This brake kit will work with any disc brake drop spindle, such as McGaughy’s, Street Edge or Belltech. You will receive a template and instructions on modifying your spindle, which requires cutting of the caliper “ears” and drilling and tapping for the caliper mounting bracket. They look amazing behind our 22-inch American Racing wheels and Nitto Invo tires.6b. This Pro Performance 14-inch front and 13-inch rear big brake kit is designed for ’88-’98 GM trucks and SUVs. This kit does not require machining to the axle or rotors, and the caliper has an integrated parking brake option. This brake kit will work with any disc brake drop spindle, such as McGaughy’s, Street Edge or Belltech. You will receive a template and instructions on modifying your spindle, which requires cutting of the caliper “ears” and drilling and tapping for the caliper mounting bracket. They look amazing behind our 22-inch American Racing wheels and Nitto Invo tires.7a. Classic Industries offers this reproduction black plastic grille as well as the dual composite headlamps and corner lights that are all designed to replace the original. This conversion is as simple as unbolting the original grille and headlights and swapping in the new stuff. To swap the headlight plugs, we turned to MrTailLight.com for the kit. The company offers the new headlight plugs and all the mounting hardware you need to take the guesswork out of the process. We can’t convey how simple this process is and it’s very affordable.7b. Classic Industries offers this reproduction black plastic grille as well as the dual composite headlamps and corner lights that are all designed to replace the original. This conversion is as simple as unbolting the original grille and headlights and swapping in the new stuff. To swap the headlight plugs, we turned to MrTailLight.com for the kit. The company offers the new headlight plugs and all the mounting hardware you need to take the guesswork out of the process. We can’t convey how simple this process is and it’s very affordable.8. Now to focus on the engine swap. The factory 4.3-liter V-6 has got to go, but since this is a perfectly running engine and transmission, we will save it for a quick flip project. The crew at Overpower Customs yanks engines on the daily so ripping this one out is child’s play. Jason and Trey removed all the plugs and bolts before hooking it up to a forklift. Replacing it will be a new BluePrint Engines 383ci Stroker motor paired up to a Centerforce clutch in our American Powertrain transmission.9. Now to focus on the engine swap. The factory 4.3-liter V-6 has got to go, but since this is a perfectly running engine and transmission, we will save it for a quick flip project. The crew at Overpower Customs yanks engines on the daily so ripping this one out is child’s play. Jason and Trey removed all the plugs and bolts before hooking it up to a forklift. Replacing it will be a new BluePrint Engines 383ci Stroker motor paired up to a Centerforce clutch in our American Powertrain transmission.10. Before the new engine can go in, Trey pressure cleaned the engine bay to remove all the old grease and grime. The core of this truck is in great shape!11a. Our BluePrint Engines 383ci Stroker engine comes turnkey other than the drive pulleys. So, before they bolt up the new 5-speed American Powertrain transmission, a Vintage Air Front Runner drive pulley kit goes in. The completed kit looks amazing! It is nice and tight to the block, so we don’t have to worry about fitment when installing the engine. Also, the Bright finish gives its the quality look they deserve.11b. Our BluePrint Engines 383ci Stroker engine comes turnkey other than the drive pulleys. So, before they bolt up the new 5-speed American Powertrain transmission, a Vintage Air Front Runner drive pulley kit goes in. The completed kit looks amazing! It is nice and tight to the block, so we don’t have to worry about fitment when installing the engine. Also, the Bright finish gives its the quality look they deserve.12a. To control our fuel delivery system, we chose to go with Edelbrock’s new Pro-Flo 4 electronic fuel injection. The Pro-Flo 4 is not just a replacement for your carburetor. It’s a complete engineered system that provides the ultimate in performance, drivability and quality. This will result in a smoother idle, faster acceleration, better peak power, improved fuel economy and the ability to control detonation, all in the E-Tuner 4 app. The key to the improved performance is the fuel injector location, which is at the end of the runner on the intake manifold right before the airflow stream enters the combustion chamber. This location provides a more efficient mixture control that’s unaffected by varying intake manifold runner temperatures and length.12b. To control our fuel delivery system, we chose to go with Edelbrock’s new Pro-Flo 4 electronic fuel injection. The Pro-Flo 4 is not just a replacement for your carburetor. It’s a complete engineered system that provides the ultimate in performance, drivability and quality. This will result in a smoother idle, faster acceleration, better peak power, improved fuel economy and the ability to control detonation, all in the E-Tuner 4 app. The key to the improved performance is the fuel injector location, which is at the end of the runner on the intake manifold right before the airflow stream enters the combustion chamber. This location provides a more efficient mixture control that’s unaffected by varying intake manifold runner temperatures and length.12c. To control our fuel delivery system, we chose to go with Edelbrock’s new Pro-Flo 4 electronic fuel injection. The Pro-Flo 4 is not just a replacement for your carburetor. It’s a complete engineered system that provides the ultimate in performance, drivability and quality. This will result in a smoother idle, faster acceleration, better peak power, improved fuel economy and the ability to control detonation, all in the E-Tuner 4 app. The key to the improved performance is the fuel injector location, which is at the end of the runner on the intake manifold right before the airflow stream enters the combustion chamber. This location provides a more efficient mixture control that’s unaffected by varying intake manifold runner temperatures and length.13a. Next are our Hedman Hedders designed for the SBC 350ci engine. Hedman Hedders began as a one-man shop in 1954. Bob Hedman, founder of Hedman Hedders, sold his highly sought-after exhaust tubes to fellow racers on the salt flats of the Mojave Desert. But what started out as a way to make a few bucks to pay for Bob’s racing hobby quickly turned into the premier header manufacturer for both the racing and street header marketplaces. The Centerforce II Clutch Series utilizes a full facing disc with premium friction materials and a pressure plate with centrifugal weights. It offers superb holding power and maximum clutch life, making this clutch ideal for selected street/strip, off-road and towing applications. ●Patented centrifugal weight design ●Patented ball bearing pressure plate ●High quality friction material ●Light pedal effort ●Increased holding capacity ●Smooth engagement13b. Next are our Hedman Hedders designed for the SBC 350ci engine. Hedman Hedders began as a one-man shop in 1954. Bob Hedman, founder of Hedman Hedders, sold his highly sought-after exhaust tubes to fellow racers on the salt flats of the Mojave Desert. But what started out as a way to make a few bucks to pay for Bob’s racing hobby quickly turned into the premier header manufacturer for both the racing and street header marketplaces. The Centerforce II Clutch Series utilizes a full facing disc with premium friction materials and a pressure plate with centrifugal weights. It offers superb holding power and maximum clutch life, making this clutch ideal for selected street/strip, off-road and towing applications. ●Patented centrifugal weight design ●Patented ball bearing pressure plate ●High quality friction material ●Light pedal effort ●Increased holding capacity ●Smooth engagement14. American Powertrain specifically designed these Pro-Fit transmission kits for ’88-’98 Chevy/GMC C1500 OBS GMT400 truck. They’re available in either 5- or 6-speed and boast a 30-50% increase in fuel economy. Low RPM cruising allows for greatly reduced driver fatigue, an improved highway driving experience and cooler engine operating temperatures. This piece reuses the stock crossmember although it’s required to move it forward to the next bolt holes and drill. It’s very easy to install! You can even use a stock C1500 pedal and factory hydraulic master cylinder like we did. Kit includes: AP Revolution shifter mechanism locates shifter Seamless DOM driveshaft assembly – race balanced, solid U-joints Driveshaft slip yoke – cryogenically hardened steel Transmission mount Pilot bearing Stainless rollers, grease pre-pack Reverse light harness – Weatherseal Speedometer conversion electronic Shifter knob Hardware, instructions and warranty15a. With the engine fully assembled, Trey can slide the engine into the bay and start prepping the cooling system. We used a set of factory V-8 motor mounts to bolt it to the frame and Mishimoto radiators and electric fans. This is a 6.2-liter (383ci) diesel cooling system that Trey recommended for additional cooling. To make it all work correctly, Trey installed a factory OEM diesel coolant reservoir and made a trick aluminum coolant transfer pipe.15b. With the engine fully assembled, Trey can slide the engine into the bay and start prepping the cooling system. We used a set of factory V-8 motor mounts to bolt it to the frame and Mishimoto radiators and electric fans. This is a 6.2-liter (383ci) diesel cooling system that Trey recommended for additional cooling. To make it all work correctly, Trey installed a factory OEM diesel coolant reservoir and made a trick aluminum coolant transfer pipe.16a. The last thing to complete before the first startup is the Dynomax exhaust. Jason welded the DIY stainless exhaust kit together and sprayed it black to look the part.16b. The last thing to complete before the first startup is the Dynomax exhaust. Jason welded the DIY stainless exhaust kit together and sprayed it black to look the part.17. The engine swap is complete, and no fancy wiring harness was needed. We know that LS swaps are the popular trend nowadays, but we didn’t want to hassle with the electronics on this one.18a. Now that we have a 5-speed transmission, we need to cut a hole in the floor for the shifter and install a clutch pedal. We used a factory pedal from the junkyard and it simply bolts into the factory location. While the interior is out, we had Corbin from Florida Boy Customs dye the dash and interior panels black.18b. Now that we have a 5-speed transmission, we need to cut a hole in the floor for the shifter and install a clutch pedal. We used a factory pedal from the junkyard and it simply bolts into the factory location. While the interior is out, we had Corbin from Florida Boy Customs dye the dash and interior panels black.19a. Now that we have a 5-speed transmission, we need to cut a hole in the floor for the shifter and install a clutch pedal. We used a factory pedal from the junkyard and it simply bolts into the factory location. While the interior is out, we had Corbin from Florida Boy Customs dye the dash and interior panels black.19b. Now that we have a 5-speed transmission, we need to cut a hole in the floor for the shifter and install a clutch pedal. We used a factory pedal from the junkyard and it simply bolts into the factory location. While the interior is out, we had Corbin from Florida Boy Customs dye the dash and interior panels black.20. Instead of reinstalling the factory bench seat, we turned to TMI Interiors to see if we could get a set of their new ’88-’98 GMT400 interior kits. Luckily for us they came through and we were able to bolt in these new custom bucket seats with center console. This kit is now available for your truck and includes door panels, seats, headliner and dash cap. We also installed a new billet steering wheel from Forever Sharp and it looks perfect! What a massive upgrade to the interior of this ’95 Chevy C1500. Those TMI seats look amazing!21. Instead of reinstalling the factory bench seat, we turned to TMI Interiors to see if we could get a set of their new ’88-’98 GMT400 interior kits. Luckily for us they came through and we were able to bolt in these new custom bucket seats with center console. This kit is now available for your truck and includes door panels, seats, headliner and dash cap. We also installed a new billet steering wheel from Forever Sharp and it looks perfect! What a massive upgrade to the interior of this ’95 Chevy C1500. Those TMI seats look amazing!22. Instead of reinstalling the factory bench seat, we turned to TMI Interiors to see if we could get a set of their new ’88-’98 GMT400 interior kits. Luckily for us they came through and we were able to bolt in these new custom bucket seats with center console. This kit is now available for your truck and includes door panels, seats, headliner and dash cap. We also installed a new billet steering wheel from Forever Sharp and it looks perfect! What a massive upgrade to the interior of this ’95 Chevy C1500. Those TMI seats look amazing!23a. The last addition to the interior is a new digital gauge cluster from Dakota Digital. This six-gauge unit is a direct bolt-in replacement for 1995-’98 GM pickups and ’95-’00 SUV and HD models. This kit requires hardwiring into the stock harness; it is not a direct plug-in. It also adds compatibility for whatever engine and transmission you are running. This replaces the entire factory instrument cluster and lens assembly, fully remade with a billet aluminum housing and optical grade polycarbonate lenses. Fully lit needles, backlit faces, and highly visible LCD message centers are a few of the things that you can see, which set the VHX Series apart from traditional instrumentation. A few of the features you don’t normally see are the micro-controlled precision stepper motors, solid state sensors for unparalleled accuracy and user-customizable display feedback. It’s completely engineered and manufactured right here in the U.S. at the company’s Sioux Falls, South Dakota, facility.23b. The last addition to the interior is a new digital gauge cluster from Dakota Digital. This six-gauge unit is a direct bolt-in replacement for 1995-’98 GM pickups and ’95-’00 SUV and HD models. This kit requires hardwiring into the stock harness; it is not a direct plug-in. It also adds compatibility for whatever engine and transmission you are running. This replaces the entire factory instrument cluster and lens assembly, fully remade with a billet aluminum housing and optical grade polycarbonate lenses. Fully lit needles, backlit faces, and highly visible LCD message centers are a few of the things that you can see, which set the VHX Series apart from traditional instrumentation. A few of the features you don’t normally see are the micro-controlled precision stepper motors, solid state sensors for unparalleled accuracy and user-customizable display feedback. It’s completely engineered and manufactured right here in the U.S. at the company’s Sioux Falls, South Dakota, facility.24a. Before bolting up the new door panels, we swapped out the factory-style side view mirrors and replaced them with these sport truck mirrors from LMC Truck.24b. Before bolting up the new door panels, we swapped out the factory-style side view mirrors and replaced them with these sport truck mirrors from LMC Truck.25. Time to get some blood in Stella’s veins and give her some spark. As with all of our build, we turned to Red Line for their engine oil, power steering and transmission fluids. We also poured in Mishimoto’s Chill radiator fluid. After a 500-mile break in we will flush the transmission and refill it with synchromesh transmission fluid.26. Our first start was a success and Stella finally got to see the sunlight again! The Blueprint Engines 383ci Stroker sounds strong and the Dynomax exhaust rumbles perfectly. Naturally Trey wants to see if anything is loose—and what better way than to light the tires up!27a. While Trey finishes some final tuning to the Edlebrock Pro-Flo, we started working on the exterior of the truck. A new 2-inch raised cowl hood from Autometal Direct combined with an LMC replacement tailgate and an AVS on the Web roll pan will give the truck the aggressive look it deserves. All this new metal will need to be painted to match, and to save costs we decided to go with Automotive Touchup color matching paint and their DIY paint products that even include the paint guns.`27b. While Trey finishes some final tuning to the Edlebrock Pro-Flo, we started working on the exterior of the truck. A new 2-inch raised cowl hood from Autometal Direct combined with an LMC replacement tailgate and an AVS on the Web roll pan will give the truck the aggressive look it deserves. All this new metal will need to be painted to match, and to save costs we decided to go with Automotive Touchup color matching paint and their DIY paint products that even include the paint guns.`28a. As with any paint project, the prep work is key. We wanted a clean work area, so the garage was cleared out and sawhorses were brought in. Taping off the parts we don’t want painted comes first.28b. As with any paint project, the prep work is key. We wanted a clean work area, so the garage was cleared out and sawhorses were brought in. Taping off the parts we don’t want painted comes first.29. These OEM panels are ready for primer with a simple scuff with scotch pads and a wipe down with acetone.30a. Automotive Touchup made it easy on us by offering a three-stage ready-to-spray paint system that requires no mixing at all. Just stir, pour and spray, giving around 15 minutes per coat and one-hour per stage.30b. Keeping the hose away from the surface and your hand parallel the panels is what we were focused on. We are not pros or even experienced amateurs, but Automotive Touchup gave us the confidence we needed to pull off a great paint job. We were extremely impressed and pleased with the results.31. Instead of reusing the factory hood hinges, we took the opportunity to bolt on these new Eddie Motorsports billet hood hinges. They come in polished or powdercoated with the bolt-on in the factory location. No cutting, no welding.32a. The provided hardware is bolted into place and the new gas struts are clipped in. No hassle!32b. The provided hardware is bolted into place and the new gas struts are clipped in. No hassle!32c. The provided hardware is bolted into place and the new gas struts are clipped in. No hassle!32d. The provided hardware is bolted into place and the new gas struts are clipped in. No hassle!33a. Lastly, the hood is brought back into the mix and bolted on with the new hardware. These hinges look great and operate extremely smoothly.33b. Lastly, the hood is brought back into the mix and bolted on with the new hardware. These hinges look great and operate extremely smoothly.34. The front of the truck is complete, and it looks great! Now time to focus on the back.35a. Before the new tailgate can go on, we need to bolt on the hinged and hardware. This kit from LMC Truck provides all the parts and pieces you need including the latch and trim ring.35b. Before the new tailgate can go on, we need to bolt on the hinged and hardware. This kit from LMC Truck provides all the parts and pieces you need including the latch and trim ring.36a. Before the new tailgate can go on, we need to bolt on the hinged and hardware. This kit from LMC Truck provides all the parts and pieces you need including the latch and trim ring.36b. Before the new tailgate can go on, we need to bolt on the hinged and hardware. This kit from LMC Truck provides all the parts and pieces you need including the latch and trim ring.37a. To give the inside of the bed a makeover, we taped off the edges and coated it with this DIY brush on bedliner kit from KBS Products. It’s easy to accomplish and looks great if prepared properly.37b. To give the inside of the bed a makeover, we taped off the edges and coated it with this DIY brush on bedliner kit from KBS Products. It’s easy to accomplish and looks great if prepared properly.37c. To give the inside of the bed a makeover, we taped off the edges and coated it with this DIY brush on bedliner kit from KBS Products. It’s easy to accomplish and looks great if prepared properly.37d. To give the inside of the bed a makeover, we taped off the edges and coated it with this DIY brush on bedliner kit from KBS Products. It’s easy to accomplish and looks great if prepared properly.38. Now that the new tailgate and roll pan are installed, the back of the truck looks great, too!
Chris Hamilton is an automotive journalist, editor, and lifelong truck enthusiast with extensive experience covering custom truck builds, fabrication, performance upgrades, aftermarket products, and a
We use cookies to enhance your browsing experience, serve personalized ads or content, and analyze our traffic. By clicking "Accept All", you consent to our use of cookies. Visit our Cookie Policy for more info.
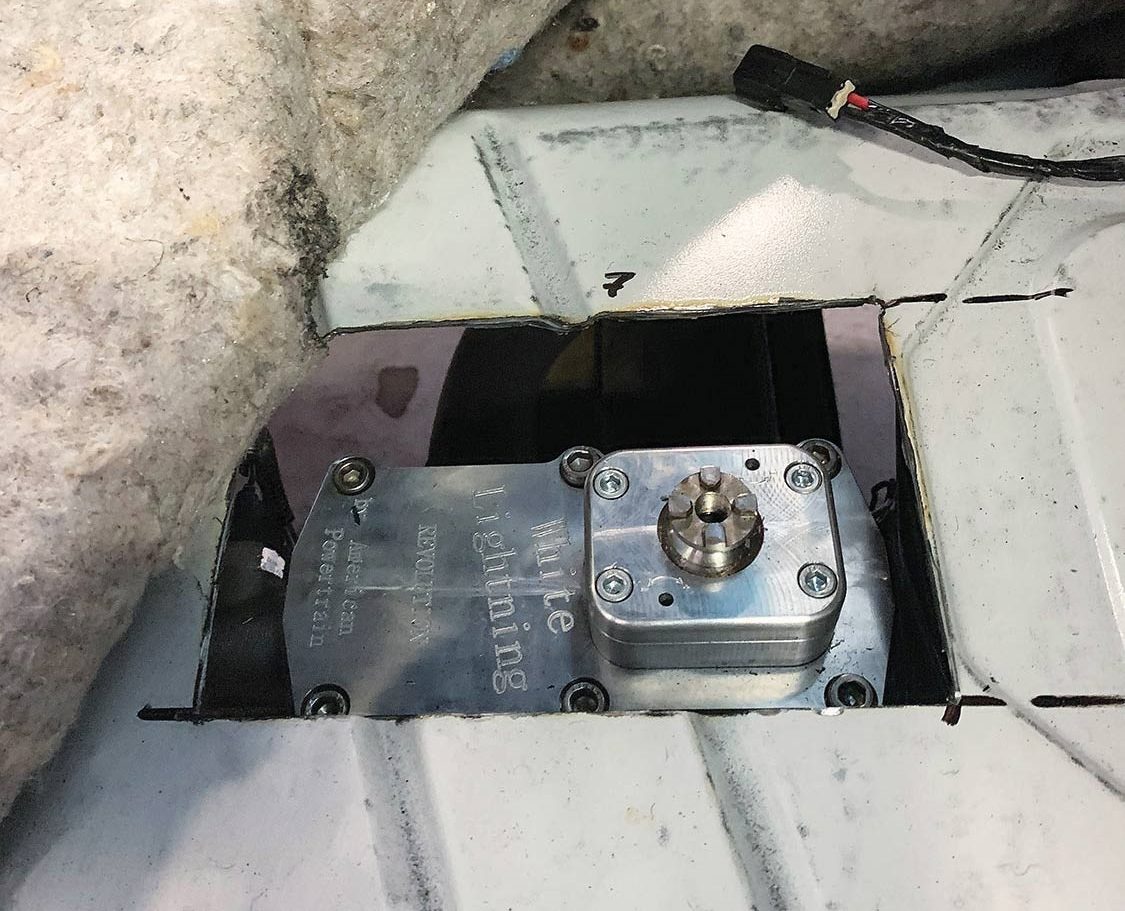
 Chris Hamilton


 Please wait...
Share Link