Crafting Custom F-100 Dashboards: A Weld-Free Journey to Perfection!
TIM ROPER . October 10, 2023 . Buyer’s Guides
Share Link
Save ArticleLogin to save it
Zero Welding Involved!
From 1967 to 1972, all Ford F-100s, F-250, and F-350s left the production line with a dashpad sitting on top of a factory-formed metal dash. After 50 years of service, most of them have seen better days and either need to be repaired or replaced altogether. While the aftermarket support as of late has improved, there have not been too many choices for replacement pads.
Dashpad covers and overlays are a budget-minded option that can cover up the cracked and faded dashpad, but that is pretty much a Band-Aid over the real issue. Then there are the more expensive replacement pads that top $400 or more. Finally, there is the elusive NOS pad or even a pristine original. Those are like finding a needle in a haystack, and the money they bring can be sky-high.
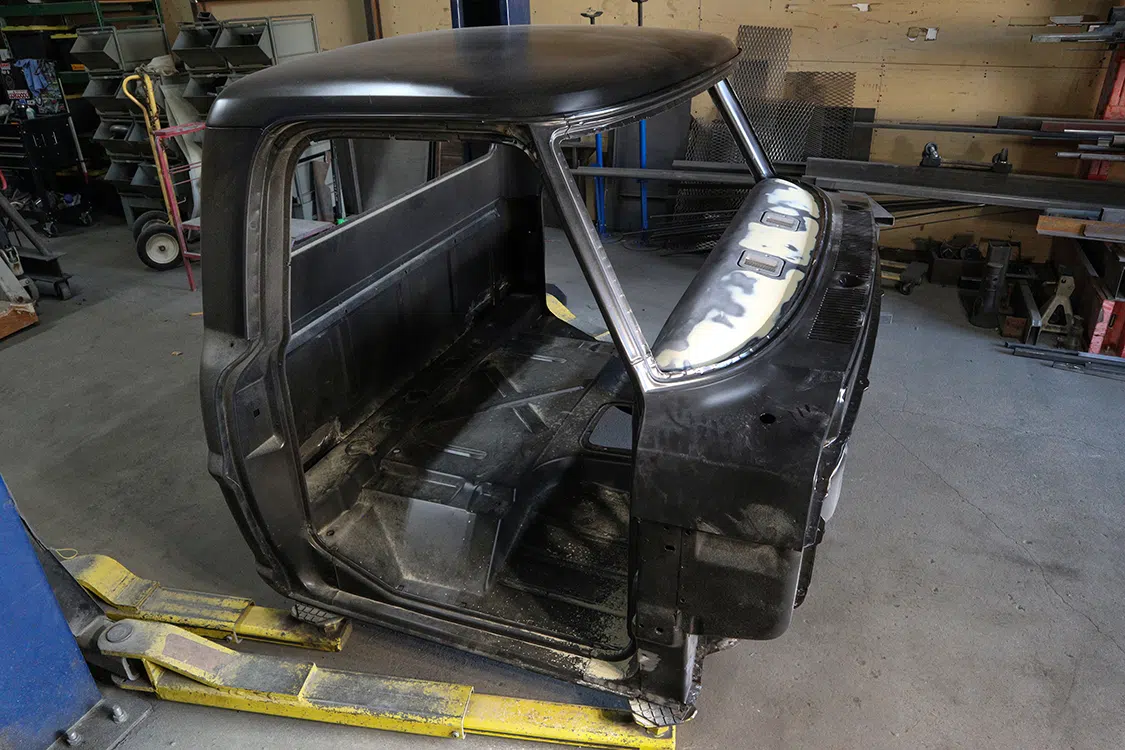
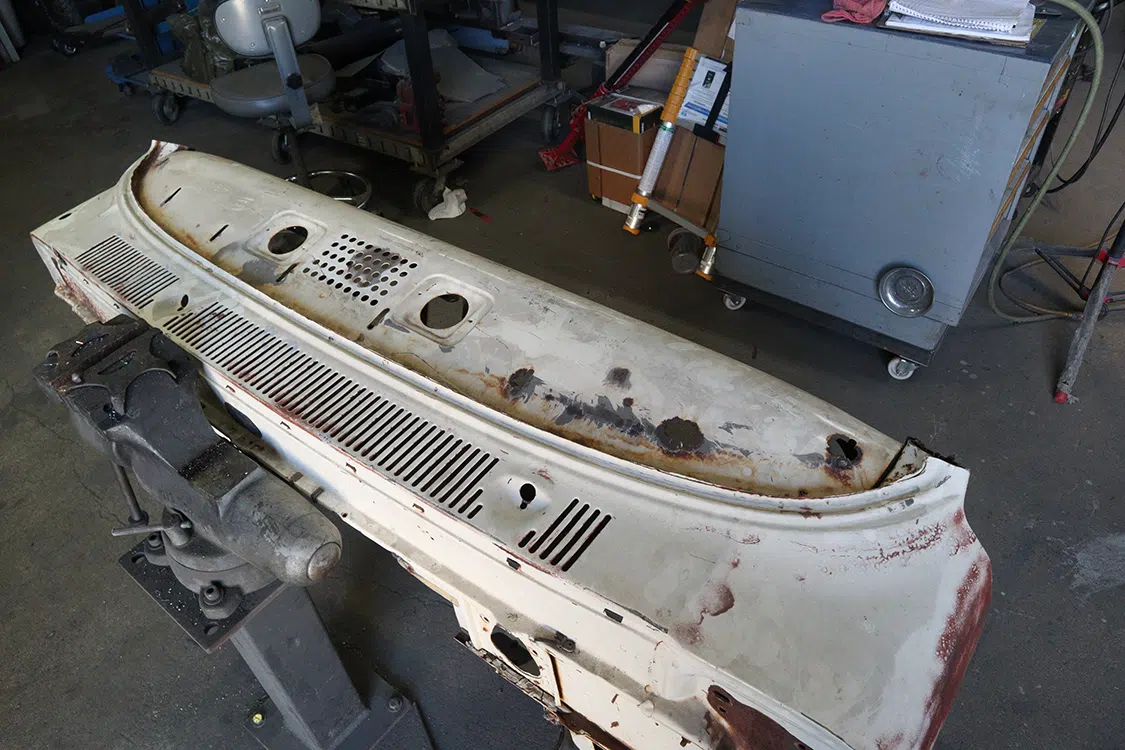
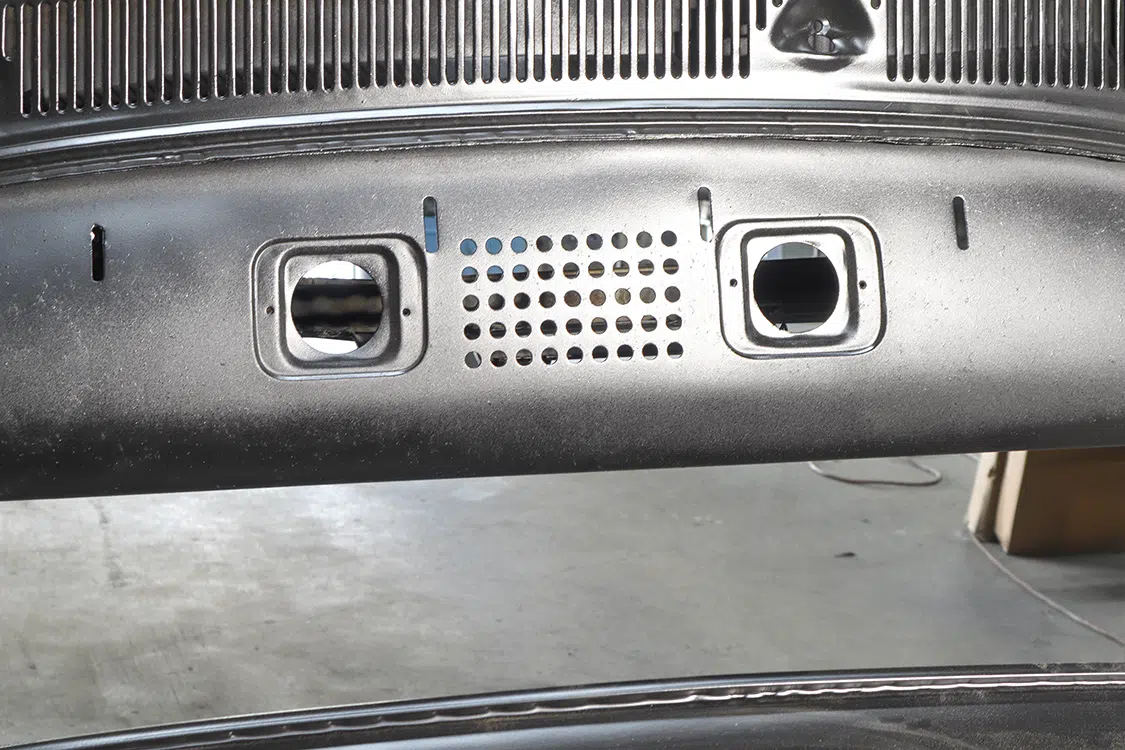
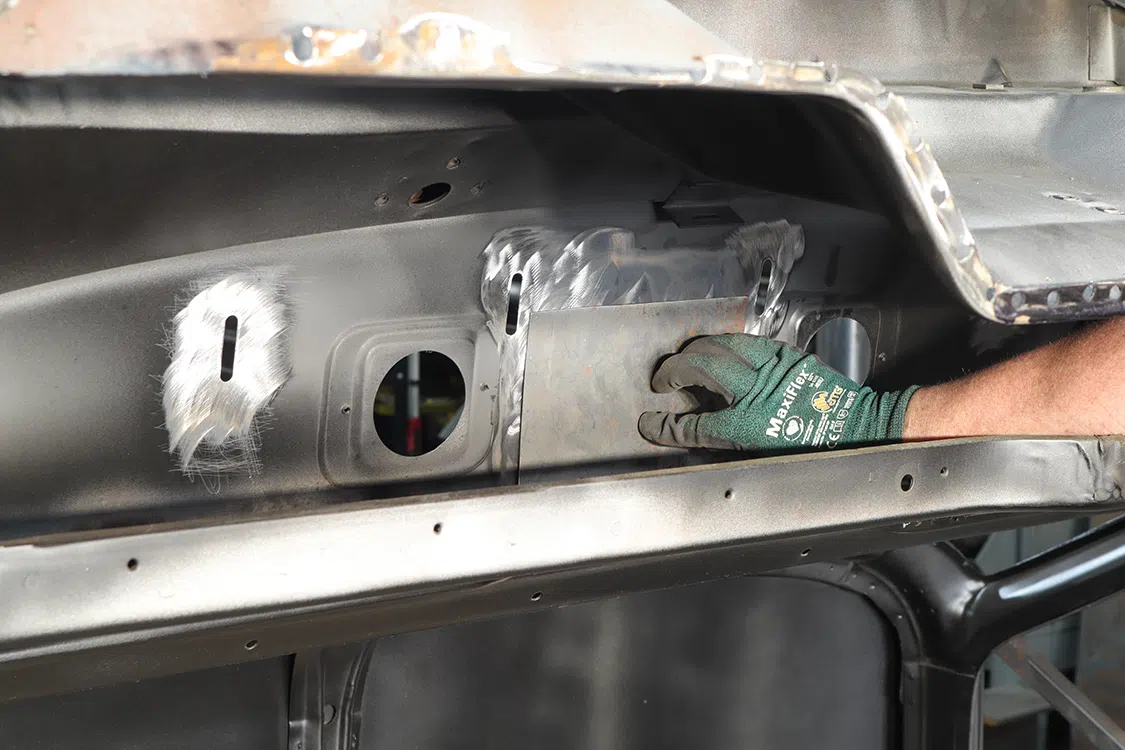
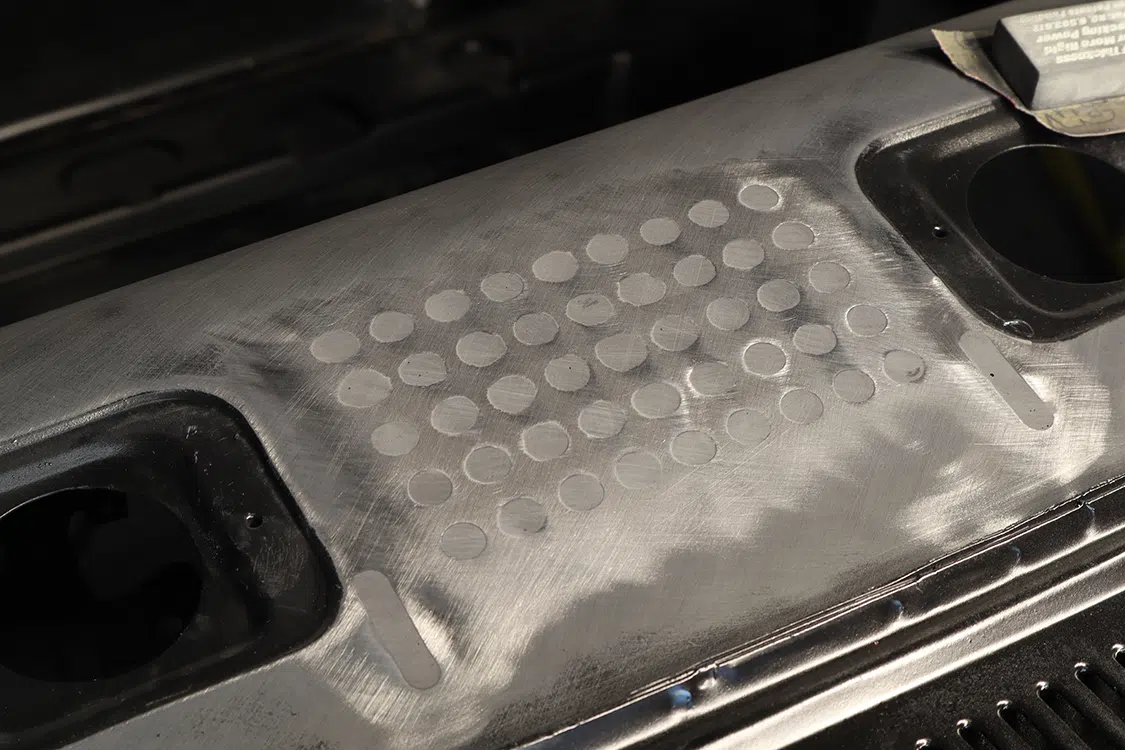
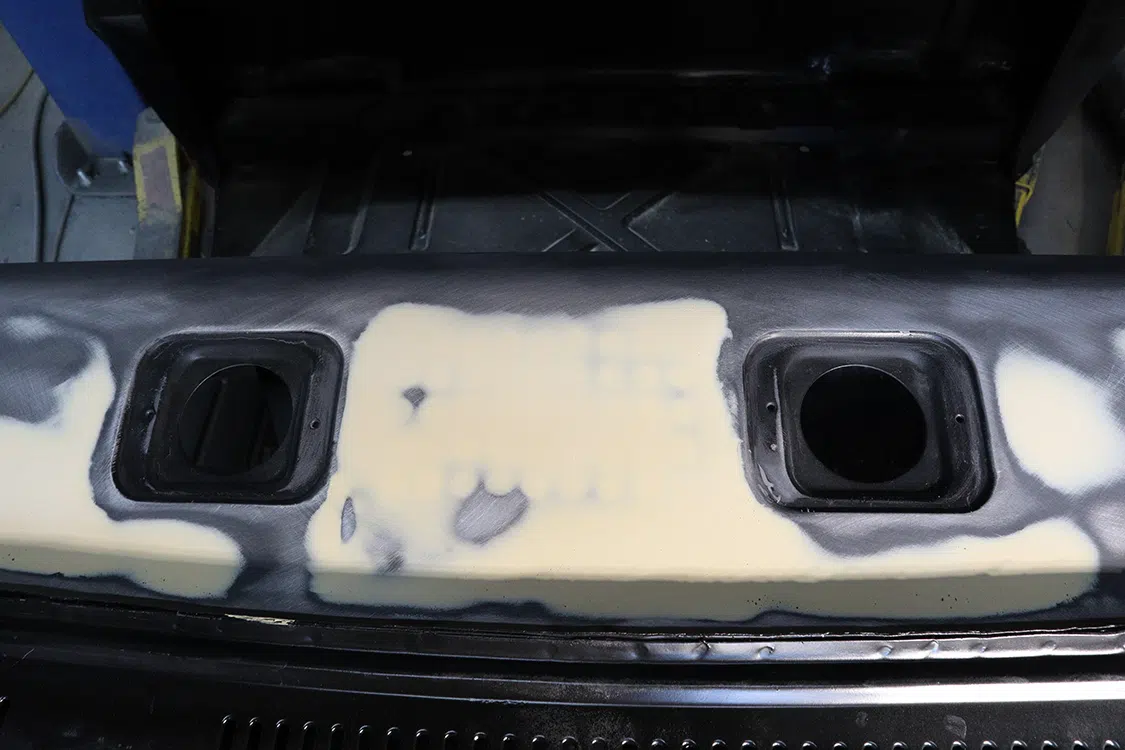
01. Here, you see the factory metal dash. Wouldn’t those slots and holes look better filled in and smoothed?02. Much improved, don’t you think?
Once you removed a dashpad from one of these trucks, you can see the factory metal dash. The things that stands out the most are the slots where the studs from the pad pass through and the holes for the factory dash speaker. You may notice the formed metal could look really nice with those provisions filled in. Typically, people would pay a body shop to weld in metal fillers and do the bodywork. Some of the more garage-DIY guys might attempt to do it themselves if they have a welder and the skills.
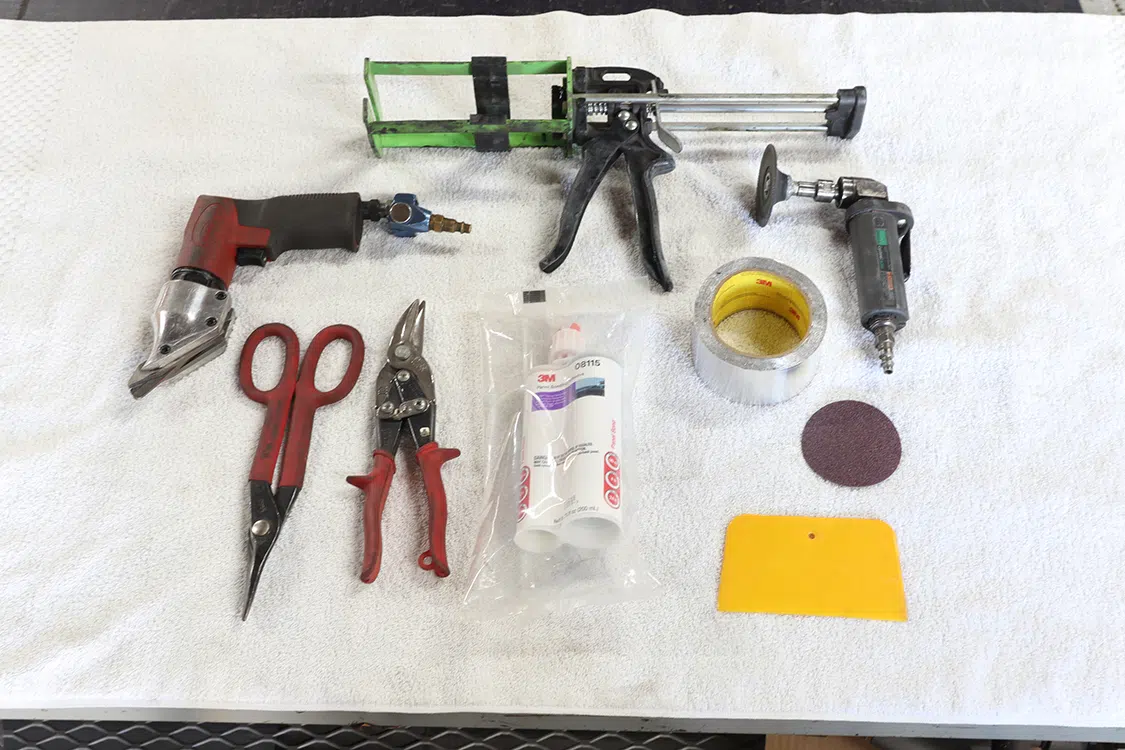
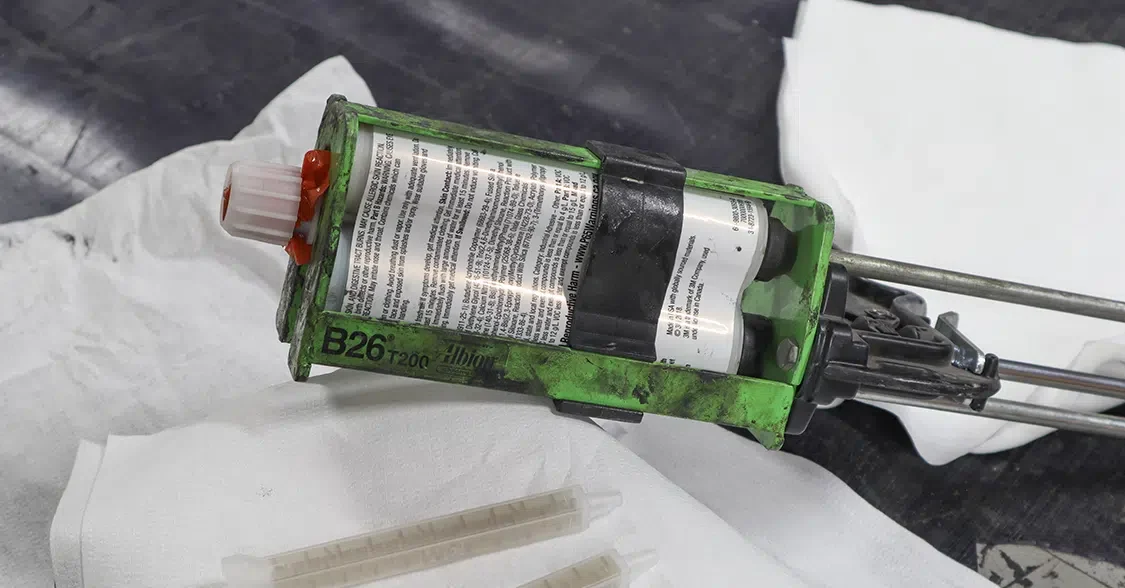
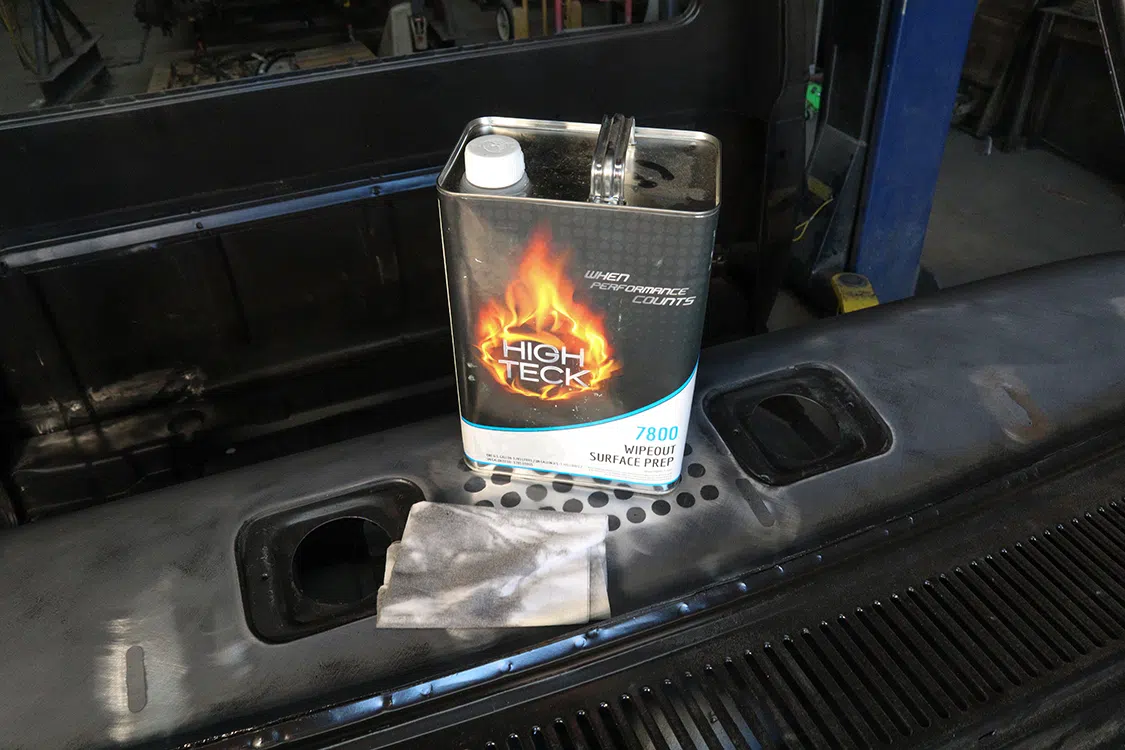
03. First, collect all the necessary tools, thin-gauge metal, adhesives, cleaners, and fillers. Here we have the application gun, hand snips, pneumatic sheetmetal shears, angle grinder, 40-grit sanding disc, plastic swipe, aluminum tape, and the 3M Panel Bond.04. Panel Bond requires the use of a specific application gun. They are readily available on the internet and at automotive paint supply stores. You can typically plan to spend between $50 and $100 for one. Ours is a well-used Albion B26 T200. Mixing tips are just below it.
So, now you might be thinking a smoothed dash would be a really nice touch on your truck, but you might be on a budget or don’t have a welder or the metal skills to do so. Well, today is your lucky day as we are going to show you step by step how to smooth your dash with no welding.
At this point you might be thinking Bondo. Well, yes, that will be involved, but that is not how we would do it or recommend it. When it comes to adhesives and paste films, technology is on your side. You may or may not be familiar with how cars and even aircraft are manufactured, but to make a long story short, most are bonded together in modern manufacturing processes.
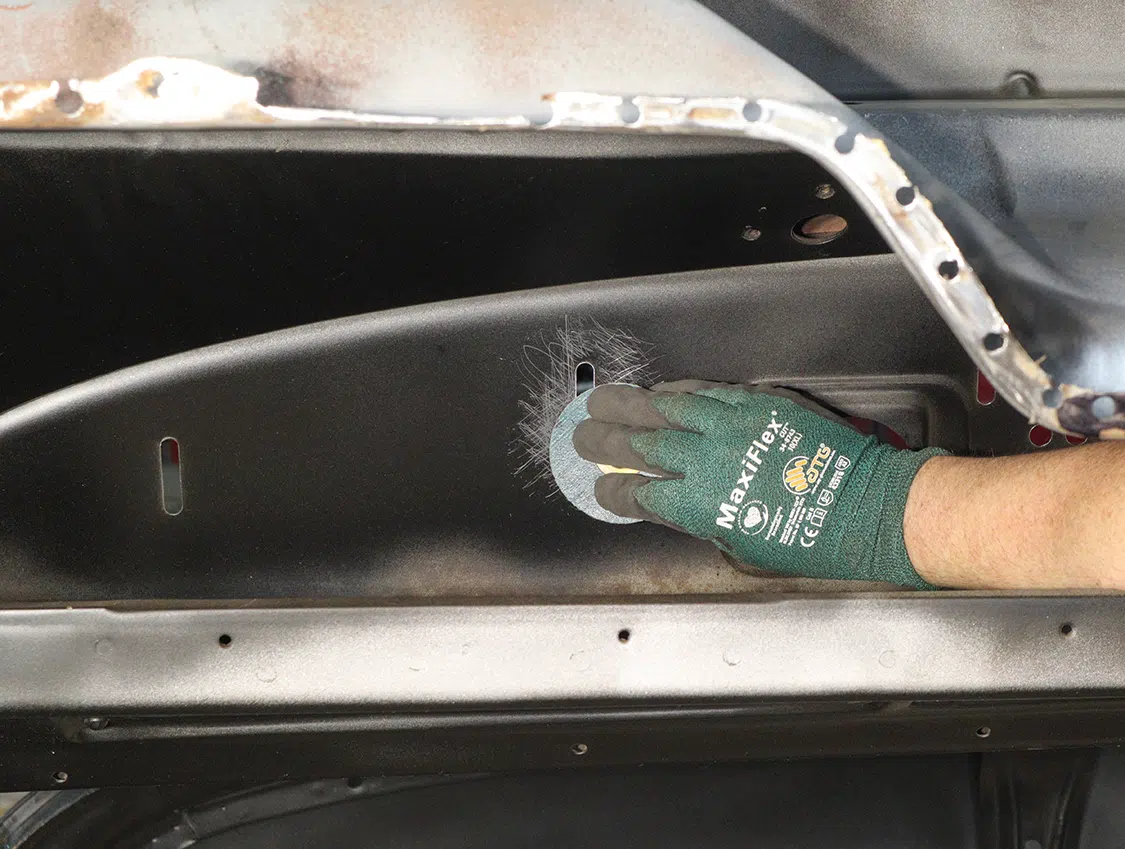
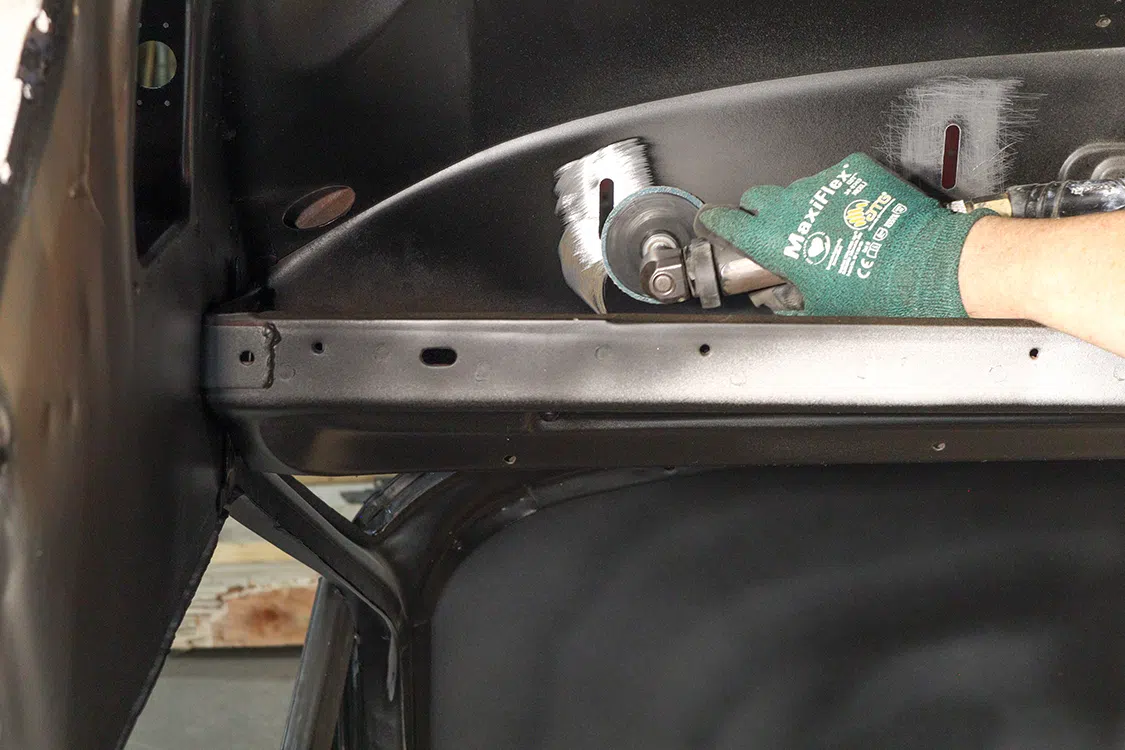
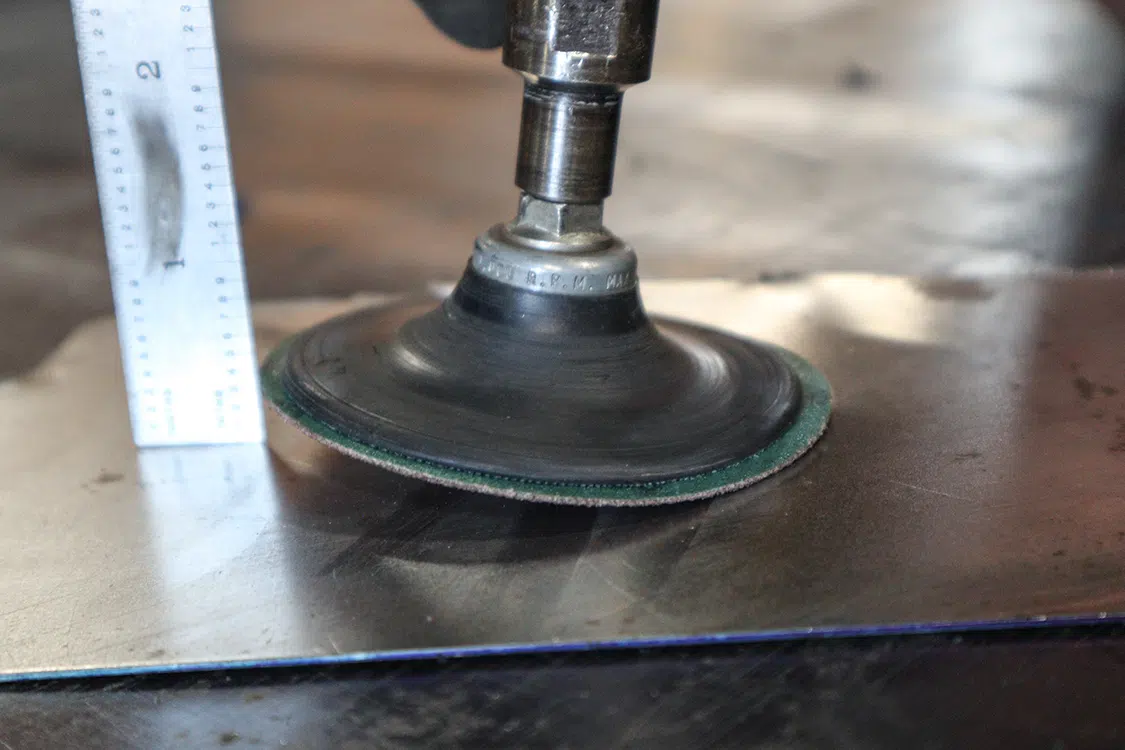
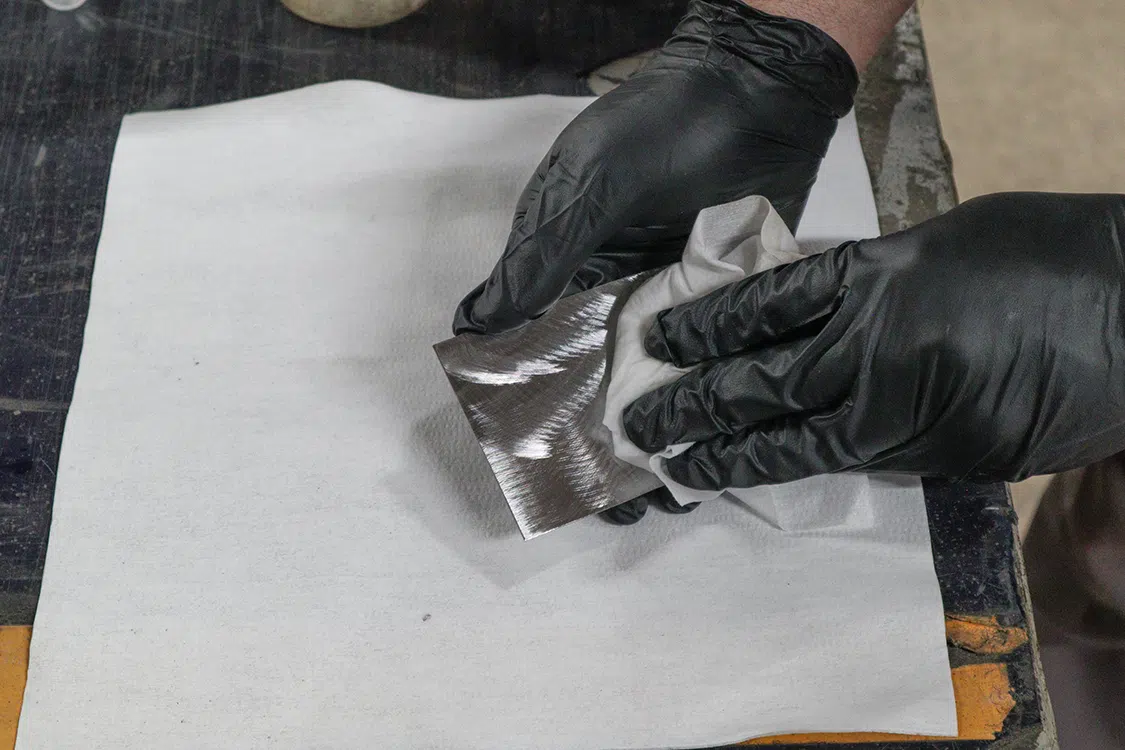
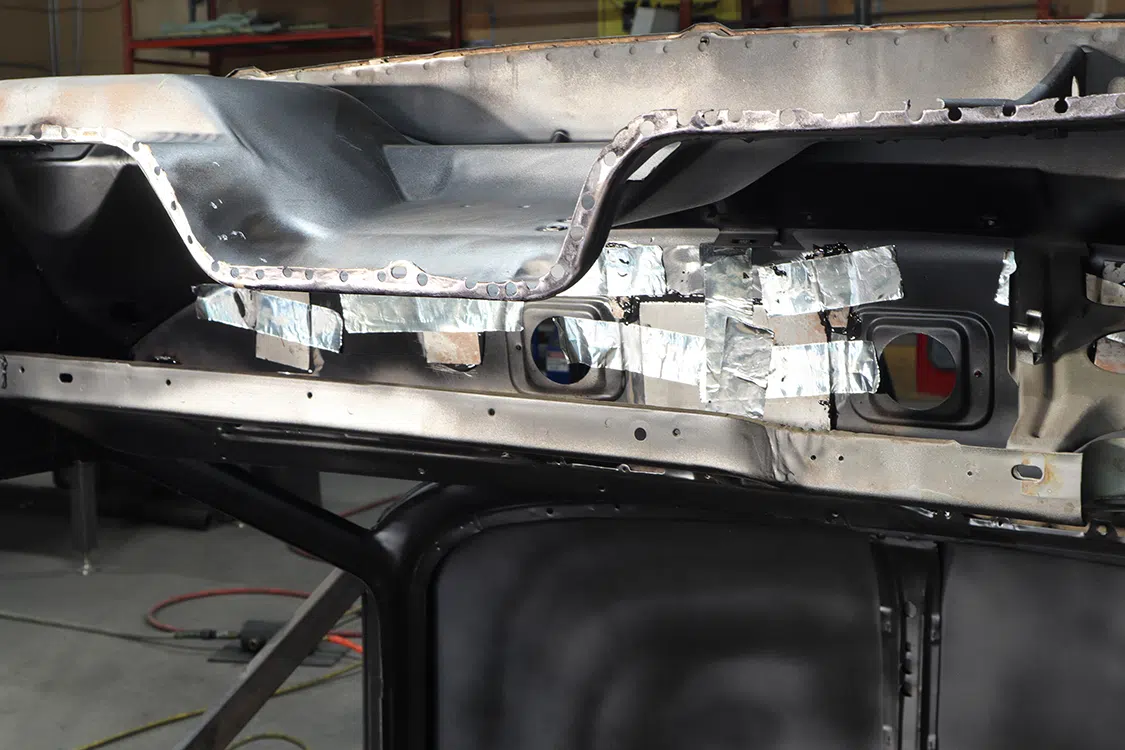
05. First, remove the old dashpad to expose the bare metal dash. Clean the top as well as the underside with acetone or alcohol to remove the years of collected dirt. Fortunately, the cab we were working with had been blasted and primed. In addition, the entire floor had been removed for replacement, which made the job a little easier and made taking pictures a snap. Don’t fret though. Having the cab in its normal configuration is doable. It just requires some laying on the cab floor to do the initial work. However, the majority can be done through the front of the dash.06. Once you have cleaned everything, scuff the areas around the slots and speaker holes with the 40-grit sanding disk. Most importantly, this needs to be done not only on the bottom of the dash where the metal doublers will be bonded, but on the top of the dash as well. Scuffing can be done by hand or preferably with the die grinder. Be generous as to extend out past the area that the doubler will cover.6(a)
Coming from an aviation background, I have been involved in the manufacture of aircraft for the past 20 years, mainly on the composites side. Where am I going with this? Having manufactured composite helicopter blades for most of my career, I have come to learn that bonding, or “gluing” in layman’s terms, has given a whole new meaning to the word strength. Not to get too in depth, but a helicopter blade by today’s standards, whether metal or all composite, are 100% bonded together. Once on the helicopter, they can see up to 10,000 hours of service with few to no failures. If you have ever seen what a helicopter blade goes through during flight you know they take a beating. They constantly flex and twist and have loads put on them that make you cringe.
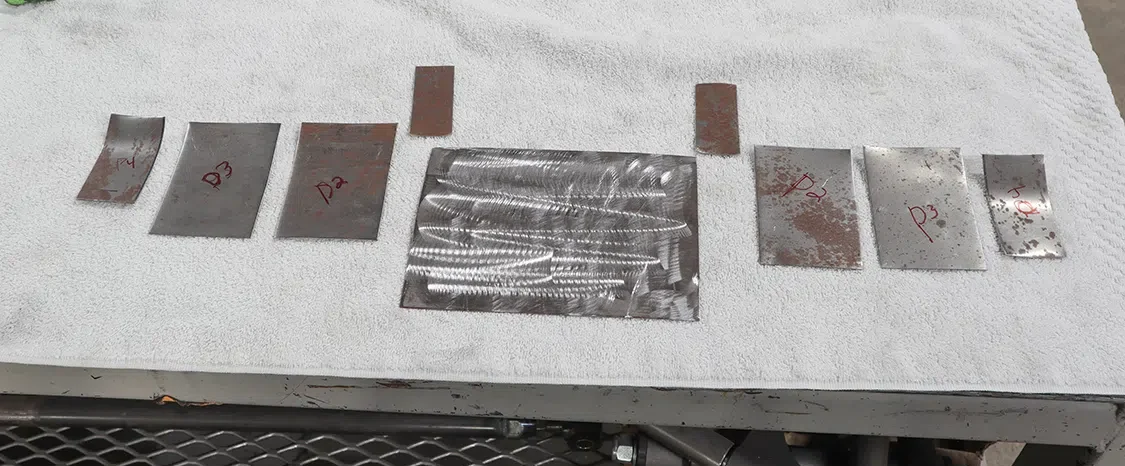
07. After the metal is scuffed on the top and bottom of the dash, it is time to make the doublers that will bond to the bottom of the dash. We used 18-gauge cold-rolled steel cut into small pieces with the pneumatic shears. Ensure the pieces you cut have at least 0.5- to 1-inch overlap passed the hole you are covering. Hand form each piece to match the contour of the dash in their respective locations. They do not need to be exact, but get as close to the contour as possible. Label the dash and the doublers so nothing gets mixed up. You could also use 20-gauge steel as well. It is often available at your local hardware store in small 2×2-foot pieces.08. Here are the doublers cut and formed, and then labeled to match where they go under the dash. You can see how much contour was put into the end pieces to match the dash.
So why are we talking about helicopter blades when we are trying to smooth a dash? Basically, the two-part epoxy technology that has been used in the aircraft industry for decades has moved over into the automotive industry. While not exactly the same, epoxies such as “Panel Bond” from a variety of manufacturers like 3M, Valvoline, and SEM to name a few, are available to anyone who wants to purchase them. They are easy to use and extremely strong.
Follow along as we show you how to smooth your dash with zero welding, readily available tools, and some sheetmetal. Oh, and don’t throw away that old dashpad quite yet, there is something you will need out of it.
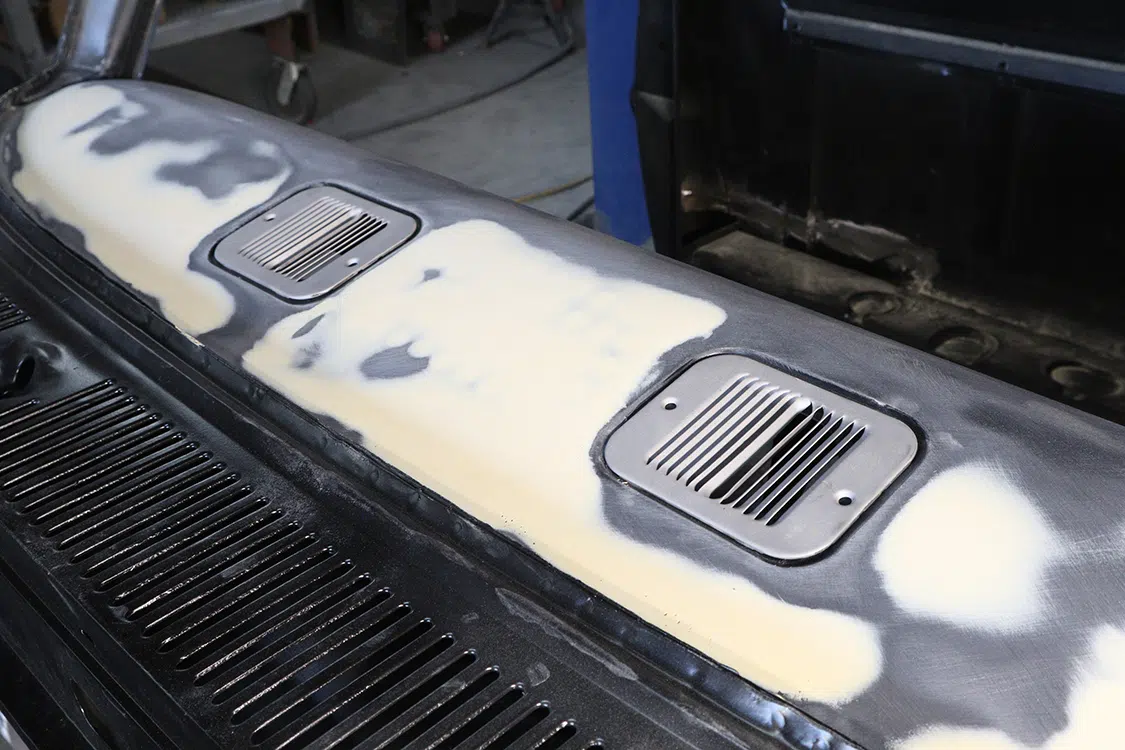
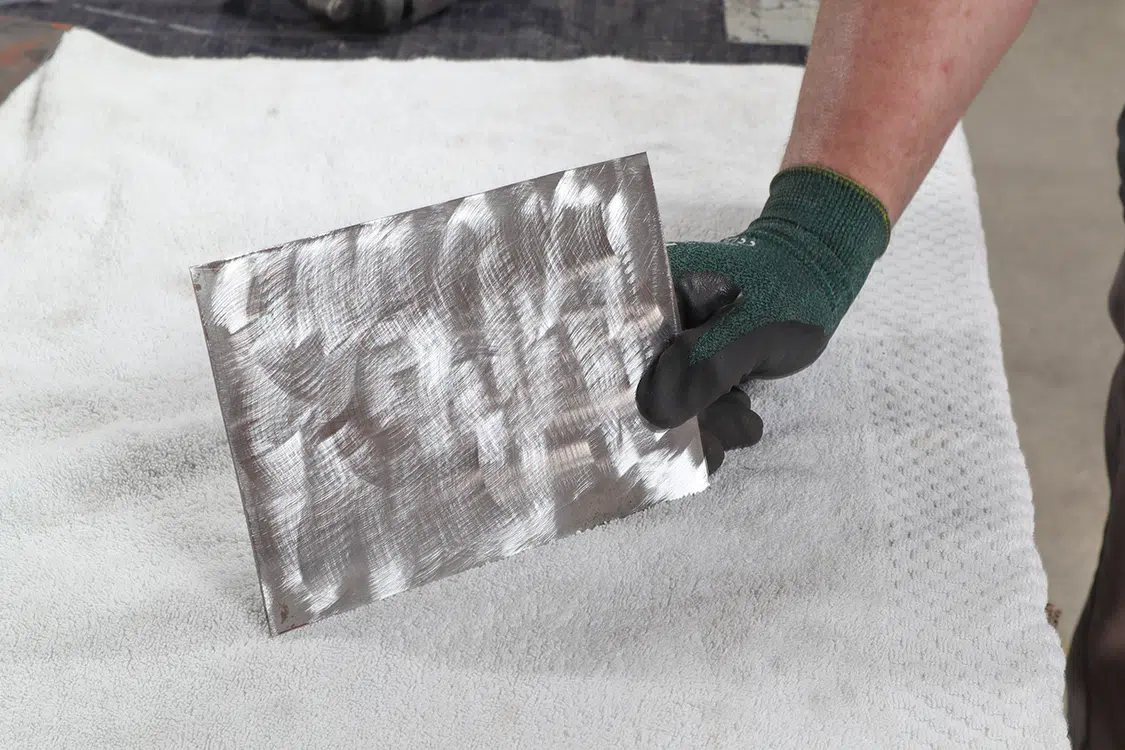
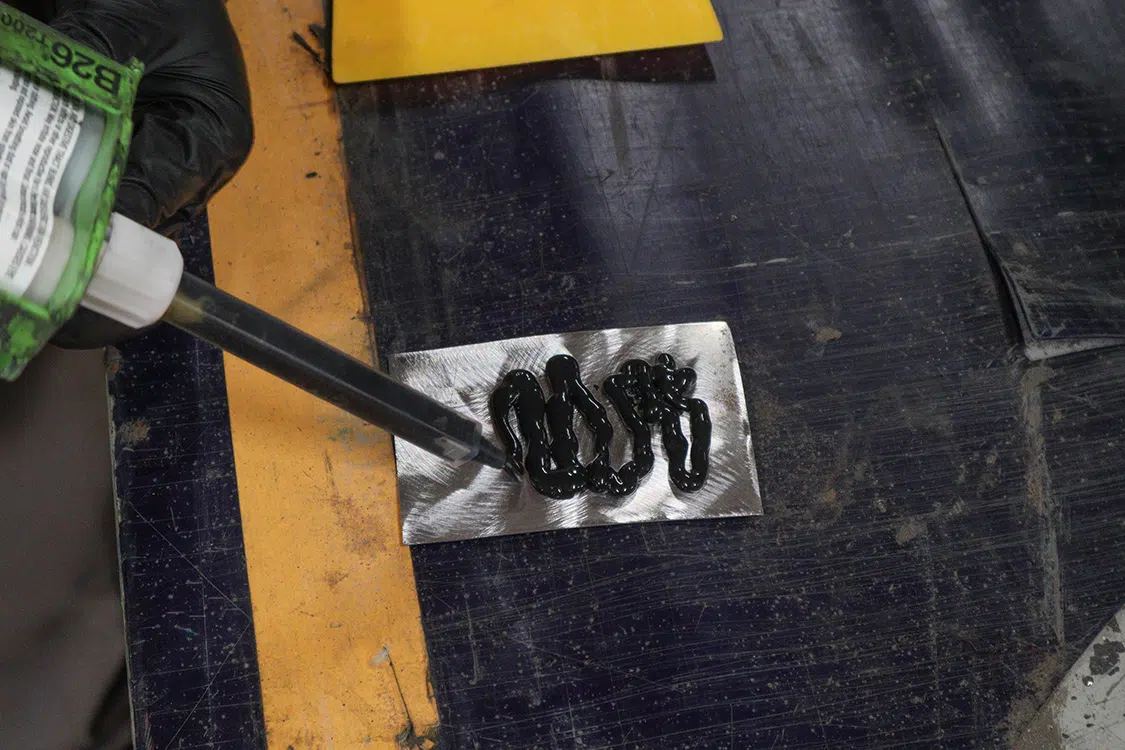
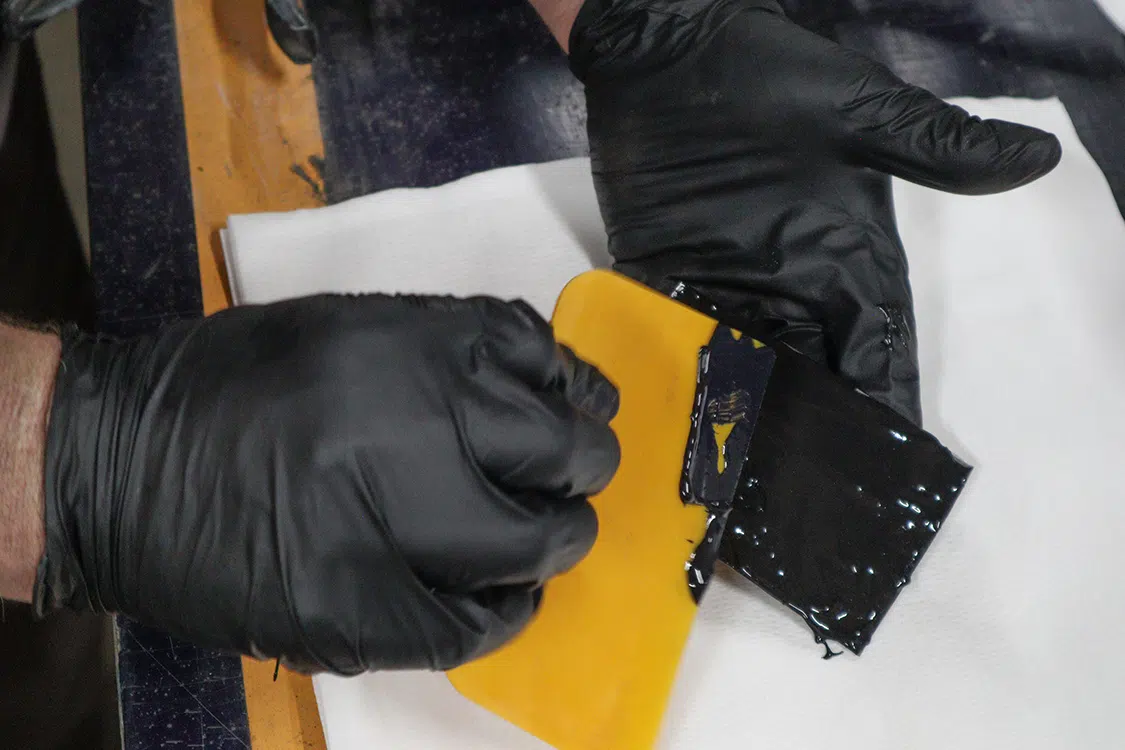
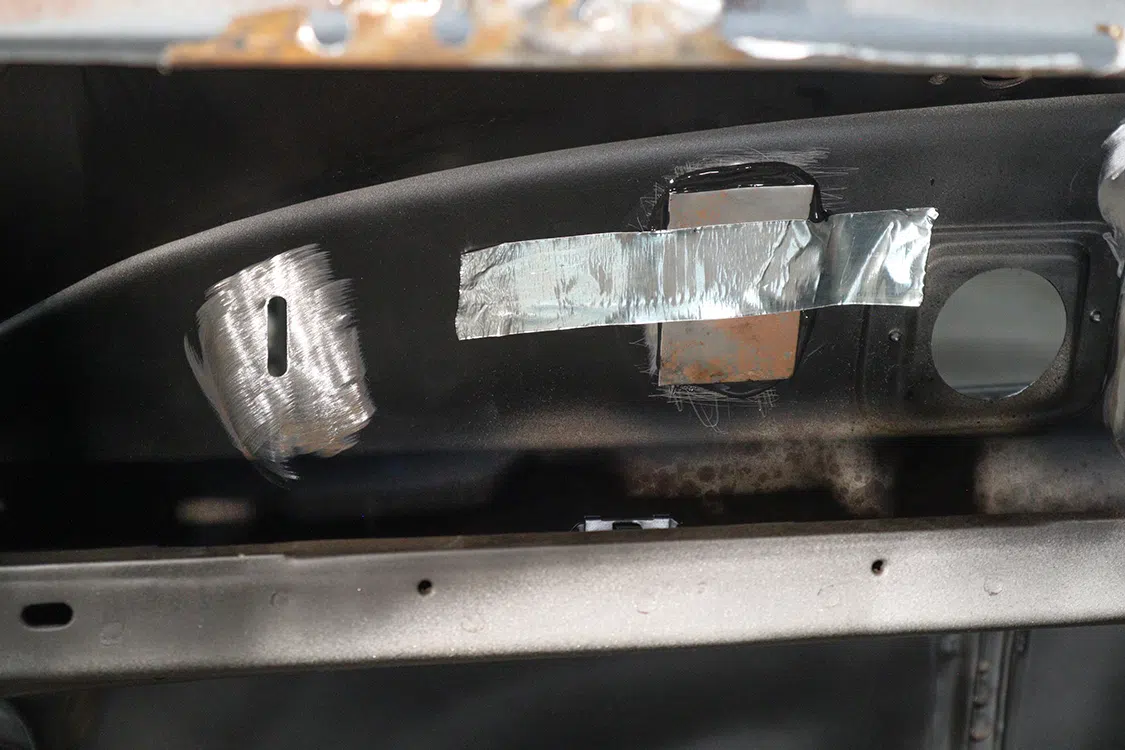
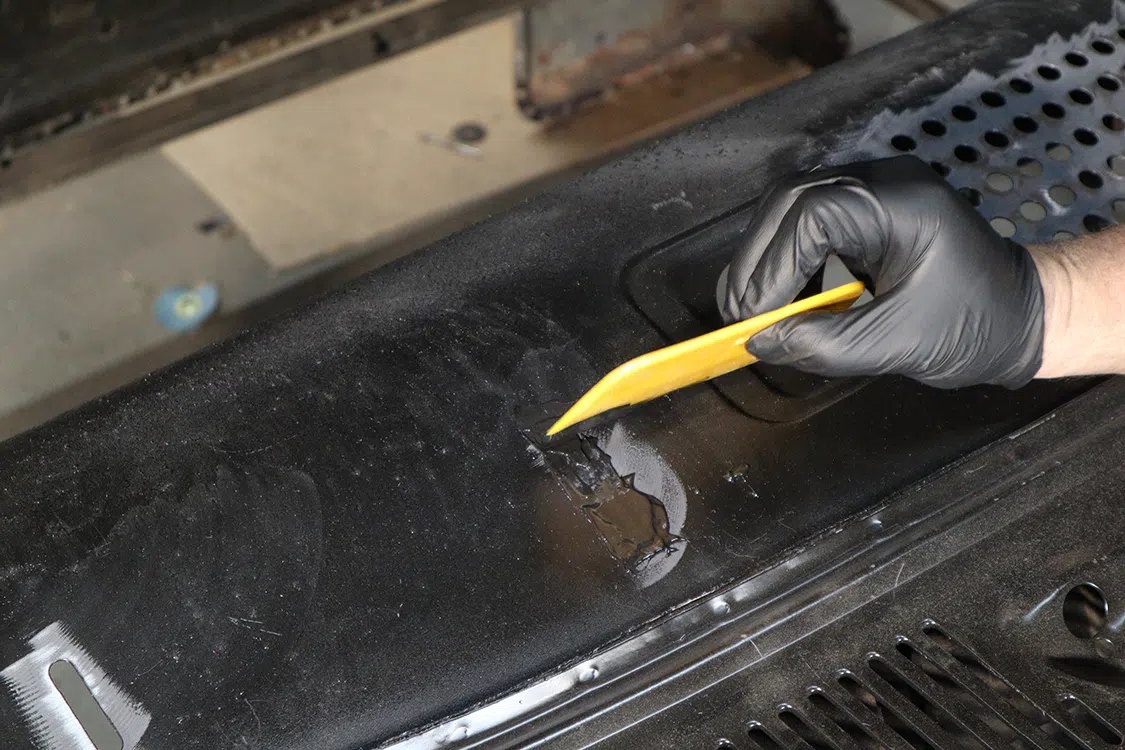
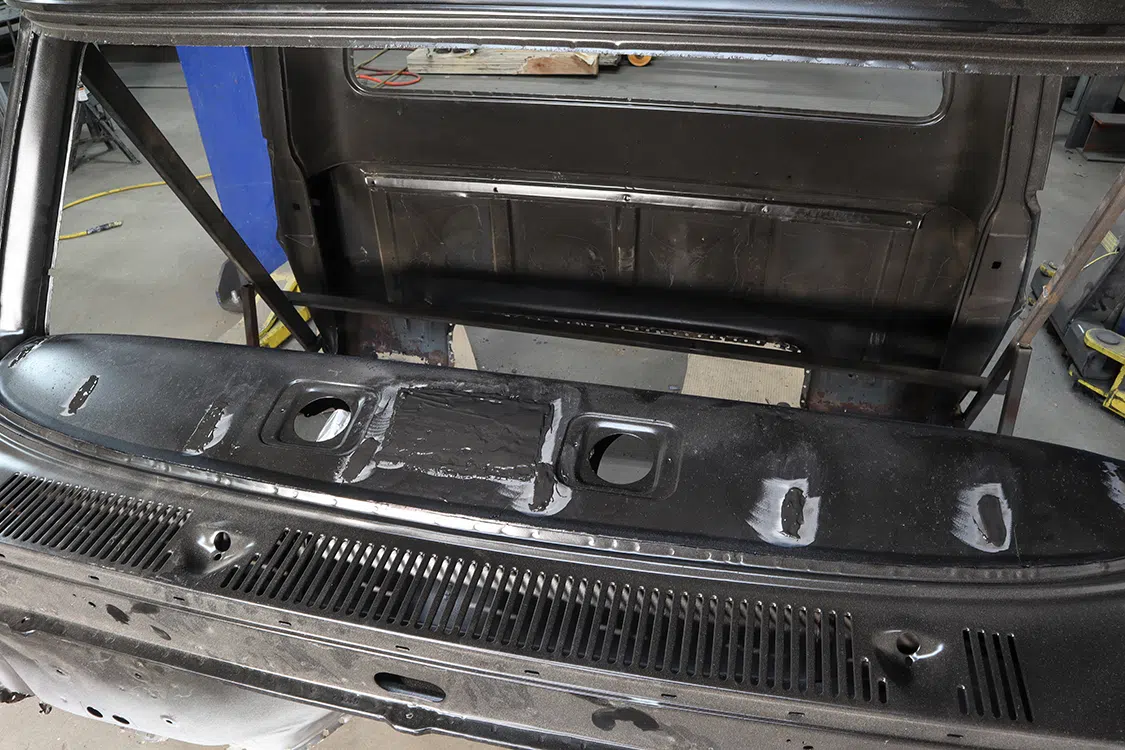
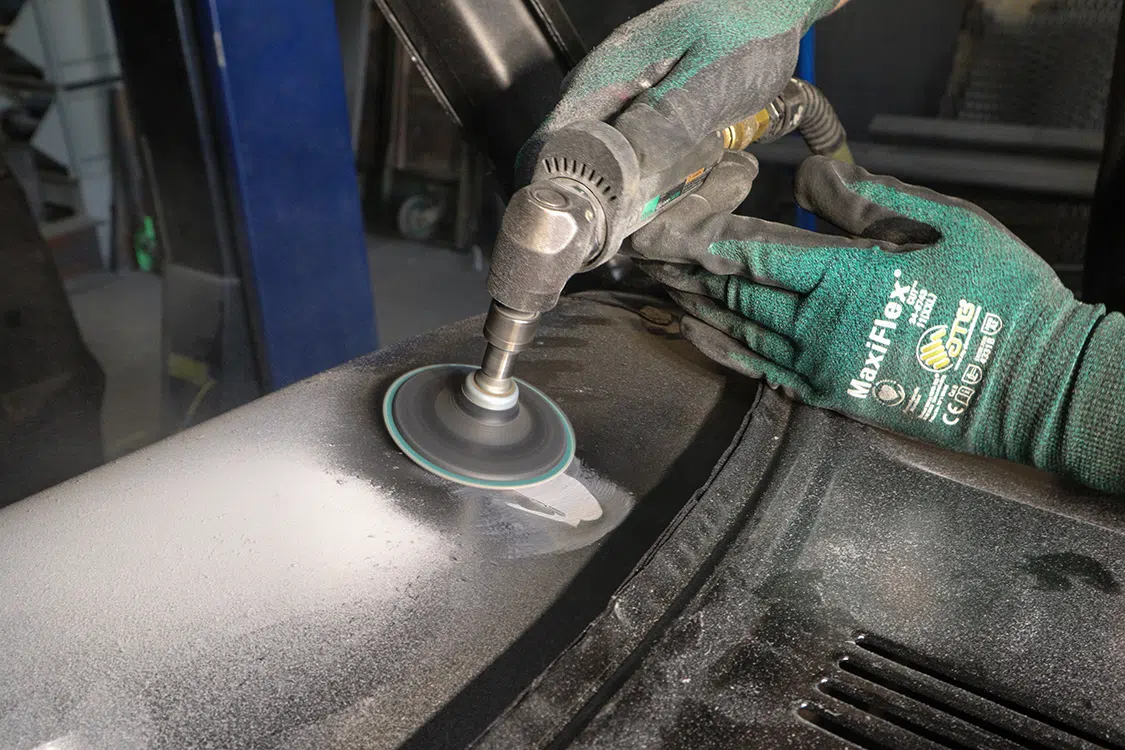
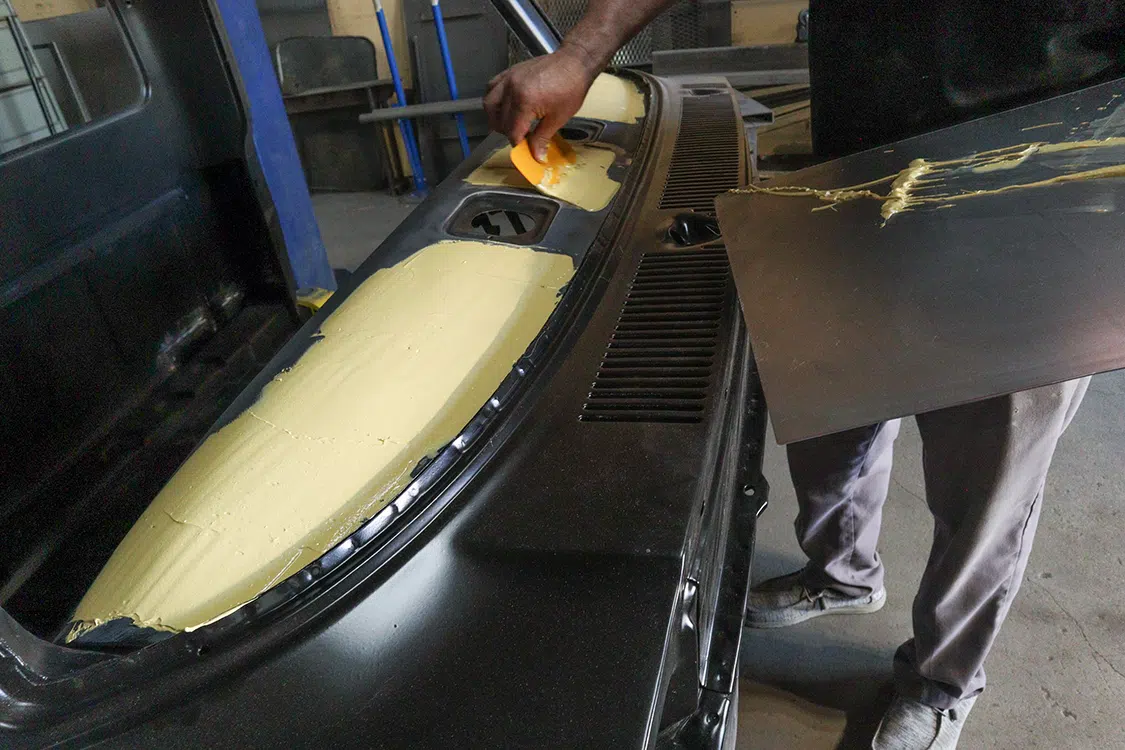
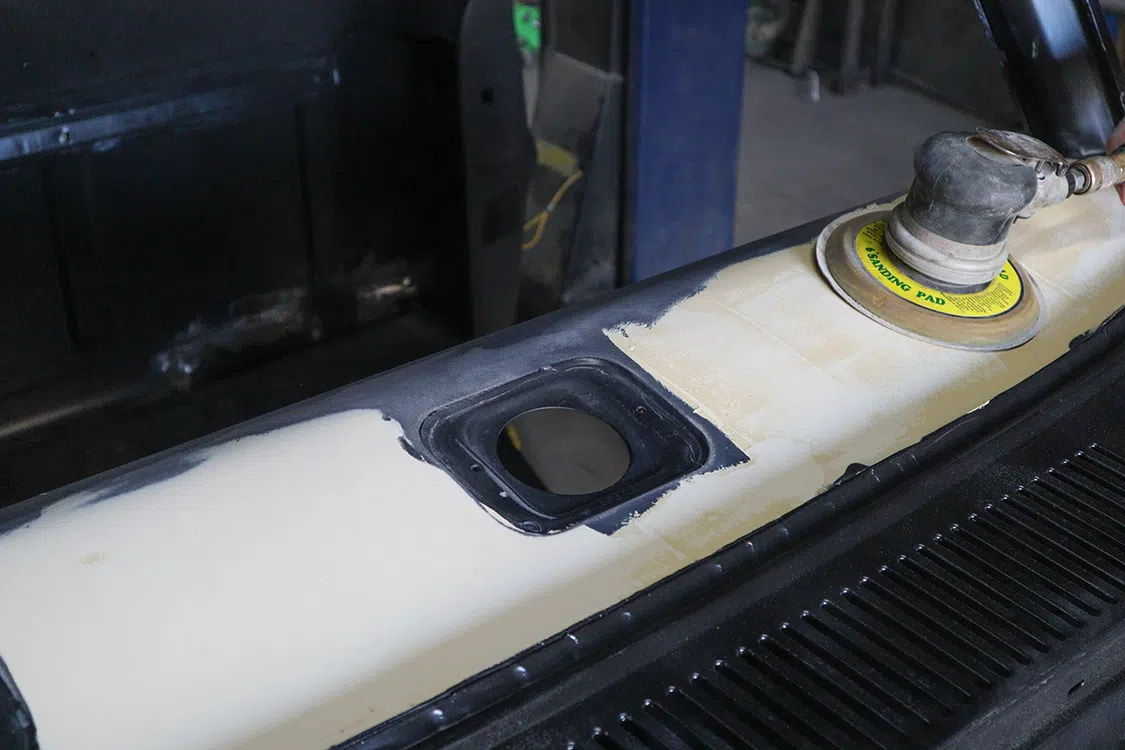
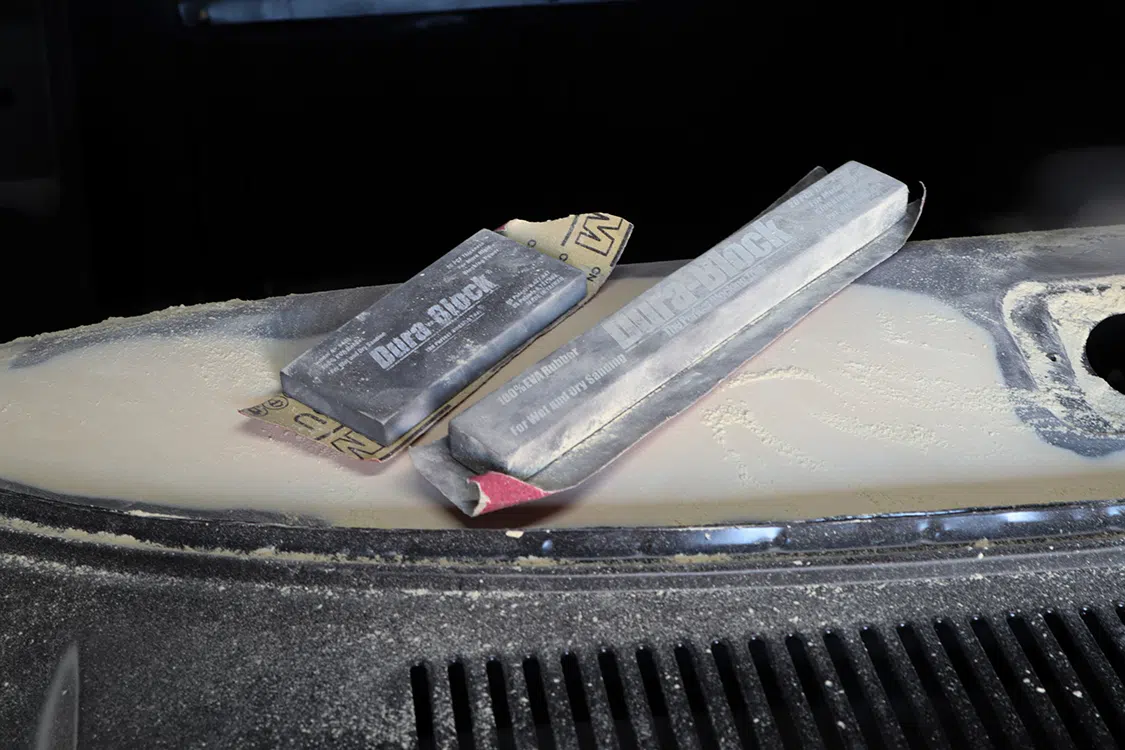
09. Be sure to scuff the mating surface of the doublers with 40-grit as well. When bonding two metals together, the faying (mating) surfaces should both be scuffed with 40-grit.9(a)10. Next, be sure to clean all surfaces that will be bonded with acetone or alcohol. The faying surfaces must be extremely clean for proper adhesion.11. Now it is time to apply the adhesive. This is where we start to make a mess. With rubber gloves on, apply a very generous amount of adhesive to the doubler. After extracting the adhesive onto the doubler, use a plastic swipe or something similar to evenly spread the adhesive over the doubler. You want the adhesive an eighth- to a quarter-inch thick to provide squeeze-out on the sides of the doubler as well as squeeze-out through the hole you are covering in the dash. You want the adhesive to basically squeeze out above the surface of the dash. Do not apply adhesive to all the doublers at once; only do one or two at a time.11(a)12. Once the doubler has adhesive on it, it is time to bond it in. Simply locate where it goes, put it in place, put a little pressure on it to ensure squeeze-out around the edges and through the hole (holes) in the dash, and then put tape over it to hold it in place. Keep in mind the doubler does not need to be perfectly square with the hole. It just needs to cover the hole completely.13. Tip: Have all your pieces of tape cut and ready to go.14. Here you can see how the final placement looks under the dash. Once the adhesive is cured, you simply remove the tape and spray some primer over the doublers if you wish.15. Looking at the top of the dash after each doubler is taped in place, lightly spread the squeeze-out past the edges of the applicable hole. Be sure to keep the adhesive proud of the surface of the dash as this will be sanded down later. If you did not get enough squeeze-out through the hole, you can add some from the applicator gun to build it up.16. Here you can see what the top of the dash looks like with all the doublers in place and the adhesive curing. Be sure to read the instructions on cure times as manufacturers have different recommendations. The adhesive we used had a cure time of four hours unless a heat source like a heat gun was used. In that case, a heated cure can be accomplished in less than 10 minutes. We opted to let the adhesive cure over night for roughly 15 hours in this case. The tape was removed when the cure was complete. Take note of the generous amount of adhesive over the speaker provision in the center. Note: Having the excessive adhesive on the top side is not necessary. We just prefer it. As long as the hole is filled, it is sufficient.17. Now that the adhesive has cured and your dash looks like an alien sneezed on it, it’s time to start making it look smooth. To get the bulk of the adhesive knocked down, you can use a grinder with a 40- or even 80-grit disc on it. Scotch-Brite pads work as well. Once the adhesive starts getting close to level with the top of the dash, 120-grit is fine. The key to this step is to remove the adhesive to perfectly level with or a few thousanths lower than the top of the dash. Ensure you are not putting too much pressure or tilting your grinder at extreme angles as to dig into the adhesive in the hole.18. Here you can see the result of sanding the adhesive level with the top of the dash. If you are concerned about shrinking or cracking, don’t. Panel bond is highly resistant to shrinking and cracking. In addition, it has a little flexibility to it.19. If using the grinder and sanding disc makes you nervous, it is permissible (and more accurate) to use a sanding block to finalize this step. If you choose this method, ensure you utilize cross-sanding techniques for the best results. With all the bonding and sanding of the adhesive complete, it is now time for the filler work. Basically, this is where you will skim the top of the dash with Bondo and sand to the final shape or finish for paint. If you have no experience with bodywork, it is recommended you use a qualified shop to perform this step. If you think you are up to the task, here is what we do, starting with the skim coat.20. Before applying any filler, be sure to sufficiently clean the top of the dash with wax and grease remover. Wipe with a white cloth until the cloth stays white.21. After the dash is clean, mix the filler per the manufacturer’s instructions and spread a thin, even layer over the top of the dash. It is recommended to mix the filler on a clean sheet of metal or plastic; do not use cardboard.22. Once the filler has cured, block-sand the surface to shape. By this we mean sand down smooth to remove any high and low spots, resulting in a very thin layer of filler. We use a DA Sander to remove the bulk of the filler and then move on to sanding blocks like Dura-Blocks to fine tune. You may (should in our opinion) need to repeat these fill and block sanding steps to get the perfect surface.23. When block-sanding, try and leave a very thin layer over the entire surface. You actually want a very thin layer of filler over every hole that was filled. When block-sanding is complete, we recommend you let the dash sit for a week or so, so the filler can “outgas” and completely set up. Not to get too technical, but cheap fillers can shrink and crack if top coated too soon. The more expensive fillers can be top coated much more quickly with no repercussions. Regardless, we let ours sit for at least a week before moving on.24. Here you see our first blocking procedure. We will continue with one or two more, but at this point you get the gist. Once the final blocking is finished, proceed with prime and paint.25. Remember how we told you to save your old dashpad? The defrost vent bezels you need are embedded in it. Simply tear them out, sandblast them, prime, and paint. They are made to screw right into the metal dash.26. And there you have it. No heat, no weld grinding, no distortion, and you now have a custom-looking smoothed ’67-’72 dash. Your friends will envy you.
We use cookies to enhance your browsing experience, serve personalized ads or content, and analyze our traffic. By clicking "Accept All", you consent to our use of cookies. Visit our Cookie Policy for more info.
 TIM ROPER
.
October 10, 2023
.
Buyer’s Guides
TIM ROPER
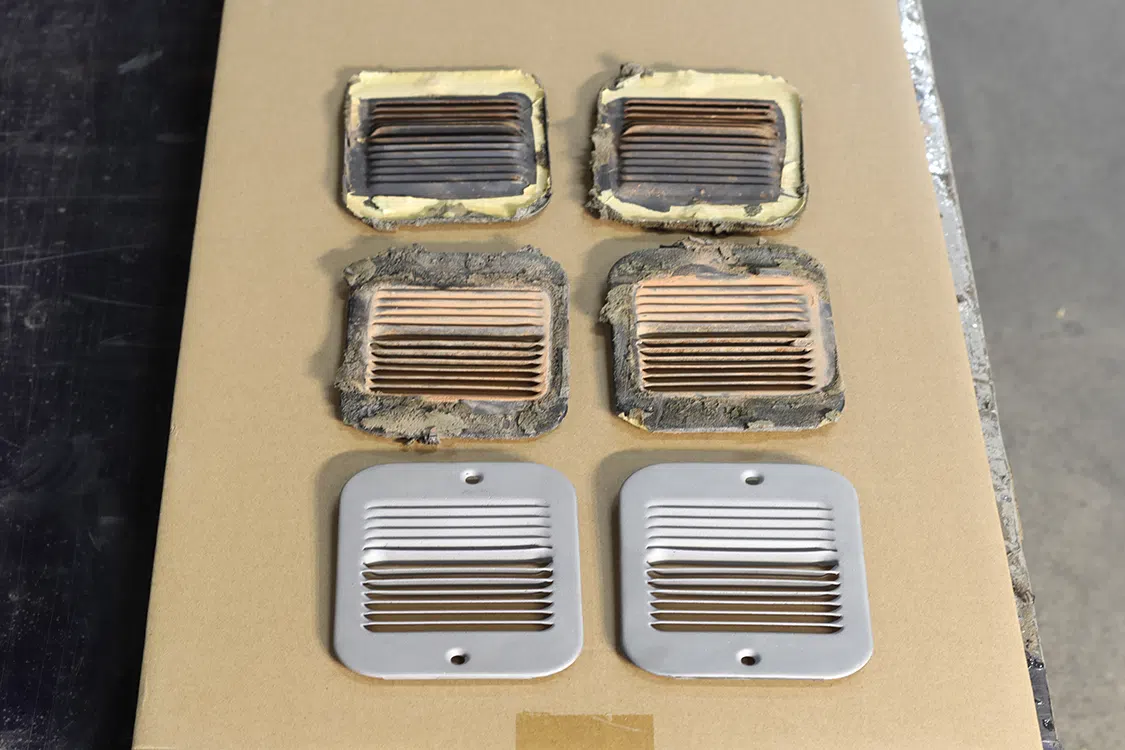
.
October 10, 2023
.
Buyer’s Guides


 Please wait...
Share Link