Motortopia - EVERYTHING Automotive!
Exciting News! Motortopia App Now Available on Apple App Store!  
Close Ad

SEMA Show 2023 Unveiling the Automotive Industry’s Pinnacle

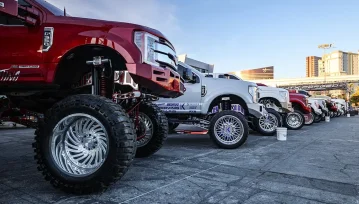
The Largest Automotive Event in the World

When it comes to automotive events, you’ll find nothing larger or more recognized than the SEMA Show. While most people perceive this event to be a car-and-truck show, it isn’t. It’s an industry-only trade show designed for aftermarket manufacturers, distributors, and related companies to network and show off the latest and greatest parts. 

Are most of these parts installed on top-notch vehicles? Yes. Are there more high-end builds than any other automotive event? Yes. So, in a way, you can say it’s a “show” but on a totally different level.

Each year people from all over the world travel to Las Vegas the first week of November to attend this event, and this was the 60th year they have done so. SEMA organizers recorded more than 130,000 attendees with 70,000-plus buyers and 3,000-plus media personal, all from over 140 countries. While the size of the crowd was massive, the size of the venue was even more impressive: With over a million square feet indoors plus all the massive outdoor areas, attendees had literally no way to see every vehicle.

Engaged Media, the parent company of Street Trucks magazine and our sister titles, sent the editorial team to SEMA so that we could give our readers the best truck coverage possible. The company also hosted a booth in the Central Hall, right in the middle of Hot Rod Alley. In the booth, we debuted our Sergeant Square C10 build you’ve seen for several months throughout the build process, which was done to benefit Mission 22. The booth stayed packed from opening to closing each day as attendees stopped by to salute the Sergeant in person.

We also debuted our Project Stockish, a ’23 Sierra build you’ve also seen on these pages. It starred in the Dropstars Wheels booth after making its way from North Carolina to Las Vegas to represent the wheel company as well as Street Trucks.

To get you the best print and digital coverage in the world, we packed our most comfortable shoes and stocked up on plenty of water and energy drinks to prepare for the miles we would walk each day as we tracked down the best trucks and the newest products.

This is one event we refuse to miss. And because it’s open only to the automotive industry, it’s a must for us that we attend to bring you as much coverage as possible. Follow our social media pages as well as the Motortopia YouTube channel for even more content from the show!

The Engaged Media booth was home to Street Truck’s Sergeant Square build for Mission 22. It had a big reveal at the show!

The best booth models of the show were practicing their poses before work.


OBS Truck Door Handles: Part Three Unveiled

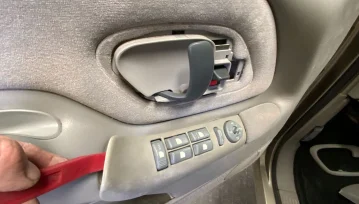
Replacing Inner and Outer Door Handles

There is nothing more frustrating than a broken door handle! The inside door handle on a OBS is a frequently used component that wears out and breaks over time. Worn out door pins and bushings can also lead to premature inner handles breaking.

The outer door handle can show signs of wear and tear, too. As it is crucial for accessing the vehicle, a faulty outer door handle can be quite inconvenient. Our shop dually has a broken driver-side handle. It still functions, but it is really annoying.

LMC truck supplied a new handle complete with clips. So let’s go through the process of replacing the inner and outer door handles on your OBS. There is a trick to getting this done easily without disconnecting all the inner panel wiring and rod , so follow along and restore functionality and enhance the overall appearance of your truck. Let’s do it!

INNER DOOR HANDLE

The dually shop truck has the typical broken inside door handle from years of hard use.
Carefully remove the handle bezel. These kind to break easily, so take your time.
Remove the two screws in the door panel and gently pop it off the door.
There is one rivet holding the handle in place. Drill it out.
Slide the old handle forward and disconnect the handle and lock rod.
Connect the handle and lock rods and slide the new handle from LMC Truck into place.
Secure the handle with a new rivet. A piece of sheetmetal will also work. Now is the time to test the handle and lock before reinstalling the door panel.
The handle works perfectly, so the panel is reinstalled and the job is complete.

OUTER DOOR HANDLE

The dually has a broken outside door handle.
Remove the door panel screws.
Remove the mirror cover.
Remove the handle bezel.
Remove the window switch bezel and disconnect.
Carefully remove the complete door panel.
Here’s the trick to getting this job done quickly. Push up the tab on the lock cylinder and slide the lock out. This allows the complete handle to be easily removed. Disconnect the handle rod.
Now simply slide the lock back into the new handle, connect the rod, and bolt it in. Replace the door panel, and you’re done.

SOURCES

LMC Truck
800-562-8782
www.lmctruck.com


Hot Rod Power Tour’s Epic 29th Annual Southeast Adventure

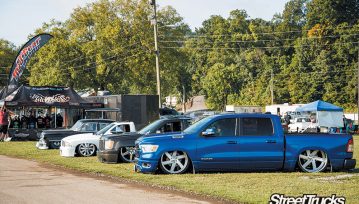
Event Cruises Through the Southeast US

When it comes to iconic automotive events across the country, the Hot Rod Power Tour is probably one of the largest and most well-known. This year’s event marked the 29th annual event and worked its way throughout the Southeast US.

But before we get into this year’s event, let’s go back to where it all started. Back in late 1994, the editors of Hot Rod Magazine wanted to draw attention to several of its events known as the Hot Rod Power Festival Series. They decided that instead of flying to all the various cities where the events were happening, why not drive their hot rods and custom vehicles from city to city?

Being this was before the internet was what it is today, they advertised this trip in the magazines and had no clue if it would be a flop or a massive event. Much to their surprise, on the kickoff date of May 13, 1995, the first leg of the trip left from the Petersen Automotive Museum in Los Angeles and had 200 vehicles while supporters stood on the streets cheering them on. Moving to the second annual event in 1996, the traffic jam was so large that it was covered as a news event locally as it left the Petersen Automotive Museum again. The goal for the Power Tour was to give enthusiasts a chance to drive their show vehicles and not just have them sit at a car show.

Fast forward to this year’s event, which started at the Atlanta Motor Speedway on June 12, 2023, for its 29th annual event, the turnout was the largest it has ever been with more than 6,000 participants. While last year’s tour was covered by Street Trucks staff members, this was my first time ever doing the trip. This tour has always been on my bucket list, but it was either too far away for me to make it, it fell the same dates as other plans, or I couldn’t get off work that long and make the trip, so I had never been able to do it—until this year.

I had planned to drive one of my vehicles, but when I found out a group of local friends were making the long haul trip, which hits all five locations along the route for the week-long event, it made more sense for me to hop in and play passenger princess so I could take photos and video for you guys throughout the week instead of holding a steering wheel for the 1,400-mile trip. Don’t worry, there was no iced lattes or cake pops involved, but plenty of energy drinks and gas station junk food were consumed throughout the week.

After the first day checking in and waiting in long lines to get into the racetrack and check out the vendors and tons of custom vehicles, there was some cool “run what you brung” autocross passes. All that was needed was a helmet and a valid driver’s license. There was also plenty of drag races by normal participants down pit row as well, through the event staff closely monitored the passes.

Once back to the hotel, it was like a typical car show hotel with folding chairs, adult beverages, and plenty of car talk. The crazy part is that it wasn’t just one or two hotels, but it was every hotel anywhere near the show venue. Back up to early the next morning, the event promotors had lined out a back road route that, for the most part, kept vehicles off the interstates and running through small town USA where, just like the very first year back in 1995, crowds stood along intersections and in front of businesses, waving and cheering as the rides passed by. With this many vehicles, it was hours of cool vehicles driving through.

Every day of the event was more backroads and small towns. This gave the trip a little more of a close-knit feeling than it would on a big highway. Every gas station had plenty of cool rides filling up and people grabbing snacks. One of the coolest parts to me was all the kids standing in the crowds taking photos and waving. To see the next generation of gearheads’ eyes lighting up when something cool rolled by is what keeps us pushing to bring you (and the next age group of readers) the best magazine we can to keep this hobby of ours going.

The second day of the event was a drive from Atlanta to Columbia, South Carolina, which was held at the South Carolina State Fairgrounds. This location also had plenty of vendors, bands, and events throughout the day.

The third day, we left Columbia and went to Rockingham Speedway in Rockingham, North Carolina, where the lines to get in were even longer. We opted to pull off to the side of the road near the entrance and watch the ever-growing lines of hot rods and cool trucks roll in before we pulled inside.

Wednesday morning, we were up bright and early again to head to the zMAX Dragway in Concord, North Carolina. Here they were letting participants run down the official drag strip, which, if you came with a group of people, let you safely race a buddy and see who got to take home bragging rights.

Thursday morning, we left Concord and headed up the mountain to the Bristol Motor Speedway in Bristol, Tennessee. This was probably one of the most scenic routes of the week as it went through several small mountain towns, several with just one red light. After a week of perfect weather and zero issues, one of our crew lost his brakes but managed to safely get stopped at a gas station where a quick bleed of the front brakes and topping off the brake fluid got us back on the road. Random people at the gas station asked if they could help of if they could loan us tools. To me, that level of camaraderie is what this event was all about. Strangers from all over the country that were there for the same reason we were, stopped to help.

Once to the final stop of the week, a quick pass through the venue and it was time for the trip back home. Throughout the week, there were stations to get your pass stamped at each venue so on the last day, you could get the Long-Haul plaque and certificate that you made the weeklong journey. That was a bucked list checkmark for sure!

If you ever have a chance to make one of these events, even if it’s just for one or two of the stops they make, do it! Even with this under my belt, I would do it again in a heartbeat.


Unleashing Perfection: The Extraordinary ’79 Unibody Chevy Pickup by Ricky Holly

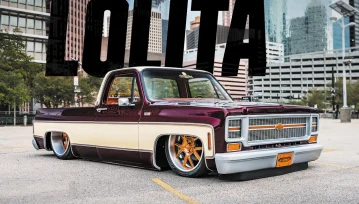
Ricky Holly’s Incredible ’79 Unibody Chevy Pickup

Ricky Holly is a name that we’ve all grown accustomed to hearing over the years. He’s been turning out the craziest vintage Chevy trucks that have only gotten better. You’ve seen his builds at the biggest shows across the country. You’ve seen his trucks on the covers and pages of the industry’s leading publications. You’ve seen pictures and videos of his creations posted and shared across all social media platforms. At this point, you have also most definitely been inundated with the praise surrounding his latest project—this ’79 Unibody Chevy pickup that has been the buzz of the custom pickup community since its grand unveiling at SEMA ’22. If for some reason you don’t already have every square inch of this truck ingrained in your memory bank, let’s get reacquainted with all its glory. 

79' Unibody Chevy Pickup

While it is rather difficult to look at this truck and select one characteristic to claim as its most notable, we’d have to say that the unibody design is the most eye-catching. His ultimate goal was to have this particular modification blend right in with the truck’s natural styling, but it does shine bright as a huge accomplishment to keen eyes.

BLAZER PLUS A SQUARE

To get this effect just right, Ricky entrusted the job to his longtime go-to paint and body shop, Alamo Customs in Alvin, Texas. Together, Ricky and the team at Alamo have produced some of the baddest classic Chevy truck projects out there, and this one might just sit at the top of the heap. The guys successfully fused the body of a ’79 Blazer with that of an ’85 Squarebody C10 pickup to create the well-proportioned unibody shell.

With that major portion of bodywork completed, the guys at Alamo then started creating more one-off touches to make Ricky’s truck, which gained the name Lolita around this point, that much more unique. At the front, a custom grille with motorized headlight panels was fabricated. At the rear, the guys came up with a tricked-out tailgate and bumper that elevate the truck’s subtle yet highly sophisticated restyling. United Pacific was sourced to provide fresh headlights, taillights, and mirrors for cleanliness sake, but it was ultimately the way these parts were painted that really changed things up.

TRICK PAINT

Custom-mixed PPG maroon and tan colors were stirred up to serve as the main two-tone paint scheme, which was to be broken up by replacement body molding from Mar-K. It was actually the other colors and effects used on the truck that made an equally if not more impactful impression. Both bumpers along with the side mirrors are not, in fact, brushed metal. The guys used paint to get the exact color and finish they had in mind, as there was no chance of running any piece of chrome on this truck per Ricky’s request. If you’ve been attempting to analyze the grain to figure out what type of wood was used for the flooring inside the full-custom bed, you might be surprised to know that it is also just paint—no planks. Actually, all of the wood trim found all throughout the truck has been specially painted to mimic the appearance of actual exotic lumber.

Slammed 1979 Unibody Chevy Pickup

Just like the rest of Ricky’s previous high-profile Chevy truck builds, this custom unibody was slated to drive at the lowest altitude possible. Another Texas business, Acme Chassis Factory in South Houston, was contacted to create a custom frame for the build that would deliver on the low-slung appearance along with excellent ride quality. To assist in creating that ride quality, nothing but top shelf air-ride components were ordered from Slam Specialties ‘bags, Air Lift air management parts, Seamless air tanks, and more. While the pandemic did slow the delivery of certain items, DRU Custom Builds of Pasadena, Texas, was on-hand patiently waiting to piece and plumb the suspension system together as the parts steadily flowed in.

From the Snowden seats covered in Apex leather, the custom dash, flooring, door panels, and center console, the interior landscape has been kept very high-end at every turn.   

The all-important decision of which wheel to run is always a tough decision for Ricky. He knew the roundabout size he could get away with once the chassis was in place, and he usually tends to gravitate toward smooth, timeless designs. Well, he most definitely chose a winner once again with the set of 22×8.5 and 24×12 Raceline Newport wheels he picked for this project. The hoops have been brushed, and the spoke centers have been treated to a splash of color that really spices up the exterior color palette.

One-off Raceline steering wheel

UNDER THE HOOD

Ricky was interested in rooting down a big, powerful engine that he could really mash on when he gets the urge, which happens way more often than you’d realize. To make the most of the available space under the hood, LT Swap King in Crosby, Texas, was contacted to help lock down a supercharged 2018 LT4 from a ZL1 Camaro. This was the perfect powerplant for the situation, and once it was mounted, wired up, and outfitted with a Brian Tooley Racing camshaft, Sanderson headers, and a Magnaflow exhaust system, Ricky was looking at 750hp. This is an ideal horsepower count for the type of driving he likes to get down on at the track.

If you’ve paid attention over the years, all of Ricky’s trucks are designed and built to operate just as good as they look. To finish out the engine transplant, an amazing collection of panels and vents were fabricated and painted to elevate the whole vibe of the engine compartment, which is more posh and luxurious than should even be allowed under the cover of a hood.


AWARD-WINNING INTERIOR

The next phase of the build is what actually earned the truck an award at last year’s SEMA show. Chris Pate at MTI (Mobile Toys Inc.) in College Station, Texas, poured his heart and soul into the creation of this Chevy’s cab space. From the Snowden seats covered in Apex leather, the custom dash, flooring, door panels, and center console, the interior landscape has been kept very high-end at every turn. Other noteworthy amenities include Dakota Digital gauges, a well-rounded sound system, Vintage Air A/C, a one-off Raceline steering wheel, and plenty of invaluable style and craftsmanship. All of this was good enough to take home Best Truck Interior honors at the largest automotive event on the planet!

To circle back to what was said at the beginning of this story, it’s incredibly hard to crown one single facet of this truck as most notable. This truck might just be a milestone for classic Chevy truck builds as a whole. While Ricky Holly is used to owning super high-quality pickups, this one has to feel a tad bit different. As always, his best truck is always the next one to come, so we are anxiously awaiting seeing what on Earth he could possibly top this build with. Until then, we’ll go ahead and leave the bar right where Ricky and his most trusted shops and fabricators have left it.

Raceline Newport wheels on a 1979 unibody Chevy

Truck Specs

Owner
Ricky Holly 

1979 Chevy Blazer
Houston
Holly Boyz

Engine & Drivetrain 

Shop: LT Swap King, Crosby, TX
2018 Supercharged LT4 V-8
Brian Tooley Racing stage 2 camshaft
Sanderson headers
Magnaflow 2.5-inch exhaust system
2018 10L90 transmission
One-off paneling under the hood

Chassis & Suspension 

Acme Chassis Factory, South Houston, TX
Custom-made frame
Custom fuel tank
Slam Specialties ‘bags, Air Lift air management, dual Viair compressors, Seamless air tanks and other air components installed by DRU Custom Builds (Drops ‘R Us), Pasadena, TX

Wheels, Tires & Brakes 

22×8.5 and 24×12 Raceline Newport wheels
Lionhart tires
Wilwood 14- and 13-inch brakes (front and rear) and master cylinder

Body & Paint

Shop: Alamo Customs, Alvin, TX
Custom mix PPG maroon and tan paint
Made from a Blazer to a unibody truck
Mar-K bed flooring and body molding
Custom grille and headlight panels
United Pacific Industries headlights and mirrors
Mirror, bumpers and bed floor painted for effect
Custom wrapped details by Pixelwerks, Houston

Interior & Sound 

Chris Pate @ Mobile Toys Inc. (MTI), College Station, TX
Snowden seats covered in tan Apex Leather
Dakota Digital gauges
Raceline steering wheel
Custom dash, floor, and center console
Sony receiver
Gladen/Mosconi audio components
Vintage Air A/C
Ididit steering column

Preserving the Past: Protecting and Enhancing the Patina on a 1967 Chevy C10

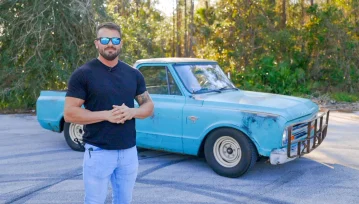
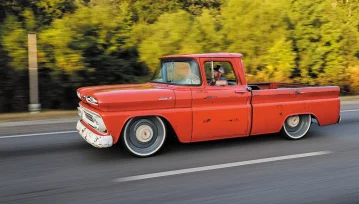
Protecting the Patina on a 1967 Chevy C10

If you’re like me, you LOVE original-paint classic trucks. There’s something about looking over the original paintjob and getting a glimpse at how the truck was treated—or abused—in the past. My OG paint ’67 C10 has a lot of character and most of it came from work on a farm. Now that this original-paint beauty earned its stripes and now resides indoors, it’s time to protect that original paint that has been neglected for 56 years. There are a couple of different ways you can protect and preserve your original paint.

01. Sweet Patina sent us its Trio Kit plus Century Polish. This kit includes its Century Polish, Patina “Sauce,” Happy Ending Final Detail Spray, and So Fresh and Clean All-Purpose Cleaner.
02. The first step of applying the “Sauce” is to get rid of dirt, grime, and contaminants on the paint. Spray a generous amount of the All-Purpose Cleaner. With a light scrubbing pad, gently scrub to loosen up the contaminants and then rise with water. I used a light gray Scotch Brite pad, but you can also use steel wool to smooth the rough surface.
2(a)
2(b)

1. Clearcoat the Original: You can go with a more permanent solution by applying a clearcoat over the original paint. I have never been a fan of this method. If the clearcoat were to ever fail, it is highly unlikely that one would be able to strip just the clearcoat off of the original paint, which means you may have to strip the entire vehicle. While there is essentially zero maintenance on this method, the risk of losing or damaging the original paint is too high for me. If this is the route you would like to go, Sweet Patina sells a matte and gloss clearcoat designed specifically for preserving patina.

03. Now that the paint is clean and dry, I can move on to polishing. This step is not necessary, but it will add gloss and depth to the paint that is left on the truck since this polish is designed to be used on the worn, weathered, and oxidized paint that hasn’t reached the surface-rust stage. Take a look at the first section I polished (far right). The Century Polish removed all of the chalk and brought back some color and depth to this 56-year-old paint. I used an orange light cutting pad, making sure to clean it out regularly because the single-stage paint will clog your foam pad.
3(a)
3(b)

2. Go with the Sweet Sauce: You can use a product like Sweet Patina “Sauce” that acts similarly to a carnauba wax. Not only are you preserving and protecting the paint, but you’re also not applying a permanent topcoat, so there is no risk for this product to fail since it naturally wears off the paint over time. This method does require you to reapply the “Sauce” a couple of times a year, but it’s so easy to do and essentially has zero risk of damaging the paint. This is the method I prefer to use, and that’s where Sweet Patina comes into play.

04. Here’s another image comparing just how well the Century Polish worked. The front clip of the truck is polished while the door and bedside are not.
05. Once the entire truck was polished, it was time to do a final wipe-down to get rid of any residue left by the Century Polish. Applying the “Sauce” is as simple as wipe-on, wipe-off. Using a microfiber towel, I applied the “Sauce” using a circular motion similar to applying wax. Once I let the product sit for 15-20 minutes, I simply wiped it off with a new microfiber towel—and that’s it!
5(a)

Sweet Patina has developed a product it calls the patina “Sauce” that has more than 20 ingredients that make up the proprietary blend, making the product one-of-a-kind. The patina “Sauce” provides a luminous finish that shows the character, depth, and beauty of your patinaed ride. It helps prevent further deterioration, preserve the patina, offer a layer of water-resistant protection that helps inhibit rust, and polymerize to a hard finish.

06. The “Sauce” repels water like a wax. Here, you can see the water droplets beading on the surface of the paint. Now that the surface is protected, we can use the Happy Ending Detail Spray between washes to help keep the paint clean and potentially prolong the life of the “Sauce.”
07. I love the way this came out, and the truck looks much better now that the paint has new life. Sweet Patina has more than 120 years of paint and refinishing experience on its team, and they know paint rust and refinishing.
7(a)


Enhance Performance and Style: Step-by-Step Guide to Installing an Eddie Motorsports S-Drive on a 350 SBC

Installing an Eddie Motorsports S-Drive on a 350 SBC

There is no better way to add “wow” factor to your engine’s appearance and performance than by installing a high-quality serpentine pulley component system.

Eddie Motor Sports in Rancho Cucamonga, California, offers its S-Drive pulley system, which comes complete with a six-rib serpentine belt that’s routed by CNC-machined 6061T6 aluminum pulleys. The S-Drive pulley systems include all of the necessary stainless steel fasteners and high-quality, name brand components, including an Edelbrock water pump, Marval power steering pump, Powermaster alternator, Sanden A/C compressor and Gates belt tensioner and six-rib serpentine belt. The kits are available in raw machined or highly polished finish or in a variety of anodized Fusion-coat colors.

Follow along as John Mutch at Savi Ranch Automotive installs an Eddie Motorsports S-Drive serpentine pulley system on a Chevy 350 small-block.

01. After applying RTV silicone to the 3/8-16 x 4 water pump mounting studs are carefully threaded into the block.
02. After applying RTV silicone to the 3/8-16 x 4 water pump mounting studs are carefully threaded into the block.
03. John applies Permatex Loctite Right Stuff Elastomeric Rubber Gasket Maker to both sides of the water pump mounting brackets before installing the rubber O-rings.
04. The water pump mounting brackets are slipped over the studs, followed by the power steering pump mounting bracket. The two 3/8-16 x 2-inch cap screw threads are coated with anti-seize before they’re threaded onto the block.
05. The water pump mounting brackets are slipped over the studs, followed by the power steering pump mounting bracket. The two 3/8-16 x 2-inch cap screw threads are coated with anti-seize before they’re threaded onto the block.
06. The water pump mounting brackets are slipped over the studs, followed by the power steering pump mounting bracket. The two 3/8-16 x 2-inch cap screw threads are coated with anti-seize before they’re threaded onto the block.
07. The Edelbrock Tuff Stuff polished aluminum water pump slides over the mounting studs.
08. Four spacer posts are threaded and tightened onto the mounting studs.
09. After aligning the main bracket onto the spacer posts, four M8 x 25mm cap screws are threaded into the spacer posts to secure the main bracket.
10. The Powermaster 140-amp, one-wire, chromed alternator is located on the mounting bracket and secured.
11. The Powermaster 140-amp, one-wire, chromed alternator is located on the mounting bracket and secured.
12. Two 5/16-18 x 3-inch cap screws are coated with anti-seize and threaded into the mounting bracket. Then the Marvel power steering pump and Eddie Motorsports pulley are installed.
13. John installs the Sanden A/C compressor to the main bracket using two M8 x 25 mm cap screws and lower shoulder bolt all coated with anti-seize and secured using lock washers.
14. The Eddie Motorsport A/C compressor pulley is secured with three ¼-20 x ¾-inch cap screws coated with Loctite Blue thread locker.
15. The Eddie Motorsport A/C compressor pulley is secured with three ¼-20 x ¾-inch cap screws coated with Loctite Blue thread locker.
16. The Eddie Motorsports crank pulley is aligned and secured using three 3/8-24 x 1-inch cap screws and Belleville washers coated with Loctite Blue thread locker.
17. The Eddie Motorsports crank pulley is aligned and secured using three 3/8-24 x 1-inch cap screws and Belleville washers coated with Loctite Blue thread locker.
18. Next, the Eddie Motorsports water pump pulley is aligned and secured with four 5/16-24 x ½-inch cap screws coated with Loctite Red thread locker.
19. The Gates serpentine belt is secured to the main bracket using a 3/8-16 x 2 ¼-inch cap screws and washers.
20. A breaker bar and socket are used to decrease the tension of the Gates tensioner. The Gates six-ribbed serpentine belt is routed onto the Eddie Motorsport pulleys.
21. After the Gates serpentine belt was successfully routed onto the Eddie Motorsports pulleys, the Gates tensioner cover is installed using two 10-32 x ¾-inch flat head screws coated with Loctite.
22. After the Gates serpentine belt was successfully routed onto the Eddie Motorsports pulleys, the Gates tensioner cover is installed using two 10-32 x ¾-inch flat head screws coated with Loctite.
23. The Eddie Motorsports S-Drive serpentine pulley system completely installed.
24. The Eddie Motorsports S-Drive serpentine pulley system completely installed.
25. The Eddie Motorsports S-Drive serpentine pulley system completely installed.

SOURCES

Eddie Motorsports
888.813.1293
Eddiemotorsports.com

Savi Ranch Auto Care Center
22945 Savi Ranch Pkwy.
Yorba Linda, CA 92887
714.282.7498


Reviving a Piece of Racing History: Restoring the 1993 Chevy Indy 500 Pace Truck to Its Former Glory

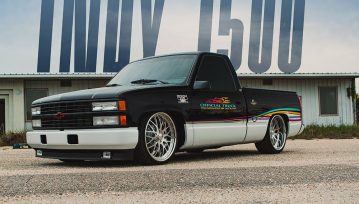
If you follow NASCAR or any other type of car racing, then you may already be familiar with the Indy 500’s longstanding tradition of introducing a different pace car just about every year to kick off the race. The official pace car of 1993 was the “new” Chevy Camaro Z28, which was selected to celebrate the launch of its fourth-generation model. 

The Z28 wasn’t the only Chevrolet vehicle to be put on a pedestal this particular year. A special Indianapolis 500-edition shortbed C1500 pickup truck was also released to the public to commemorate the company’s participation in the big race. Only 1,534 of them were built and sold, and all of them sported the same very distinctive two-tone black and white paintjob adorned with multicolor logos and graphics to signify it as being part of the limited-edition run.

1993 Chevy Indy 500 Pace Truck

While these race-inspired Silverado pickups were hot commodities at the time of their initial release, they have since drifted into the realm of rarities. Vintage, limited-edition badged trucks tend to gain their own cult following these days, and this Indy 500 specimen is no different. Nostalgia rules the marketplace in today’s market, and nothing screams early ’90s vibes quite like colorful, striped graphics on an OBS Chevy truck body.

THE STARS ALIGN

These trucks pop up for sale every now and then in various conditions and price points, but they still remain somewhat hard to find below market value. Ty Zito of Prairieville, Louisiana, has been a fan of the Indy 500 Chevy truck for years but has always been hesitant to pull the trigger and purchase one. These pickups are sometimes placed on the chopping block by various automotive auction houses, but every now and then, one will surface on Craigslist for a steal. Ty had always kept his eyes on sales listings of these trucks, but having the disposable funds ready to strike when one pops up, as well as it being close enough to pick up, have proved to be the make-or-break factors of scoring one.

After years of searching, however, the stars aligned for Ty in Owensboro, Kentucky. An Indy truck was listed for sale at a price he was willing to pay. And while the drive was a little too far for him at that time, he lucked out when Chris Stafford of C/K Syndicate agreed to go fetch the truck on his behalf. Game on!

START WITH SUSPENSION

While the truck was in fair enough condition, it was in need of some serious TLC to bring back the luster of its glory days. Before anything was buffed or polished though, Ty first started to analyze what could be done to refresh the Chevy’s suspension.

Chris Stafford once again offered to be of service for this phase of the rebuild. He welded a notch under the bed before installing a coilover conversion kit and narrowed A-arms from Stone Fab, which would allow easy compatibility with front Aldan coilover units. A Belltech flip kit, sway bar, and Aldan adjustable shocks are responsible for dropping the rear to give the C1500 a much lower, aggressive stance for a modernized, custom appearance.

1993 Chevy 1500 Indy pace truck


Dakota Digital VHX gauges

While upgrading the truck’s chassis, Chris also upgraded the front brake system with drilled and slotted rotors from Little Shop MFG. He went with the company’s rear disc brake conversion and master cylinder swap kit for all-around performance stopping power. To capitalize on the truck’s fully revamped chassis, a staggered set of Intro ID313 wheels and Lionhart tires were mixed in to give Ty’s Indy 500 pickup the updated, sporty appearance it so desperately deserved.

REWORK AND REFRESH

To keep the Chevy as original as possible where it counted the most, Ty kept the factory-equipped 350 V-8, but he had Joe Gerbitz and Mikey Stinson of 3rd Coast Customs perform a simple engine rebuild while cleaning it up cosmetically for good measure. New valve covers and an air cleaner were included in the cleanup process, and to add some extra performance gains, Brent Kelly at Exhaust Pros was asked to fabricate a custom 3-inch exhaust system. Other than that, the engine bay was kept relatively untouched, which is really all that was necessary to help preserve this historical pickup project.


Next, T.J. Maples and Joe Gerbitz of 3rd Coast gave the Indy 500 Chevy’s original paint a welcomed refresh. They also reworked the OEM grille and bumpers and replaced the truck’s lighting housings to give the Chevy a spruced-up shine from front to back. Again, there was no need to do anything more than simply restore the truck’s OG façade as its iconic factory style is what has made it as desirable as it has been for nearly 30 years.

FACTORY PLUS

When it came time to address the Chevy’s interior, Ty treaded lightly as to not destroy the natural styling within the cab. While he had no reason to suffer with the dated cloth upholstery and cracked plastics that do deteriorate over the years, Ty wished to create a familiar environment that even the strictest of purists could appreciate. Since Ty’s truck was equipped with a bench seat (only 414 of the 1,534 run were outfitted with factory bucket seats), Lawrence Bergeron of LB Upholstery suggested swapping the worn out bench with a brand new one from Snowden. He covered it in gray leather and suede upholstery that closely resembled the old material’s color. The door panels were also reupholstered to match.

Gray leather and suede upholstery
Ty kept the factory-equipped 350 V-8, but he had Joe Gerbitz and Mikey Stinson of 3rd Coast Customs perform a simple engine rebuild while cleaning it up cosmetically for good measure.

C1500 pickup truck

Chris Stafford clocked back in for work inside of the cab by first installing a new dash and then creating custom kick panels that house Powerbass component speakers. A Sony head unit and a combination of amps and subs were also wired up to give the single cab a robust, well-rounded sound signal. While he was at it, Chris replaced the headliner and made new visors to complete the fully renovated interior space. It now looks as factory as you can get save for the Billet Specialties steering wheel and Dakota Digital VHX gauges—but even those blend in all too well.

It’s always cool to see these Indy 500 trucks pop up at shows, and it’s even better when the right sets of hands not only expertly restore them but also go the extra mile by adding subtle custom touches to elevate their original style and performance. Ty’s Chevy maintains the classic Indy truck appearance but has gained heightened appeal with its lower, more capable suspension, premium wheels, and its clean-as-hell interior space. The rebuilt 350 and restored exterior ensure that this commemorative edition Chevy will remain on the road and stay relevant for a long time to come.

3rd Coast Customs also reworked the OEM grille and bumpers and replaced the truck’s lighting housings to give the Chevy a spruced-up shine from front to back.

Spray-in bedliner on an 1993 Chevy 1500 Lowered 1993 Chevy 1500 Indy pace truck 1993 Chevy 1500 Indy pace truck 22-inch Intro ID313 wheels

TRUCK SPECS

 Owner 

Ty Zito 

1993 Chevy 1500 Indy pace truck
Relaxed Atmosphere
Prairieville, LA

Engine

1993 Chevy V-8 350ci
Engine buildup/modifications by Joe Gerbitz & Mikey Stinson
Comps Cams camshaft
Ceramic coated headers
Custom 3-inch exhaust system by Brent Kelly at Exhaust Pros, McComb, MS
Edelbrock air cleaner
New valve covers
1993 Monster 4L60 transmission by 3rd Coast Customs, Mt. Hermon, LA

Chassis & Suspension 

Frame modification by Chris Stafford at C/K Syndicate, Tylertown, MS
Stock 1993 chassis
Weld-in notch under bed
Stone Fab coilover conversion w/ narrowed A-Arms and front sway bar
Aldan American coilovers up front, rear adjustable shocks
Belltech flip kit and rear sway bar
Rearend narrowed 3 inches by Jeremy at BH Fabrication

Wheels, Tires & Brakes 

22-inch Intro ID313 wheels
285/35/22 Lionhart LH-TEN tires
Little Shop MFG drilled and slotted front brakes, rear disc brake conversion, NBS master cylinder swap

Body & Paint

Summit White and Tuxedo Black by T.J. Maples & Joe Gerbitz @ 3rd Coast Customs
Slosh Tubz faux metal wheel tubs and fillers
OEM grille and bumpers restored
Classic Parts of America stock style replacement headlights
Spray-in bedliner

Interior & Stereo 

Shop: Lawrence Bergeron @ LB Upholstery, Kentwood, LA
Bench seat from Snowden custom seats
Gray leather and suede upholstery
New dash, dyed panels, custom kick panels and stereo install by Chris Stafford @ C/K Garage
Dakota Digital VHX gauges
Billet Specialties steering wheel
Sony head unit
Powerbass component speakers, subwoofers and amps


A Fresh Update to Your OBS Grille

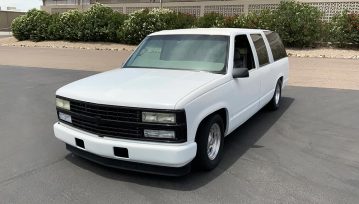
Step one was to rewind the front of the 1999 Suburban back to 1993 pace truck standards with a few upgrades. After a quick call to LMC Truck, the crew had all the necessary conversion parts, including a grille shell, billet insert, lower grille filler, turn signal lamps, side marker lamps, front fender extensions, and the correct front bumper. At some point in its life, Brik Yrd had been converted with a 1993 GMC grille with the correct lower grille filler and fender extensions and a smooth, front work-truck bumper with no strips or guards. This is a simple conversion. All OBS grilles are interchangeable from OBS ’88-’98 with the correct corresponding year’s parts. Follow along as the team brings Steve’s vision to reality.

1999 Suburban
Our donor for this project is this 1998 Chevy Suburban. This truck is extremely clean and all factory, but we want to give it a sportier look. So, we’re going to start with the grille.
White 1999 Suburban
The first step is to remove the old pieces. Luckily on these trucks, the grille is very easy to remove with some basic tools. Just lightly pull on the panel to find the next fastener until it easily comes off the truck.
White Suburban with LMC replacement grille
Before we paint and install our new grille, we want to test fit the LMC replacement grille that we ordered. We also are replacing the headlights and driving lights for a much cleaner look. The test fit went great, and the panels fit as they should.
 Billet grille
We also want to add a billet grille to the factory grille shell. Before we cut the grille shell, we tape off the billet grille so it does not get scratched during test fitting.
prepring OBS grille for paint
We also tape off the entire grille shell around the spot that will be cut. We don’t want anything flying into the shell and scratching it before paint.
With a clean cut and a perfect it, the grille is now ready to be painted and the billet metal can be set to the side.
We don’t need a paint booth for something this simple job as long as we have decent ventilation. So, we hung the new grille on a drying rack and gave it a few solid coats of Automotive Touchup’s white paint to match the truck. We also added clearcoat from Automotive Touchup for a factory finish.
Leaving it alone for a few hours to dry is the hardest part of this project. Patience is as important as details, so just wait!
With the grille fully painted and extremely impressive looking, we can now mount the billet panel in its final location before adding it to the truck.

Keep following along online at OBS Headquarters or OBS Builder’s Guide for more updates on Project Brik Yrd.


’89 Chevy Cheyenne C1500 | Red Ryder

On Every Kid’s Wish List in the 1990s

How many of you wanted a Red Ryder BB gun after “A Christmas Story” appeared on TV when you were a kid? It was one of the most influential movie scenes in the ’80s, and to this day it still plays nonstop during the holiday season. 

Roller block SBC 355ci V-8 Chevy
Roller block SBC 355ci V-8

Few things stick around for that long and still hold sentimental value to millions of people around the country. Show anyone in your family a picture of a stock ’88-’98 GMT400 truck, and we promise at least one of them has a great story involving one of them. Either it’s your grandpa who used one as a farm truck his whole life and watched the sunset in it with his wife for the past 30 years, or it’s your mom who met your dad in their parent’s work truck on a Friday night. Everyone has a memory that involves this all-American Bow Tie, and this particular shortbed is no different.

American Powertrain “White Lightning” Tremec 5-speed transmission

bucket seats

Dylan Eaton from Spring Hill, Florida, grew up with this exact truck—well, a stock daily-driven version of it at least. His dad picked it up from the dealership new in 1989 and drove it until 2008 when he gave it to Dylan. This was the first truck Dylan ever owned, and he wanted to prove he cared about it as much as his dad did. Now after a little over eight years and around $25,000 dollars or more, Dylan is proud to tell the story of this long-time family member. He knew the path he wanted to take when he started customizing. A daily driven, big power, thick tire street machine. Nothing more and nothing less. He wants to jump the truck at any time and have a strong crank. No special fuel and no pre-charging, just a ready and reliable show truck.

Welded roll pan

Because it was so well maintained since its time on the showroom floor, the exterior of the truck only needed some fresh paint and a few simple upgrades. A Street Scene front grille with billet inserts was installed, the factory bumpers were shaved and painted, the bed rail stake holes were shaved, and a steel roll pan was welded and smoothed in. Finally, the whole truck was painted Viper Red by Donnie Peake of Peake’s Autobody Inc. To get the stance correct, Dylan and his dad installed a 5-inch front and 7-inch rear suspension drop that included DJM Control Arms, Belltech coil springs, new spindles, a rear flip kit, C-notch for the rear frame rails, and Belltech Street Performer shocks. They also bolted on a 1.375-inch front sway bar with polyurethane bushings and body mounts as well as a Calvert Racing Caltrac bar.

Viper Red Chevy
Forever Sharp steering wheel
Street Scene front grille

The power plant on this sweet OBS is an ’87 GM roller block SBC 355ci V-8 built by Mark’s Performance and Machine in New Port Richey, Florida. The block was balanced, blueprinted, decked and line honed. It was also bored 0.030 over and has a Pro Meth methanol injection system. Eagle connecting rods, Comp Cams nx276hr camshaft, JE Pistons, Total Seal rings and King bearings complete the internals, and it’s all bolted together with ARP bolts and studs. Under the block is a Morosso oil pan. Topping off the engine build are Air Flow Research Eliminator 180cc heads, a polished 192-intake 16-rib supercharger from The Blower Shop, a Devane “Weekend Warrior” 930cfm carburetor, and Hooker Headers. These bolt up to Hooker Max Flow mufflers and flow out the back of the truck. An MSD ignition keeps the timing in check and an American Powertrain “White Lightning” Tremec 5-speed transmission with hydraulic throwout bearings and a SPEC Type 3 clutch wrap up the drivetrain.

Dakota Digital VHX

All this power is sent back to the 14-bolt 5-lug 454SS rearend with 3:73 gears. Some 17-inch American Racing Torq Thrust 2 wheels are at each corner with a 17×7 up front and 17×9.5 in the rear. The Michelin Pilot Sport 4s tires give Dylan the traction he needs and the SSBC Big Bite brakes stop him when he steps on the pedal. The SSBC rear disc brake conversion and SSBC adjustable proportioning valve give him all the braking power he needs for this beast of a truck. 

’89 Chevy Cheyenne C1500

This truck is on every grown kid’s Christmas list, and you don’t have to worry about shooting your own eye out with a truck like this—although you may break a few necks when you drive by.  

  Truck Specs:

Dylan Eaton
’89 Chevy Cheyenne C1500
Spring Hill, Florida

Chassis/Suspension

  • 5-inch front and 7-inch rear suspension drop 
  • DJM control arms
  • Belltech springs and spindles
  • Belltech flip kit and C-notch
  • Belltech Street Performer shocks
  • 1.375-inch front sway bar
  • Polyurethane bushings and body mounts
  • Calvert Racing Caltrac bars

Engine/Drivetrain/Performance

  • ’87 GM roller block SBC 355ci V-8
  • Built by Mark’s Performance and Machine in New Port Richey, Florida
  • Balanced, Blueprinted, Decked, Line Honed
  • Bored 0.030 over
  • Pro Meth methanol injection
  • Eagle connecting rods
  • JE Pistons with Total Seal rings
  • King bearings
  • ARP bolts and studs
  • Moroso oil pan
  • Comp Cams nx276hr camshaft
  • 502/520 lift and 276/288 duration
  • Air Flow Research Eliminator 180cc heads
  • The Blower Shop polished 192-intake 16-rib supercharger
  • Devane “Weekend Warrior” 930cfm carburetor
  • Hooker Headers
  • Hooker Max Flow mufflers
  • MSD ignition
  • American Powertrain “White Lightning” Tremec 5-speed transmission
  • T56 Magnum with hydraulic throwout bearing
  • SPEC Type 3 clutch

Wheels/Tires/Brakes

  • 17-inch American Racing Torq Thrust 2 wheels
  • 17×7 front width 17×9.5 rear width
  • Michelin Pilot Sport 4s tires
  • 224/45/17 front and 275/40/17 rear
  • SSBC Big Bite brakes
  • SSBC rear disc brake conversion
  • SSBC adjustable proportioning valve
  • 14-bolt 5-lug 454 SS rearend with 3:73 gears

Body/Paint

  • Street Scene front grille
  • Billet grille inserts
  • Shaved and painted factory bumpers
  • Bed rail stake holes shaved
  •  
  • Painted Viper Red by Donnie Peake of Peake’s Autobody Inc.

Interior

  • 454 SS bucket seats
  • Black with red stitching by Catalina Custom Upholstery in Spring Hill, Florida
  • Dakota Digital VHX carbon fiber and red gauge cluster
  • Forever Sharp steering wheel
  • Sony single din head unit
  • Factory dash and door panels dyed black

Why Wrap? | A New Suit for Project Artemis

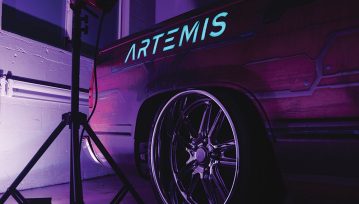
A New Suit for Project Artemis

If you remember from the last issue, we dropped off our 1998 GMC Sierra known as Project Artemis to the amazing minds at Glarb Wrapped and Tate Designs for an overhaul of epic proportions. A combination of a killer design, high quality prints and one of the best installers in the game is all that it took to transform this basic bagged Bowtie into a motorized masterpiece we can’t wait to take to shows. Not only is the design eye-catching and hypnotizing, but it also incorporates LED panels underneath the wrap that light up at the push of a button. Now the name of the truck can be seen at night, which will definitely stand out in the crowd.

Ryan Sandoval from Glarb Wrapped sent his files to We Print Wraps, and within a few weeks we were watching them install a high-quality material that will last as long as paint. With a design this intricate, Ryan only trusted one crew to lead with the install. Tate designs in Ft. Lauderdale, Florida, was proud to participate and happily lead the charge. Tape measures went flying and numbers were being calculated in their heads faster than we could take photos, but there’s a method to their madness that you can only appreciate if you just sit back and watch the process. We were able to hang out with them for the entire week as they sanded, stripped and wrapped the entire truck from bumper to bumper. Their work is amazing, and from what we know it’s second to none. We have a whole new respect for this particular industry, and before you drop your deposit at your favorite paint shop, just give this method of metal masking another look. Check out the steps it takes to prepare these wraps and line them up correctly.

When we finished the last issue, our 1998 Chevy truck was completely prepped and ready for the new wrap. Ryan and Tate sanded down the rough spots and made these old panels as smooth as possible. The new design is amazing and will hide any minor imperfections in the paint.

First thing is first—test fitting the panels they received from We Print Wraps. Now is the time you want to find out if something is printed wrong. But with an all-star design team like we have, everything was as perfect as expected.

The Ready Player One, Cyberpunk mashup design that Ryan Sandoval created is very cool. It’s exactly how we saw it on the rendering. There were even a few surprises in the design we couldn’t see in the render. So cool!

With all the panels correct and accounted for, it was time to place the flat LED panels. These super cool, remote controlled panels will have a black mask that matches the cutout of the vinyl. A thin flat wire sticks to the panel, and it is nearly unnoticeable under the wrap.

The hood of our 1998 GMC Sierra will have a panel in the center that shows the name Artemis, a character from the movie “Ready Player One.”

With the LED panel in place, Ryan carefully set the vinyl. There is only going to be one shot at this, so it has to be right!

As they carefully stretched without warping the design, Tate cut out the letter so the light can show through.

Boom! How cool is that? We can’t wait to go to the next night show. This light can turn on and off with the remote, and it’s only one of four on this truck!

With the hood lined up and laid down smoothly, they can now focus on sitting in the edges. This part takes some real skill and experience, but when done right, it’s truly hard to tell it’s not paint.

Next, they focused on the side panels including the front fenders and the cab. The bed will be done separately.

These magnets help everything stay in place while they line it up. Tool of the trade!

Before they start to stick to the sides, the back is lined up as well, ensuring that all parts of the design match. Lots of variables need to be considered before final placement, which is why we highly recommend a professional install your design printed from We Print Wraps.

The Artemis logo will also be visible on the bed sides, so the location needs to be considered as we’re lining everything up.

One last wipe down before the adhesive backing comes off and we never see the factory paint again.

With the adhesive backing removed and the wheel wells cleared and cut, they start to carefully lay down the vinyl, keeping it straight and free of air bubbles or debris.

A blow torch is one of the most surprising tools that you may not know this industry uses. It quickly loosens the material and gives you additional movement and flex.

Once the body panels are completely smooth and free of air, they can trim the windows without cutting any of the factory rubber. Again, another reason to contact a professional installer for your vinyl wrap.

The tip of the front fenders is a tricky area to do correctly. The excess material will be trimmed and removed.

Getting up close and personal with a truck is something these installers have to do to get the job done right. These are not your standard company van wraps. These are high-quality, high-dollar coverings for your custom show vehicle.

In order to get the design as far behind the cab as possible, Tate removed the bolts holding on the bed and slid it out of the way. Now the wrap flows as much as possible, which looks great.

Now that everything is lined up and ready to go, Ryan trimmed and prepared the LED panels for the bedside and wired up the control boxes.

One last test of the lights before attaching it to the bedside permanently.

The flat LED power wire sticks to the bed and tucks underneath the factory trim.

Now Ryan can lay down the vinyl knowing everything lines up perfectly. Trim all the edges and move onto the next panel.

Now you can see what the wrap looks like during the day and at night. We will continue on with the opposite side and show you the final product in our next issue. Until then, give these guys a follow online and check out when they’re up to now!

Belltech Lowering Kit | ’96 GMC Sierra C1500

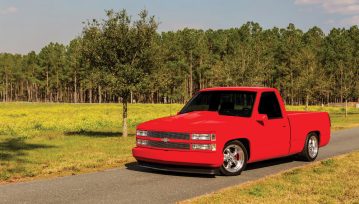
Installing A Belltech Lowering Kit in a ’96 GMC Sierra C1500

When it comes to lowered trucks, the stance is everything! Without the proper stance, the truck will not look good or handle correctly. One company has been getting it right since 1983—Belltech. 

Belltech was at the forefront of the sport truck craze in the early ’90s building parts for none other than the GMT400 trucks. The launch of the drop spindle allowed people to lower their trucks while maintaining front-end geometry. They also addressed the rest of the suspension with shackle kits, flip kits and lowering coil springs. All of these components resulted in a ride quality that hadn’t been realized before now.

We recently picked up a 1996 GMC Sierra C1500 as a project truck. It was a bit rough around the edges but had great bones and potential. A little elbow grease and replacing a few things such as the carpet and body side moldings had the truck looking much better than when we bought it. The next step was to address the suspension, brakes and wheels.

’96 GMC Sierra C1500

To get the stance and look we wanted, we reached out to our friends at Belltech and Ridler wheels. We knew we wanted it to be low, but didn’t want to lay frame. The folks at Belltech recommended a 4/6 lowering kit with their Street Performance shocks part #688SP. We chose the new Ridler 606 gray with milled spoke wheels wrapped in Toyo rubber to round out the look we were after.

While we were tearing into the suspension, we also decided to upgrade the brakes and steering components. We chose drilled and slotted front rotors and a rear disc conversion from Little Shop Manufacturing. To ensure the truck steered straight and true, new steering components and balljoints were in order from Proforged.

All of these parts combined are going to create a truck that handles as well as it looks. Lets dive into what it takes to istall a 4/6 lowering kit from Belltech.

Belltech Lowering Kit
We laid all of the parts out and took inventory to ensure we had everything we needed to get the job done.

Removing the bed on a ’96 GMC Sierra to install a Belltech lowering kit
The first order is to get the bed removed. We also chose to take a pressure washer to the frame to get rid of years of caked-on dirt and grime.

After we got the truck on the lift, we removed all of the wheels and tires. We decided to start on the front first. Unbolt the caliper and secure it out of the way to prevent damaging the brake hose. Remove the dust cap from the rotor, remove the spindle nut and the rotor assembly. Next detatch the backing plate from the spindle by unfastening the three bolts.

Take out the two bottom bolts and upper nut from the shock and discard the shock.

Pull out the cotter pins and unfasten the nuts from the tie rod end, upper and lower ball joints. Leave both nuts on the ball joints at this time to prevent the coil spring from unloading.

Support the lower control arm with a jack. Using a deadblow hammer, gently strike the spindle at the lower ball joint to release it. Repeat for the top ball joint. Once loose, you can now remove the nuts from the ball joints.

Slowly lower the control arm to release the tension on the coil spring. Make sure to stay clear in case the spring bounces out. Lift the spindle off of the lower ball joint. Now is the time to replace those worn-out ball joints as we did.

A comparison of the spindles and springs shows the difference and how it results in a drop.

The springs come with a 1-inch spacer for the top. Use this spacer for a 4-inch drop. If a 5-inch is what you are after, omit the spacer. Now install the spring back into the spring pocket. Using a jack slowly apply tension to the spring. Make sure it seats properly into the lower control arm.

Set the new spindle on the lower ball joint and hand tighten the lower ball joint castle nut. Slowly jack up the lower control arm until the upper ball joint is fully inserted into the spindle and install the castle nut. Re-attach the tie rod end. Torque the castle nuts to 90 lb-ft and install new cotter pins.

Intall the new Street Performance shocks. The upper shock cover must be removed for the shock to fit into the control arm.

Reinstall the dust shield and rotor assembly and brake caliper. Repeat the process for the other side. Let’s move on to the rear.

Start by supporting the rear axle with a jack. Make sure to put a slight pre-load on the springs to aid in removing the spring bolts.

Starting on one side, remove the shock and U-bolts

While supporting the leaf spring, remove the front and rear eyebolts. Carefully lift the leaf spring pack and set out of the way.

Remove the two bolts circled and secure the brake line and wiring harness clear of the chassis.

Locate the cut template located in the drop kit. Attach to the frame using tapered punches inserted through the existing holes in the frame.

Using a center punch, mark the upper and lower hole locations as indicated on the template. Remove the template and drill ½-inch holes through the chassis. We used a step bit to step up to the ½-inch hole.

Using a scribe or equivalent, connect the holes. We found it worked best to scribe to the far outside of the holes. Be sure the leave the radius intact to reduce the possibility of stress cracks arising. Using a cut-off wheel, Sawzall, or plasma cutter cut along the scribed lines. Debur the edges.

Test fit the C-section. (Some trimming may be required) Using the C-section as a guide, mark the eight holes located on the side of the chassis and the two located on the bottom (circled). Remove the C-section and drill each hole to ½ inch. Applying a little paint to all of the drilled holes is recommended to prevent rust forming on the bare metal.

Install the C-section using the supplied ½-inch hardware. Torque to 110-120 lb-ft. Make sure to tighten the side bolts first, then the two bottom bolts. Note: Extended cab trucks require a few extra steps due to the two-piece driveshaft. Since ours is a regular cab, we could omit these steps. Reinstall the leaf spring, ensuring it is under the rear axle. Do not fully tighten the leaf spring eyebolts at this time.  Repeat the notch steps on the other side.

Once the C-notch is complete and the leaf springs are reinstalled, it is time to install the flip kit. Remove the original spring pack plate and replace with the new axle saddle. Make sure the hole in the bottom of the saddle is forward of the axle centerline. Lower axle into the new saddles.

Install the supplied U-bolts and spring bottom plate. Torque in 5-10 lb-ft increments to a final torque of 85-100 lb-ft.

The transformation is drastic and just what we were looking for!  The 4/6 drop and the Ridler 20×10 rear in 275/40R20 and 20×8.5 fronts in 245/40R20 tires give the perfect look and stance. We couldn’t be happier with the outcome!

Check out other Belltech lowering tech installs click here!

Sources

Belltech
www.belltech.com
800-445-3767

Ridler Wheel
www.ridlerwheel.com
866-894-3351

Proforged
www.proforged.com
866-464-6553

Little Shop Manufacturing
www.littleshopmfg.com


1996 Chevy C3500 Dually | NO COMPROMIZE

Mike Barcia Left No Stone Unturned on This Wicked 1-Ton

A DRIVER. Every custom truck enthusiast must have one. The driver is the truck that gets mobbed on the daily work commute and usually gets put through the paces on the weekend hauling the “show truck” around. The driver is never left alone for long, however. It always starts out innocent enough with a drop kit or airbag suspension setup, wheels and tires, and maybe some upgraded audio and simple exterior bolt-ons, but that only lasts so long. Pretty soon, the custom truck freak’s desire to take the build further and further takes over, and what was once the driver becomes yet another show truck. So much for self-restraint!

Mike Barcia out of Tampa, Florida, bought a driver back in January 2001 to tow his full custom Isuzu show truck. The driver came to him in the form of a trade where Mike gave up the title to his bagged ’90 C3500 and some cash for the ’96 four-door that would eventually become No Compromize.

After a weekend of de-grampifying the OBS Crew, Mike set about getting it on the ground. Set up with full air-ride suspension, the truck’s stock black paint eventually gave way to a full color change with a crisp and clean two-tone with traditional flames heating up the beltline coupled with billet interior accents, ear pounding audio and deep detail under the hood. It didn’t take long before the driver became another show truck. So, Mike decided to take the dually off the road and show circuit and build the most radical custom 1-ton on the planet. The Isuzu was sidelined and the dually became the popular girl getting all of the love and attention.

It was February 2003 when Mike and friend and fellow Negative Camber club member Robbie Taylor tore the truck down to perform a traditional 4-inch body drop on it. After the rockers were kissing the Florida asphalt, the truck looked cool but Mike thought, “It’ll just be another bagged and bodied dually with nice paint and a stock frame under it.” So, the decision was made to go for broke and have a full custom chassis built. Also being a fan and regular attendee of ISCA World of Wheels car shows where the best of best show up to compete, Mike knew that if he wanted to play on that level with the truck, then he had to bring his A game.

Enter Jimmy Graham of Jimmy’s Rod N Customs in Edgewater, Florida. Jimmy hand built and fabricated a oneoff custom chassis equipped with a custom built four-link rear suspension. The leadingedge underpinnings feature custom front suspension and shock hoops built from scratch. Not only is the chassis of No Compromize a work of fabrication and design art, but the depth of detail is unmatched.

After Jimmy finished fabbing up the ultimate bones and suspension, Mike took special care to grind smooth all unnecessary roughness, such as the factory ridges on top of the rear differential where the axle tubes meet the pumpkin. Mike and Gerald Ashe welded up all of the seams and grinded all the welds baby butt smooth. Friend and fellow NC club member David “Double D” Dekorver bodyworked the frame before Chris Bareswilt covered the chassis and suspension components in Euro Red. The frame and suspension were painted as opposed to powdercoated for a superior finish, and then Mike wet sanded and polished to perfection.

To keep things extra clean and smooth, all of the wiring was run through the frame rails, the air compressors were plumbed into the chassis tubing, and all of the chromed stainless bolts were clocked the same direction for that extra touch of ISCA detail. Polished stainless hard lines handle fluid transfer to the brakes and transmission, while a fully polished 3-inch stainless exhaust system built by Jimmy Graham with one-off billet chrome plated exhaust hangers built by Tom Hingle of Billet & Acrylic Fantasies kick out the octane cocktails. Cruising juice is housed in a custom aluminum fuel cell built by Jeff Davy of Devious Customs. The factory rearend was shortened 9 inches and stuffed with shortened Franklin axles while the first set of 24-inch Raceline Ratchet polished wheels mounted on Toyo rubber. Mike even sanded the side walls down for a smooth no-letter look. For an extra touch, Mike reached out to Kennedy Brown from Fat Dog Designs in Jonesboro, Arkansas, to machine one-off billet floating logo No Compromize center caps.

The truck comes to a halt with one-off billet 4-piston calipers and custom slotted and drilled rotors by Aerospace Engineering. Slam Specialties Slam Bags get the meticulously detailed underpinnings on the ground while air management from Accuair sends lift and drop commands from Mike’s itchy trigger fingers. Viair compressors re-supply the tanks.

The factory big block, while mechanically stock, has a bit more bite with a March Pulley Set, Edelbrock Headers and 3-inch custom built stainless exhaust. Making the most noise under the hood is the deep detail, including the smoothed block and heads, paint-matched block, and all of the chromed and polished accents. Mike wanted the world’s finest chrome, so he reached out to Steve from Advanced Plating in Tennessee to get that accomplished. Billet Specialties valve covers cap off the valve train in style, while a custom-built radiator from Performance Rod and Customs keeps the BBC’s operating temps in check. A Wilwood master cylinder kicks fluid to the custom machined calipers allowing them to bite down on the slotted and drilled rotors.

When building a truck of this caliber, getting it this low and expecting it to compete and win on the extremely competitive indoor show circuit, you have to pull out all of the stops. Modifications lead to more modifications to achieve the right fit, the right look, the right form and most importantly the right function! Not only does No Compromize have a detailed to the nines, full-custom chassis, but the envelope was deeply modified as well, demanding a mountain of metal work from the firewall forward.

Blending classic CK lines with more modern Silverado styling, Mike opted to go with a ‘06 Chevy cat-eye front end. Sounds simple, right? But this mod combined with Mike’s obsession to go over the top turned into a five-year fabrication adventure just to make it seamless. Jimmy’s Rod ‘N’ Custom knocked it out of the park again with hammer bending all of the edges for a clean, smooth look. The front fenders were sectioned and lengthened in the front to make them flush with the ’06 Silverado bumper. On the backside, the ’06 fender is joined with the ’96 fender, and the wheel opening had to be cut, sectioned and massaged to make the lines flow proportionately. Moving up, the hood was lengthened on the backside by 10 inches and the windshield wiper cowl area was removed. The side curves of the hood were cut off so that when the hood was opened a clean fender line was achieved. The hood top body lines were then rebuilt and moved in 2 inches per side. The bottom side of the hood was hand built with a bead-rolled insert added for a smooth look and to gain clearance between the top of the intake and the base of the hood. The ’06 Silverado bumper top was chromed and the lower half sectioned and extended by Gerald Ashe so the bottom sat flush with the tarmac when the truck is laid out.

Even before paint was laid down, the engine compartment alone was a work of art in and of itself, with a custom bead-rolled firewall, custom core support and core support bead-rolled sheetmetal cover and bead-rolled fender wells. The radiator and power steering caps were all frenched into the sheetmetal work as well as the hood hinge pockets. To take it one step further, Mike wanted custom billet hood hinges, but he had no clue what he was getting himself into. After commissioning four different machine shops and delaying the build for over a year, Bobby McCurdy finally saved the day. Bobby designed and cut a set of one-off custom billet hood hinges like no other. The truck is basically a highend turn table street rod with a bed on it.

After Jimmy finished the work on the front clip and the engine compartment, it was time to get the cab and bed slick and smooth. Starting with the bed, the fuel door, stake pockets, tailgate handle and taillights were all shaved. A motorcycle style fuel cap was added to the top of the bed rail while one-off custom taillights by Greening Auto were frenched in for stylish stopping. A custom roll pan was built, and the dually fenders were raised 2 inches so  the 24-inch Raceline would tuck. Jimmy fabricated new bead-rolled sheetmetal to the front outside bulkhead of the bed, and the factory dually fender marker lights were shaved in favor of custom one off machined replacement. Jimmy kept the tools burning by fabricating a push-button tailgate handle on the inside of the tailgate, rounding all four corners of the inside of the bed, building bead-rolled interior sheetmetal inserts inside the inner bed sides, and building widened bead-rolled inner wheel tubs. It didn’t stop there. The welder kept on blazing with a custom raised and smoothed bed floor panel, both top and bottom, smooth sheetmetal on the inside of the tailgate and bead-rolled billet oval No Compromize insert into  the tailgate.

Ever since the truck came off the road and was torn down in ’03, the color of choice for the modified metal was to be red. When it came time for the metal work to be body worked and covered in color, Mike delivered the truck to Justin and Eli Griffin at Twin States Rod Shop in Meridian, Mississippi. Once the truck was arrow straight, smooth and ready for color, it was time for the booth and the ultimate decision on color. Since the chassis was already red and Mike wanted it to stand out, it was decided that the body better be an opposing color. BASF RM products were custom mixed to come up with the custom color nicknamed “SEMA Gray,” and the truck was coated from nose to tail and roof to rocker and the liquid art buried in RM Glamour clear coat.

Completion of the metal work, body work and paint led to wiring before the truck was delivered to the upholstery and audio shop for threads and sounds. Justin and Eli Griffin installed a Painless Performance wiring harness to connect all of the electrical dots and a custom motor wire harness from Tempe Speed & Performance to get the bigblock cranking.

No head turning, jaw dropping and awardwinning custom show truck is complete without a double throw down interior and some tunes to pummel ear drums. Aaron Markwell, Jesse Johannesen and the team of Innerworx in Sarasota, Florida, got down on the cabin of No Compromize with the entire interior inner structure built out of ABS plastic and then cut, shaped, layered and routered out to perfection. Innerworx built the custom dash, door panels, center console, overhead console and the seats. A total of 11 hides of Relicate Napa saddle leather were used to wrap the full custom interior. Mushroom Versaweave textile carpet covers the cab floor. Complementing the supple leather and smooth street rod sculpted styling of the threads is a Flaming River steering column topped by a custom machined 15-inch billet steering wheel. Vintage Air climate control keeps show cruising temps in check while Classic Instruments gauges provide accurate reporting on the big blocks behavioral patterns. Further accenting the cruising chamber are a variety of billet dress-up items from Clayton Machine Works. To finish off the interior, Mike had Jeff Bertrand of J&B Microfinish in Pontiac, Illinois, machine custom billet seat recliner handles to match the door handles, while Tony Pasquini of Automods in Sarasota, Florida, performed the interior leather laser engraving NC logos throughout. Tom Hingle of Billet and Acrylic Fantasies in Vero Beach, Florida, designed and machined more than 100 unique custom billet parts placed carefully and strategically throughout the build to add class and detail at every turn. A keen eye will note the “NC” engraved throughout the billet accents signifying two things—the truck’s name, No Compromize, and Mike’s truck club, Negative Camber.

For cruising beats, Mike went with all Sony components featuring three-way speakers up front, two 10-inch subwoofers in the center console and a sixchanel Bluetooth amplifier with DSP sending the signals.

No Compromize was a 15-year journey in the making from the time Mike tore it down until the day it rolled into the SEMA Show in November 2018. His commitment to the level and quality of the build is self-evident in the finished product. Mike is thankful for the help and support of his wife, Heather, and daughters Madison and Brooke Barcia for allowing him to pursue his dream. Mike would also like to extend his deepest appreciation for the hard work and dedication of the build team, including Justin Griffin, Eli Griffin, Gauge Griffin, Jimmy Graham, Aaron Markwell, Jesse Johannesen, Chris Bareswilt, Gerald Ashe, David Dekorver, Robbie Taylor, Efrain Ramos, Tony Pasquini, Cody Holmes, Chris Douglass, Joe Griswold, Alex Madrigal, Kennedy Brown, Bobby McCurdy, Jeff Bertrand, Andre Brown, Chris Rawlins, Matty Barkley, Anthony DeMichael, Chuck Scheer, Bryan Perreault, Danny Terneus and CJ Fayet. Bad ass trucks, family and friends— what it’s all about!

TRUCK SPECS

Mike Barcia
1996 Chevy C3500 Dually
Tampa, Florida
Negative Camber

Chassis/Suspension

  • Full custom chassis and suspension by Jimmy Graham at Jimmy’s Rod ‘N’ Customs, Edgewater, Florida
  • Custom four-link, custom front suspension and shock hoops
  • Shortened and smoothed rearend
  • Chassis body worked and smoothed by David Dekorver of Dub D Kustoms
  • Chassis paint by Chris Bareswilt of Tampa
  • Slam Specialties slam bags
  • Accuair air management
  • Viair compressors
  • Custom fuel tank by Jeff Davy of Devious Customs

Engine/Drivetrain/Performance

  • Factory 7.4-liter 454
  • Edelbrock headers
  • March Performance pulleys
  • Custom 3-inch stainless exhaust fabricated by Jimmy’s Rod ‘N’ Customs

Wheels/Tires Brakes

  • 24-inch Raceline Ratchet dually wheels
  • Custom machined center caps by Kennedy Brown at Fat Dog Designs in Jonesboro, Arkansas
  • Toyo 255/30/24 tires sanded to remove all logos, letters and numbers
  • Custom machined billet four-piston calipers, cross drilled and slotted rotors by Aerospace Engineering
  • Wilwood master cylinder

Body /Paint

  • ’06 Chevy cat-eye front end
  • Custom built hood hinges by Bobby McCurdy
  • All curved edges of front sheetmetal
  • Bead-rolled firewall
  • Custom core support
  • Bead-rolled fender wells
  • Sectioned and lengthened front fenders
  • Modified wheel well openings
  • Lengthened hood 10 inches
  • Traditional 4-inch body drop
  • Shaved fuel door
  • Shaved stake pockets
  • Shaved tailgate handle
  • Frenched one-off taillights
  • Raised dually fenders
  • Custom roll pan
  • Metal Mods by Jimmy Graham Jimmy’s Rod N Customs
  • Paint: SEMA Gray by BASF sprayed by Justin Griffin and Eli Griffin at Twin States Rod Shop

Interior

  • Hand-built dash, door panels, seats and consoles
  • Relicate Napa saddle leather
  • Design, fabrication and stitchwork by Innerworx Modern Interior Solutions, Aaron Markwell, Jesse Johannesen and team in Sarasota, Florida
  • Vintage Air climate control
  • Classic Instruments gauges
  • Flaming River steering column
  • billet from Clayton Machine Works

Miscellaneous Custom Tricks

  • Interior laser engraving by Tony Pasquini of Auto Mods in Sarasota, Florida
  • One-off machined parts by Tom Hingle of Billet and Acrylic Fantasies in Vero Beach, Florida
  • Billet seat hardware by Jeff Bertrand of J&B Microfinish in Pontiac, Illinois
  • Billet/LED taillights and billet fan shroud by Jesse Greening of Greening Auto in Cullman, Alabama
  • Chrome plating by Advance Plating
  • Door moldings and rubbers by Precision Replacement Parts


LS in an OBS | Making the Swap After the Drop!

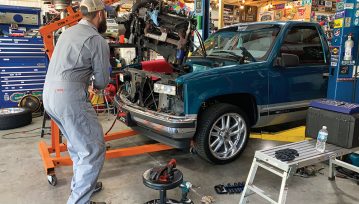
LS in an OBS…. Making the Swap After the Drop!

Before the pandemic, life was easier in so many ways for so many people. One problem we constantly heard was builders had increased customer orders but couldn’t procure the materials needed for manufacturing, which is what we went through while trying to create content for our tech section.  

The last time we visited this particular project was over six months ago with the installation of a QA1 coilover suspension. This 1997 Chevy C1500 now handles like a rail car but lacks the power to really test out the engineering. Yes, we could upgrade the factory 305ci engine to gain a few hundred horsepower, but the time, dollars and effort spent doing that would be on par with a complete LS engine swap. So that’s the route we are going on this build, and we really hope you follow along.

Did I mention we are supercharging it? Now I have your attention!

1997 Chevy GMT400

Our block of choice is a 6.0-liter LS engine out of a 2003 Silverado 2500 HD. We are going to completely strip it down and prep it properly for the big power we expect to get with this ProCharger supercharger system. Along the way, we will strengthen the structure with ARP bolts and paint it nicely to match the rest of the truck. This P-1SC-1 supercharger system from ProCharger is self-contained (SC) and the only gear-driven centrifugal superchargers to feature self-lubrication. SC ProChargers also feature the highest step-up ratio, exclusive billet impellers and the industry’s only billet gearcases for superior rigidity, sealing and appearance.

We are sending the harness to Current Performance Wiring for a complete overhaul. Which will make it plug and play with our 6.0-liter LS. The follow OEM wire colors and use OEM connectors to produce the best quality products. They go through a multi-step quality inspection process that’s guaranteed to meet or exceed even the most demanding show car owner’s expectations. We are replacing this original OEM transmission with a Chevrolet 4L80 transmission to handle the additional power and finishing it all off with some Red Line fluids. Keep in tune with this one because the end result will be something you want to see, we promise!

This 1997 Chevy GMT400 was extremely well maintained by the original owner and sold to a hardcore gearhead with high standard and an attention to detail. After a QA1 coilover conversion and a set of 20-inch US Mags wheels, its sits like a title holder but performs like an amature. Time to fix that!

6.0-liter LS engine
The block for this serious swap is a 6.0-liter LS engine straight out of a 2003 Silverado 2500 HD. We are going to completely strip it down and prep it properly for the big power we expect to get with this ProCharger supercharger system.

Joe Egizio from Egizio Motors in Ocala

Joe Egizio from Egizio Motors in Ocala, Florida, is performing the surgery, and he’s basically a newbie to the operating room. Yes he’s performed many mechanical masterpieces in his day, but never a ProCharged 6.0 LS in an ONB Chevy. We will all learn together! First on the list, cleaning and painting the block.

The weak link in a connecting rod has always been the bolt, and racers know that nobody builds a better bolt than ARP. However, it is critically important to monitor the stretch of each bolt and replace it when it has permanently elongated by .0005. This is typically defined by the loads that are carried by the bolts in terms of piston/rod weight and the rotational speed of the engine. You should also know that ARP rod bolts are superior in the area of fatigue strength. Testing has shown ARP rod bolts to have 10 times the fatigue strength of other bolts.

LS Valve springs
Assembling the valve springs is the next step to building an unbreakable LS. Valve springs are the unsung heroes of horsepower. The springs provide force to keep the valve in contact with the mating components during the valve opening, peak lift, and during closing of the intake and exhaust cycles.

ARP assembly lubricant will get you within 5% of the required pre-load on the first pull and stays consistent with each subsequent cycle including race prep, machining, pre-assembly and final assembly! It’s developed to be more consistent, more repeatable and manufactured with no harmful contaminants.

The valve covers look great installed on the newly painted block. Time to start adding the goodies!

LS Rocker Assembly
With the valve springs in place we can move to the rocker assembly and and then the valve covers.

Pro Charger
The big picture of this project is this beautiful ProCharger system we are adding.

The best thing about ProCharger is that the kit comes complete with everything you need, including the intercooler and even a license plate frame!

The first part of the puzzle is the harmonic balancer. It does not actually balance an engine, but rather it absorbs and removes unwanted vibration due to torsional twisting of the crankshaft.

Next, the main bracket is installed, which allows all the other pieces to bolt up. We also added the new waterpump.

This ProCharger head unit will align the six-rib belt as needed and give you some adjustments based on tension.

Looking great so far! All this black powdercoating looks great, and it came that way out of the box.

Our kit came with this P-1SC-1 supercharger is self-contained (SC) and the only gear-driven centrifugal superchargers to feature self-lubrication. SC ProChargers also feature the highest step-up ratio, exclusive billet impellers. The industry’s only billet gearcases for superior rigidity, sealing and appearance.

Yes, this will fit in that truck! We know it doesn’t look like it, but this entire engine and ProCharger system will slide in. Fits perfectly in our 1997 Chevy C1500.

Red Line Fluids
Like most projects we do, we use Red Line fluids throughout. Red Line has a reputation with racers and enthusiasts alike for creating products that perform and protect better than any on the market. No compromises.

With the engine prepped and ready to install, we need to yank out the old 350ci V-8. We will be reusing the factory wiring harness, so we need to take that out first, with patience!

Current Performance Wiring was formed in 1999 when LT1 engine swaps were truly gaining momentum, and the LS1 engine has just come to market. They follow OEM wire colors and use OEM connectors to produce the best quality products and they go through a multi-step quality inspection process. Guaranteed to meet or exceed even the most demanding show car owner’s expectations.

Current Performance Wiring manufactures custom engine & transmission harnesses for:

  • ’05-Newer LS2, LS3 & LS7 (24 and 58 tooth)
  • ’97-’04 LS1, LS2, LS6
  • ’99-Newer Vortec 4.8, 5.3, 6.0, 6.2
  • ’94-’97 LT1 & LT4
  • ’96-03 Vortec 5.7L 350
  • Gen V Direct injected LT1, LT4, L83, L86

Next on the task list is to remove the transmission. Since we are replacing everything, it’s a cleaner process to take it all apart in the truck than it is to yank it all out though the engine bay. We are replacing this original OEM transmission with a Chevrolet 4L80 transmission.

LS Swapping a 1997 Chevy GMT 400

With the transmission out of the way, we can start pulling the engine block. This particular small block turned nearly 300K miles on the odometer before being removed in perfectly working condition. This may be a project for another day!

The 6.0-liter LS engine looks menacing and roaring to rip. With this much detail and precision going into this project, we need to clean the engine bay before we begin the install.

A quick bath and a little scrubbing gave this bay a fresh look. The previous owner was a full time detailer and it shows.


Until the next issue, we will put this project away. Focus on some other items until we get out wiring harness back from Current Performance. Stay tuned!

Check Out A Video:  https://youtu.be/EPQQWeW8xFI

SourceS

ARP Bolts
800-826-3045
arp-bolts.com

Current Performance Wiring
727-844-7570
www.currentperformance.com

ProCharger Superchargers
913-338-2886
www.procharger.com

Red Line Oil
800-624-7958
www.redlineoil.com

RIDETECH AIR SUSPENSION | PROJECT ARTEMIS PART 2

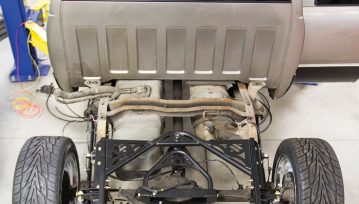
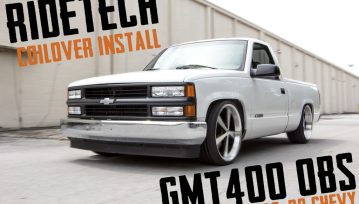
Project Artemis Ridetech Air Suspension Install.

 A couple of issues back, we introduced you to not only our latest project truck known as Artemis but also a new tech team helping out on this year’s OBS build. SaltWorks Fab in Myakka City, Florida, is known for building some amazing hotrods and trophy-winning showpieces for customers. With way more expendable income than we do, so having the crew take time out of their busy schedule to help us document Artemis’ RideTech suspension swap is an honor we are proud to boast about. So, if you missed the February ’21 issue where we documented the front suspension install, we suggest you head over to www.engagedmediamags.com to buy a copy while you can. In this issue, we tackle the rear of our 1998 GMC Sierra 1500 SLE. A C-notch install and a lot of sweet-looking, well-engineered suspension parts.

We said it in the last issue, but it stands repeating. This is a completely bolt-on air-ride suspension for ’88-’98 Chevy/GMC 2WD trucks.

No cutting the bed floor and no removing the fender liners. Just a C-notch and a quick shave of the bed brace. All the permanent modifications that needed to be made. They’re nothing that would stop us from putting it back to stock one day if we wanted to. Which is what we were looking for in an air suspension system. This Ridetech system also has electronic ride height sensors that set your ride height to whatever PSI you want. This way, even if you have a leak. The system will correct it at the push of a button until you can pull off and make a repair.

The final piece to the new suspension puzzle is picking a wheel and tire package. For project Artemis, we wanted a setup that would allow us to have a super low stance without cutting anything and a decent ride on 40-series tires. If you have any experience with air suspension, county roads and 35-series tires, you will more than likely understand our desires for this driver. The wheels are staggered fit, 20-inch aluminum wheels from US Mags with a width of 8 inches up front, and 9.5 inches in the back. Having a wider wheel in the back not only looks cool, but it also stretches the 40-series tire just a bit to give up some extra clearance out back when cruising low and slow. Now let’s check out the steps to installing the rear of this extremely well-engineered air suspension system for GMT400 trucks.

C-notch install
In this issue, we tackle the rear of our 1998 GMC Sierra 1500 SLE with a C-notch install and a lot of sweet-looking, well-engineered suspension parts. If you missed the February ’21 issue where we documented the front suspension install, we suggest you head over to www.engagedmediamags.com to buy a copy while you can. Until then, step one, of course, is removing the bed.

Rear frame rail ready for c-notch
With this Ridetech suspension system, the only major modification you need to make to your ’88-’98 Chevy or GMC truck. Is to add a C-notch to the rear frame rail. This is a simple yet tedious process that must be done in order to get as low as possible. By allowing additional clearance for the axle to travel up, while bringing the body of the truck down.

Drilling frame for c-notch

Grinding out frame for c-notch
Lots of guys have their own technique for cutting a notch, and generally they all work great, but the way the team at SaltWorks performed the task made it look basic beyond belief. Trace the pattern, drill some relief holes in the corners, grind down the gunk so you don’t ruin your blade, and simply use a grinder to remove the piece. (Editor’s note: Be sure to properly support both sides of the frame to avoid any drooping or sagging.)

Installing ridetech c-notch

With the Ridetech provided C-notch in place, they drilled all the bolts and bolted it onto place. You may be surprised by just how much additional strength these give to the chassis.

Ridetech lower bag mount bracket
Next, the lower bag mount brackets are installed on the rear axle using a set of U-bolts provided in the kit.

With the bracket in place, the front of the parallel link bars can be bolted into the factory leaf spring location.

Now the rear of the link bar can be bolted to the lower bag bracket mounting point.

Ridetech upper wishbone bracket
Next to the upper wishbone bracket is installed. This piece bolts into the C-notch on both sides and eventually ties to the differential.

This differential bracket easily bolts to the rearend and the upper crossmember. It’s a very, very well-engineered design and fits absolutely perfectly.

Ridetech shockwave
The Ridetech shockwave airbag is next to be installed. It simply bolts into place behind the axle and allows for plenty of wheel clearance.

The final pieces to the mechanical parts puzzle are the ride height sensors. These digital do-gooders keep the truck height in check by maintaining pressure to your pre-desired setting.

Here you can see the complete rear suspension installed and ready to be covered by the bed—but before that we need to coat that frame!

kbs undercoating

KBS Coatings is our go to source for frame and fuel tank coatings. This spray-on rubberized undercoating not only prevents rust and corrosion, but it also helps with sound deadening which is great for a 20-plus-year-old truck!

Before the bed can go on, we snipped off the back of the exhaust pipe so it doesn’t clank on the axle while driving. We will be replacing this in the next issue with an all new Flowmaster exhaust from Holley Performance.

Next up, the bed can be bolted back into place and the fun part begins—ruining electrical wires and airline! But that’s after they mount the air tank.

Organizing and planning are a big part of any major modification, and this one is no different. Deciding which way to route the black airline and which wires need to go where is not a task for the tired. So, if you’ve been working long hours with no sleep, hold off on this step until after your nap.

This is a completely bolt-on air-ride suspension for ’88-’98 Chevy/GMC 2WD trucks. No cutting the bed floor and no removing the fender liners.

When attaching the hose to the frame, be sure to give it some slack in case you need to trim the ends a few times. The last thing you want is to have to replace an entire airline for a few missing inches. Once it’s all complete, the battery power can be connected and tested. Time to turn the key!

You can’t hear it in the picture, but this baby is buzzing with energy from the dual compressors filling up the air tank.

That first time setting any suspension project on the ground is exciting. Nicole even broke away from her digital duties to show her love of the low.

Us Mags

Our choice for wheels is this ultra-bright chrome Bullet design from US Mags. These are staggered fit, 20-inch aluminum wheels. With a width of 8 inches up front and 9.5 inches in the back. If you have any experience with air suspension, county roads and 35-series tires. You will more than likely understand our desires for a 40-series tire. Having a wider wheel in the back not only looks cool. But it also stretches the 40-series tire just a bit. To give up some extra clearance out back.

Man, she looks good! Those wheels are the perfect fit, and the stance is impressive. Since we didn’t have to cut anything major away from the factory truck.

Before we can take it for a test ride, we need to coat the bed with a real bedliner. This will prevent it from rusting near the drill holes and will look amazing next to the new wrap.

Speaking of wrap, here’s a little teaser!


THE SPARK SHOW | EVENT COVERAGE 2020

EVENT RAISED $4000 AND 130 FUNKO POP FIGURES FOR POPS FOR PATIENTS

The Sparks Show 2020 at the Sevier County Fairgrounds in Sevierville, Tennessee, brought quite the crowd! This three-day event packed a fun-filled weekend for the whole family. The August show was presented by Sparkles Detail, Fennell Custom Interiors, Minitruckers Union, Jr. Griffey & Son Body Shop and Logan Wade Photography. 

The show started on Friday night with an epic pre-party. DJ Maze and OLP were set up at the showgrounds bringing the tunes while Molloy’s BBQ was slinging some mouthwatering street tacos. The night then wound down with a corn hole tournament brought to you by Corey Floyd Photography. Tacos and cornhole: What more could you ask for? RED OBS AT The Sparks Show

Unfortunately, Saturday morning started with a lot of rain. Despite the rain, the grounds were absolutely packed with amazing rides! The sun finally began to shine in the afternoon as the rain moved out. Everyone dried off their vehicles so they would be prepared for judging. The quality of rides, as well as the people, were absolutely amazing! Adam Tripp, Don Dizzy Davis and the Sparks Show crew immediately got to work knocking out the judging. As the sun began to set at the fairgrounds, the fun wasn’t over yet! The Sparks Show crew shut down the parkway with an epic cruise with a fleet of trucks from No Regrets, Aftermath and several more.

Luckily, Sunday morning brought more sun and no rain. New vehicles and even more spectators started to roll into the fairgrounds. While you walked around the show you could hop under the pavilion to check out all of the awesome auction and raffle items. From the Rose Metalworks panel and custom cornhole board to a Golden Ticket for Minitruck Nationals 2020, this show had it all! Michelle Boone organized the club games while the crew set up for the limbo contest on the far side of the fairgrounds.

This show always raises money or collects donations for a specific charity, and this year they donated to POPs for Patients (www.popsforpatients.org). The Sparks Show was able to raise $4,000 plus approximately 130 Funko Pop figures for donation! As the show began to come to an end, it was time for awards.

The awards were created by Welch’s Chop Shop, Mad House Designs and many more sponsored by Jr. Griffey & Son Body Shop. Darrell Poe was presented with the Best of Show truck. The Best Paint award went to Chris Denton and the Best of Show Car went to David Culpepper with the VW Beetle, a.k.a. Beetlejuice. Josh and Anne Holt took home the OLP Minis On Da Rise award this year. The Club Participation Hammer stayed with Banzai with a total of 23 registered vehicles at the show.

Despite the COVID-19 pandemic and the weather conditions, this was one of the best years for The Sparks Show! Adam and Don aren’t stopping now, so be on the lookout for the Sparks Show 2021!

The Sparks ShowCRAMBURY AT The Sparks Show

RideTech Suspension Install 88-98 Chevy OBS CK GMT400 Trucks

Generally, truck trends are unpredictable and cycle quickly through the ranks of the top industry builders and ballers. F-100 bump-sides and pro-touring, patina-paneled C10s are just a few recent examples of popular projects that the average Joe wouldn’t think to produce until they see a fully completed custom gracing the pages of national publications or influential social media channels. These ideas and completed concepts come from the mindset of being unique with the goal of making a statement at massive events like SEMA, LST and Texas Heatwave. With that said, I think it’s safe to say we all see the next major trend hurling down the pipeline like a 6-foot surfer named Bodhi riding a 15-foot wave off Bells Beach during the 50-year storm. (That was a “Point Break” reference if you didn’t catch it. What a great ’90s movie!)

Speaking of the ’90s, if you were a natural born truck junkie finally making it to the legal driving age around those times, you most certainly wanted a Chevy C/K truck since they were literally everywhere. Everyone from utility company employees to school district secretaries used these heavily produced pickups for their day-to-day operations. Even your grandpa’s grocery-getter was most likely an ’89-’98 Chevy. They came in so many different visual styles with factory options galore. Originally designed by Donald Wood in 1983, Chevy was able to move 551,223 of these GMT400 trucks by 1989 alone according to the Standard Catalog, not to mention the popular 454 model released in 1990 that sold 16,953 units over the four years with 13,748 of those units selling in the first year of production alone.


This is the 1995 Chevy C/K that we originally picked up for a mere $2,000. We purchased it from the original owner, it has 150,000 miles on the factory installed engine, cold air conditioning and a handwritten chart that records all of the basic maintenance that has ever been done. The perfect project truck, and we named her Stella for “female star” because we intend to make her famous!

With that heavy of a number, it’s easy to see why we not only saw a massive increase of these trucks in magazines, but also why the custom aftermarket scene is heating up so much right now. These trucks are still pretty easy to come by and the demographic of buyers are slightly older and more well-off than your average new-truck enthusiast. The guys who wanted these trucks in their teens are now older, generally successful and more comfortable than they were at 16 years old. These factors are driving the great custom parts manufacturers to focus on these industry icons to get ahead of the curve.

It’s easy to talk the talk, but it’s far more impactful to walk the walk. So, we put on our Airwalks and jumped into the deep end of desire by picking up a running, driving 1995 Chevy C/K truck from the original owner for a smooth $2,000. Cold A/C and a solid cranking 4.3-liter V-6 gave this truck the appeal, but a full gas tank and a fresh oil change just shows that the previous owner still has love for this 20-plus-year-old family member.

In the next few issues we are going to take you through the process of giving this truck new life on the same old roads it’s been cruising down since its inception, first starting with suspension, brakes and wheels/tires, followed up with a facelift for the ages. The plans don’t stop there, but you’re going to need to stick to the script the see the next steps. If you’re not a subscriber already, I implore you to do so. If this truck doesn’t motivate you to go out and start wrenching on your own project, I’m not sure you picked up the right publication. Now let’s get to the good stuff!


Usually we include the “after” shot toward the end of the story, but we wanted to show you the before and after side by side so you can see the dramatic transition. Now to walk you through how it was done.

Like most of the projects in the past, we turn to Dallas Maynard of Full Pen Fabrication to make the magic happen. Before he got down to the nitty gritty, Dallas removed the bed and pressure cleaned the frame. Twenty-plus years of rust and road grime is better off in the driveway than in your face—am I right?

While he cleaned the chassis, I laid out all the parts. Our suspension of choice is RideTech’s all new wishbone designed coilover suspension that is completely bolt in and professionally engineered by the team at RideTech. We are also installing Pro Performance’s big brake upgrade that is designed specifically for the ’89-’98 GMT400 trucks.


First on the list is to remove the old suspension hardware. Leaf springs are old news and completely obsolete with this kit.


Using the supplied paper template, Dallas marked the C-notch location and used a cut-off wheel to slice the frame. Before the new structured brackets can go on, he took the time to coat the frame to avoid any more future rusting.


A few C-clamps hold the new RideTech notch bracket in place while he drills out all the holes and bolts in the new hardware. Everything we needed was supplied in the kit, saving us trips to the hardware store. The notches are reinforced in multiple planes to maintain structural integrity while improving axle to frame clearance.

Moving on, Dallas installed the wishbone cradle between the frame rails. The cradle accepts a “wishbone” upper link that eliminates the need for a Panhard bar or other lateral locating device.

Next in the list is the lower axle mounts for the coilovers. Compared to the platform’s original leaf springs, RideTech’s wishbone system dramatically improves ride quality and handling and accepts either coilovers or Shockwave for air suspension.


All RideTech coilovers utilize a single-tube cartridge. Known as “monotube,” the design features a significantly larger piston area, which in turn provides more responsive damping than a twin tube shock. A single adjustment knob controls the rebound curve, allowing you to fine tune your truck’s shocks to suit your driving style and specs. Also, we get our first look at this killer brake upgrade from AZ Pro Performance.

The final piece is the lower links that feature RideTech’s patented R-joints. The advanced rod end design offers long service life with zero binding and no noise.

After a quick coat of paint, we can step back to appreciate this amazing system setup. We can’t wait to drive it!

Before the bed could go back on, Dallas had to make a quick cut to the brace under the bed. This gave us that little bit of extra clearance we needed without cutting the actual bed floor.

The front of this truck is next on the list. To make things easy, we simply unbolted the upper and lower control arms, the factory sway bay and steering linkage. Slide it out as one massive unit and ask a friend to help you toss it in the dumpster.


With an empty wheel well, we are ready to bolt in the new upper and lower control arms. All the factory brackets are reused and the coilovers mount in the stock shock location. Really well designed!

Before we can install the new McGaughy’s spindle, we need to make some minor modifications. A simple slice with the cutoff wheel and a drill/tap is all that’s needed. It’s time consuming but definitely not something you can’t do at home. Just use the right tools and be patient.

With the spindles installed, Dallas can now focus his efforts on these massive disc brakes from AZ Pro Performance.

Key features of these brakes:

  • No need to buy new spindles, just modify current spindles
  • Uses new calipers, not rebuilt
  • Precise machined hub
  • Laser cut mounting bracket
  • Fits 19-inch wheels and larger
  • Will work with most aftermarket wheels, since caliper offset is kept to a minimum


Our choice for wheels and tires are 22-inch American Racing Novas that are staggered front and back. The tires are none other than Toyo Tires ST III. The Proxes ST III is the perfect balance of dynamic looks and sport-oriented performance for trucks and SUVs. With a wider tread and a silica-based tread compound, the Proxes ST III stops up to 6 feet shorter in wet conditions while delivering superb handling, excellent all-season performance, consistent wear and a smooth, quiet ride. These tires are also backed by a 40,000-mile warranty.

Our first look at Stella on the ground gives us the chills! Although before we take a test drive, that front end has to be upgraded. We can’t roll with that work truck grille with this amazing stance. The final stance has not been dialed in yet due to some additional weight that will be soon added to the front. More on that later.

Originally founded in 1976, Classic Industries made its name selling small, hard-to-find items for the restoration of early Camaro models from a small facility in Palm Springs, California. The Classic Industries headquarters now features a retail showroom, corporate offices, parts production, complete call center, shipping center and multiple warehouses for the largest inventory of parts and accessories in the restoration and performance industry.
This reproduction black plastic grille is designed for models with dual composite headlamps and made to replace the original. However, it features semi-flush Bowtie emblem mounting pad for a smooth, clean look.

This conversion is as simple as unbolting the original grill and headlights and installing the new. There is an additional step required and we turned to Mr. Tail Light for the parts. The company offers the new headlight plugs and all the mounting hardware you need to take the guesswork out of the process. We can’t convey how simple this process is when you work with great companies like these.